Easy Hawaiian Guava Cake carries the sunlit essence of island summers in every bite—its vibrant pink glaze and tropical sweetness make dessert feel like a beachside escape. This layered cake, born from the fusion of mainland ingredients and Hawaiian ingenuity, celebrates the bold flavor of guava without requiring advanced culinary skills. Whether you’re a busy home cook or a lover of tropical flavors, this recipe promises a deliciously simple creation that honors generations of island baking traditions.
What is Easy Hawaiian Guava Cake?
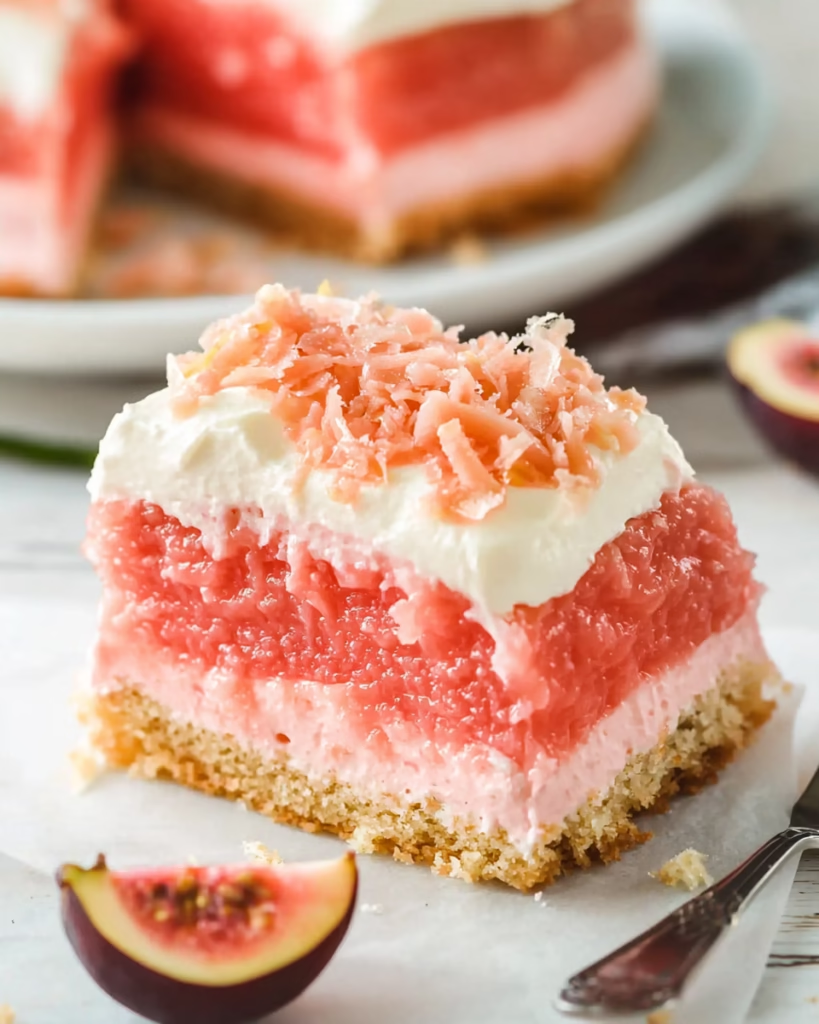
Easy Hawaiian Guava Cake traces its roots to 1970s Waikiki, where bakers transformed canned guava nectar into luscious desserts. The original version married a store-bought strawberry cake mix with fresh guava, symbolizing the resourcefulness of Hawaiian home cooks who turned accessible ingredients into bold flavors. The three-layer construction—velvety cream cheese, sweet guava gel, and sponge cake base—creates a dessert that feels both modern and deeply nostalgic, like a memory of sitting on a lanai surrounded by waves.
Guava nectar plays the hero role here, lending a tangy-sweet depth that balances the richness of cream cheese and coconut oil. Using canned nectar keeps the recipe approachable while delivering the essence of tropical groves. The finished cake has a delicate contrast: soft cake sponges, cool whipped filling, and a jiggly, jewel-toned glaze that trembles like the sea at sunset.
Reasons to Try Easy Hawaiian Guava Cake
This dessert thrives on simplicity. With a single bowl method, most steps take no more than 25 minutes in the oven, while the magic happens in the refrigerator as layers set. Beginners will love the forgiving nature of the recipe, and families can assemble the final tiers after work or school. The bold guava flavor adds a surprising twist to classic layer cakes, making it unforgettable for dinner parties, potlucks, or lazy Saturday afternoons.
What makes this recipe special is its versatility. It adapts easily to dietary needs with simple ingredient swaps (vegan coconut cream instead of cool whip, gluten-free flour for the cake). The vibrant pink hue makes it visually stunning, perfect for capturing attention at any gathering. You’ll feel a deep sense of accomplishment knowing you created something colorful and flavorful with minimal effort.
As someone who learned to bake at a kitchen table surrounded by sea breezes, I feel this cake carries the heart of Hawaiian hospitality. It’s the kind of treat that makes your kitchen smell like a memory—sweet, comforting, and just a little wild. Think about the last time a dessert surprised you with both ease and elegance, and imagine recreating that moment again today.
Ingredients Needed to Make Easy Hawaiian Guava Cake
15-ounce box of strawberry cake mix—its subtle berries help brighten the cake without overpowering the guava
1½ cups guava nectar (Kern’s, Jumex, or Goya brands work beautifully)
3 room-temperature eggs, which blend more seamlessly into the batter
⅓ cup liquid coconut oil, for a delicate tropical note
10-ounce cream cheese, softened to room temperature
½ cup granulated sugar
1 teaspoon pure vanilla extract
8-ounce tub of Cool Whip (thaw according to package instructions)
2½ cups guava nectar for the glaze
4 tablespoons cornstarch
3 tablespoons water
Coconut flakes for garnish, optional
Each ingredient connects to my grandmother’s teaching—use what you have, trust the process, and let flavors sing
Instructions to Make Easy Hawaiian Guava Cake – Step by Step
Step 1: Begin by greasing a 13×9-inch baking dish with non-stick spray. This size is ideal for layering and sharing among loved ones. Preheat your oven to 350°F while you work on the batter.
Step 2: In a mixing bowl, add dry cake mix, guava nectar, eggs, and coconut oil. Start on low speed for 30 seconds, then pause to scrape down the bowl. When mixing, listen closely—the batter will smooth out and thicken as it blends for another 2 minutes on medium-high, creating a custard-like consistency that hints of vanilla and ripe guava.
Step 3: Pour the batter into your prepared pan, tilting and swirling it gently to cover the bottom evenly. The cake will expand, filling the corners like island clouds drifting toward the horizon. Place it in the preheated oven, keeping the kitchen warm and fragrant with tropical hints.
Step 4: Bake 24–26 minutes, watching for the golden edge that curls slightly upward. The center will gently tremble when shaken, a sign of moist richness. To check doneness, insert a toothpick into the middle; it should come out light crumb-dusted, not gummy. Let it cool completely on a wire rack, a patient step that preserves its delicate structure.
Step 5: While the cake cools, whip the cream cheese until fluffy and light. Add sugar and vanilla, letting them dissolve into the mixture—imagine the same slow process your grandmother used to teach in her sunlit kitchen. Gently fold in Cool Whip until the texture resembles a silken cloud, then chill to set.
Step 6: For the glaze, combine 2½ cups guava nectar, sugar, cornstarch, and water in a saucepan. Gently bring it to a simmer while stirring, creating a caramel-like base. Then whisk in the cornstarch slurry until thickened into a gel. Let it chill, watching as the syrup transforms into a glossy, amber-colored glaze.
Step 7: Once all layers are cooled, spread the cream cheese mixture over the cake base like you’re layering comfort after a long day. Drizzle the set glaze across the top, allowing it to drip down the sides in gentle, natural cascades. Chill for another hour to set fully—the same way my mother would preserve her desserts in the kitchen’s corner refrigerator, waiting to serve them to eager friends.
Step 8: Garnish with toasted sweetened coconut flakes for a final textural contrast. Slice carefully with a heated knife, and serve chilled with a glass of warm guava juice—watching droplets of glaze pool on the plate in a way that makes each bite feel like an island sunrise.
Chef’s Tips for a Perfect Result
- Use room-temperature eggs: They integrate more smoothly, creating a uniform texture in the cake layers
- Opt for pink guava nectar: Its vibrant color and slightly sweeter profile enhance the visual appeal and flavor
- Patience during setting: Letting each layer chill fully prevents slippage and maintains elegant presentation
- Double-check nectar consistency: For a smoother glaze, strain homemade nectar or use a fine mesh sieve before cooking
- Let the cake rest 20 minutes before slicing: This allows the layers to settle and prevents crumbling while cutting
- Use fresh springform pan: If available, it simplifies slicing later and maintains the cake’s elegant shape
Variations and Substitutions
Vegan Option: Replace Cool Whip with vegan coconut cream and use dairy-free cream cheese. The texture will be subtly lighter but maintains the same creamy essence.
Gluten-Free Alternative: Substitute strawberry cake mix with a gluten-free version. The final layers might be slightly denser but maintain the same sweetness and structure.
Low-Carb Version: Use powdered sweetener instead of granulated for both cake and glaze. The guava nectar already reduces the need for extra sugars while contributing natural fructose.
Budget Swap: Make guava glaze from scratch with pureed guava paste instead of canned nectar. The result is deeper, tart-like flavor at a lower cost.
Tropical Twist: Add a layer of shredded coconut between the cake and cream cheese for extra texture and aroma, just as my grandmother would have done to evoke the beach.
How to Serve and Pair
Present this cake on a large white platter to let its pink hues shine. Use a sharp knife dipped in hot water for clean slices, and serve on chilled dessert plates to preserve the glaze’s texture. Pair with a tropical fruit salad or a simple coconut milk punch for an authentic island feast.
For special occasions, decorate with edible hibiscus flowers or toasted macadamia nuts to connect with Hawaiian aesthetics. It’s perfect for picnics, backyard barbecues, or quiet evenings where family gathers to share stories. When I serve this cake, it always feels like transporting loved ones to the shores of my childhood.
Storage and Reheating
Refrigerator: Store in an airtight container for 3–4 days. The layers will retain moisture, but the glaze might soften slightly over time.
Freezer: Wrap in plastic then aluminum foil, and freeze for 2–3 months. Best thawed overnight on the counter to preserve texture details.
Room Temperature: Only safe for 1–2 hours due to the dairy in cream cheese. For picnics, serve in covered cake carriers.
Reheating: Place on a baking sheet in a 300°F oven for 10–15 minutes until the cake reawakens the warmth from initial baking. Avoid microwaving—the glaze will become sticky and lose its shimmer. For stovetop reheating, place slices in a pan with splash coconut water, covering gently to preserve the glaze.
Nutritional Values
Per serving: 423 calories
44g carbohydrates
4g protein
23g fat
2g fiber
These approximate values reflect a balance between the natural sweetness of guava nectar and the richness of cream fillings. Substitute ingredients as needed to adjust for health goals while keeping the cake’s soul intact.
Frequently Asked Questions
Can I use another fruit juice instead of guava nectar?
Yes, pink grapefruit juice adds a citrusy freshness but will mellow the guava flavor. For boldness, mix guava with a splash of pineapple juice for extra tropical character.
How do I know my cake is properly baked without overdoing it?
When a finger gently presses into the center and leaves a small impression that springs back slowly, it’s ready. Also watch for golden edges and slight shrinkage from the pan’s rim.
Why is my cream cheese layer weeping onto the cake after refrigeration?
The most common issue stems from improper folding in Cool Whip. Use a rubber spatula to gently incorporate it in figure-8 motions, ensuring no large pockets of liquid remain in the filling.
Can I make this all in advance?
Prepare each layer a day ahead: Store cake at room temperature, cream cheese in the fridge overnight, and glaze in airtight jars for up to 72 hours. Assemble 4 hours before serving to allow perfect chilling.
What toppings work well with the guava glaze?
Whipped cream dollops and toasted sesame seeds create a sweet-salty balance. For texture, add crushed macadamia nuts—my grandmother always recommended a handful for every six slices, creating a memory of shared joy.
Conclusion
Easy Hawaiian Guava Cake is more than a dessert—it’s an invitation to the kitchen table, a bridge between generations through tropical simplicity. With layers of creamy richness and vibrant guava notes, this cake carries the warmth of island breezes and cherished memories. The secret to its irresistible charm lies in that final glaze, where golden nectar transforms into a jewel-like finish that feels handmade and heartfelt.
Print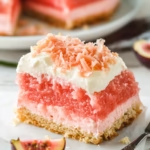
Easy Hawaiian Guava Cake
- Prep Time: 20
- Cook Time: 30
- Total Time: 90
- Yield: 12 slices 1x
- Category: desserts
- Method: Baking
- Cuisine: Hawaiian
- Diet: Vegetarian
Description
A vibrant tropical cake with layers of spongy cake, tangy guava gel, and velvety cream cheese, topped with a pink glaze. Perfectly balances sweetness and tartness for a taste of island summers.
Ingredients
15-ounce box strawberry cake mix
1½ cups canned guava nectar
1 cup all-purpose flour
2 cups granulated sugar
½ teaspoon baking soda
¼ teaspoon salt
½ cup canola oil
½ cup coconut oil, softened
2 large eggs
2 tablespoons milky white distilled vinegar
16 ounces cream cheese, softened
2 tablespoons unsalted butter
1½ cups powdered sugar, sifted
12 ounces guava paste (optional, for glaze)
8 ounces canned guava nectar
1 cup shredded coconut (optional for topping)
Instructions
Preheat oven to 350°F (175°C). Grease and flour a 9-inch springform pan.
Mix cake mix, guava nectar, flour, sugar, baking soda, salt, oil, and eggs until smooth. Pour into pan.
Bake for 25–30 minutes or until a toothpick comes out clean. Cool completely.
For cream cheese layer: Beat cream cheese and butter until smooth. Gradually add powdered sugar while mixing. Spread over cooled cake.
Chill for 1 hour to set. For guava gel: Heat 1 cup guava nectar with 2 tablespoons cornstarch in a saucepan until thickened. Spread over cream cheese layer.
Chill for 2 hours. Make glaze: Blend 8 ounces guava nectar with 1 tablespoon agar-agar powder and 2 tablespoons water. Pour over cake and chill until firm.
Before serving, top with shredded coconut if desired.
Notes
Use a non-stick springform pan for easier release. For vegan option, substitute cream cheese with vegan coconut cream and use non-dairy flour. Guava paste intensifies flavor but is optional. Stored covered, refrigerate for up to 5 days.
Nutrition
- Serving Size: 1 slice
- Calories: 320
- Sugar: 42g
- Sodium: 240mg
- Fat: 18g
- Saturated Fat: 9g
- Carbohydrates: 50g
- Fiber: 1g
- Protein: 5g
- Cholesterol: 50mg