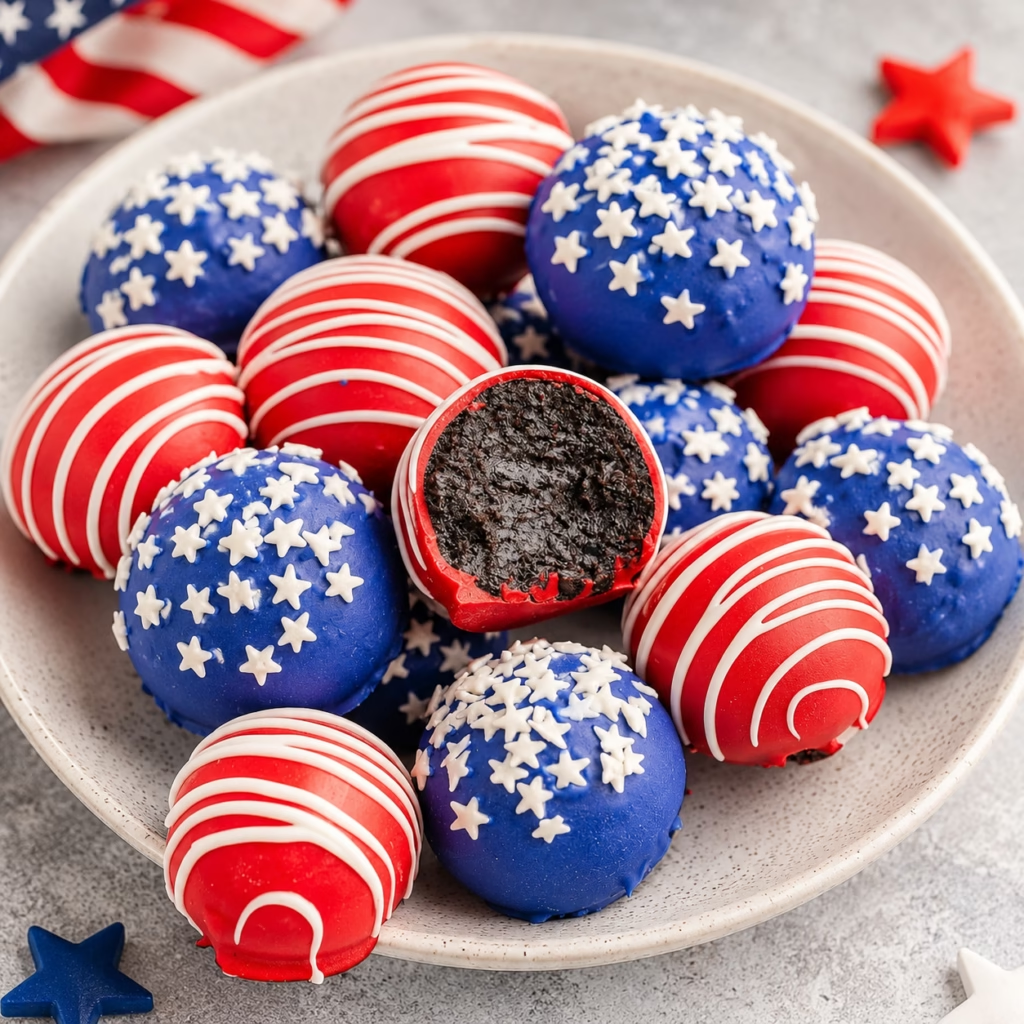
Patriotic Oreo Balls bring together the comforting crunch of Oreo cookies and the rich creaminess of cream cheese, wrapped in a vibrant red, white, and blue candy shell. These bite-sized treats are not just desserts—they are little parcels of joy, perfect for sharing with friends, family, or even as a nostalgic afternoon sweet. Every bite carries the essence of celebration, reminding us of summers spent baking, holidays filled with laughter, and the quiet moments of life’s simple pleasures.
Made from familiar ingredients like Oreo cookies and cream cheese, they are both comforting and exciting. Whether you’re celebrating a national day or simply wanting to bring color and flavor into your kitchen, these sweet little orbs offer a perfect blend of traditional and creative indulgence. With a soft center and a dazzling candy shell, Patriotic Oreo Balls are more than just a treat—they are a tribute to the timeless magic of baking.
What Are Patriotic Oreo Balls?
Patriotic Oreo Balls are a fun and festive twist on the classic Oreo treat. Instead of the usual cookie filling, they are made by combining crushed Oreo crumbs with softened cream cheese, then chilled into balls. Each ball is individually dipped in red and blue candy melts and decorated with white star confetti, creating a vibrant tribute in every bite.
Though they might seem like a modern innovation, their roots echo the tradition of cookie-based dessert balls that have been popular for generations. These types of treats were once made with graham crackers, shortbread, or even store-bought cookies—quick, easy, and always crowd-pleasing. What makes Patriotic Oreo Balls unique is their color and patriotic appeal, making them especially perfect for Fourth of July, holidays, and patriotic-themed events.
Reasons to Try Patriotic Oreo Balls
There are many reasons why this recipe deserves a place in your cookbook. For one, their preparation is surprisingly simple—no baking required. The entire process, from mixing to coating, is done at room temperature, and the result is a treat that feels both homemade and professionally finished. They’re perfect for the home baker who wants to create something special without spending hours in the kitchen.
These bite-sized confections are also incredibly versatile. They can be tailored for any season or occasion—just change the candy color or sprinkles to match the theme. Whether you’re hosting a party, need goody bags for kids, or simply want a colorful snack, these Oreo balls are a delightful and thoughtful option. They are also a hit with both kids and adults, making them a true crowd-pleaser no matter the age of your guests.
Ingredients Needed to Make Patriotic Oreo Balls
- 1 lb 2.12 oz Family Size package Oreo Cookies
- 8-ounce block cream cheese, softened to room temperature
- 12-ounce bag red candy melts
- 12-ounce bag blue candy melts
- ⅓ cup Ghirardelli white melting wafers
- White star confetti sprinkles for topping
Each of these ingredients plays a role in bringing out the texture, flavor, and charm of Patriotic Oreo Balls. The Oreo cookies ground into crumbs provide a rich, chocolatey base for the soft cream cheese center. The candy melts and sprinkles not only add bold color but also a festive flair and a touch of crunch. These ingredients come together in a balance of comfort and celebration.
Instructions to Make Patriotic Oreo Balls – Step by Step
Step 1:
To begin, prepare your workspace. Line two baking trays with parchment paper—this is important to keep the Oreo balls from sticking and to make them easy to handle. Set the trays aside while you prepare the other ingredients. This simple step will help ensure that later stages of the recipe go smoothly and your patriotic treats look as good as they taste.
Next, take the Oreo cookies and place them in a food processor or a high-speed blender. Pulse the machine in short bursts until you create fine, even crumbs. This texture is essential for mixing with the cream cheese without making the final ball too grainy. If you don’t have a food processor, you can place the cookies in a large resealable plastic bag and crush them using a rolling pin. Be careful not to over-crush them or they’ll become too powdery.
Step 2:
Once the Oreo crumbs are ready, transfer them to a large mixing bowl. Add in the softened cream cheese and use a hand mixer on medium speed to blend everything together until a smooth, dense paste forms. It’s essential that the cream cheese is at room temperature, as it ensures a smooth, lump-free texture and easy shaping. If your cream cheese is too cold, it might not mix in well and could create uneven, difficult-to-roll portions.
This mixture should feel firm and easy to handle, yet still soft enough to mold into balls. If it feels too dry, you can add a teaspoon of milk at a time to help it come together. If it’s too moist, allow it to refrigerate for a few minutes before shaping. This consistency is important to ensure the Oreo balls hold their shape and can be easily coated later.
Step 3:
Now it’s time to shape the Oreo balls. Using a 1.5-inch cookie scoop (or a small tablespoon and a spoon to smooth the edges), scoop up even portions of the Oreo-cream cheese mixture. You want them to be uniform in size so they look neat when finished and cook evenly if you choose to freeze them later. With your palms, gently roll each portion into smooth balls and place them evenly on the prepared baking trays. This step is crucial to ensure that every ball is uniform in size and appearance before moving onto the next stage.
Step 4:
After shaping, refrigerate the Oreo balls for at least 2 hours. This chilling time is essential for firming up the balls so they can hold their shape when dipped in the candy melts later. If time is tight, you can use the freezer for 15-20 minutes, but be careful not to freeze them too long, as that can make the candy melts harden on the surface before you have a chance to smooth them out.
Step 5:
Once chilled, start with the blue-coated balls. Fill a double boiler with a small amount of water and bring it to a low simmer. (If you prefer, a microwave-safe bowl can also work—just be careful when heating the candy melts to avoid overheating or burning them.) Place the blue candy melts in your chosen container and melt them slowly, stirring every 30 seconds until they become smooth and glossy.
Using a fork, pick up an Oreo ball and dip it slightly into the melted candy melts, then slowly lower it into a full coat. Remove the fork and gently tap to remove any excess. Immediately sprinkle the ball with white star confetti while the candy coating is still soft. Place it back on the tray and continue with the remaining half of the batch. Once done, return the tray to the refrigerator to allow the coating to set.
Step 6:
Next, prepare the red candy melts in the same way—melt them gently and ensure they are smooth before coating. Take the second tray of Oreo balls from the refrigerator and repeat the dipping process, coating them in red candy melts. As before, tap off the excess after dipping and return the tray to the refrigerator to set. Make sure the red coating is evenly applied and that the balls are spaced out to prevent them from sticking to one another.
Step 7:
Finally, it’s time for decoration. In another microwave-safe bowl, melt the white melting wafers in 30-second increments with a few intervals in between to ensure an even consistency. Once melted, transfer the mixture into a small piping bag and snip the tip for precise drizzling. Choose the red-coated Oreo balls and draw small white stars or lines on the surface of each one. This detail gives the balls a patriotic finish that feels both thoughtful and complete. Return the drizzled balls to the refrigerator for 10 more minutes to let the white coating set completely.
Chef’s Tips for a Perfect Result
- Use room-temperature cream cheese: it blends more smoothly and ensures the mixture is workable without breaking up the Oreo cookies.
- Don’t over-crush the Oreo crumbs: they should resemble fine granules—too fine can make the texture overly dry.
- Chill for at least 2 hours: this is crucial for the texture and for easier coating.
- Work in small batches: melting candy melts can get messy if too many balls are done at once.
- Tap off excess coating gently: too much tapping can cause uneven thickness or thin spots.
- Use white melting wafers instead of regular white candy melts: they are more reliable for drizzling and don’t crumble or crack later.
Variations and Substitutions
Feel free to personalize your Patriotic Oreo Balls with your favorite twists and substitutions. Here are some fun and easy variations:
- Vegan Option – Use vegan Oreo cookies and a vegan cream cheese alternative. Replace the white melting wafers and candy melts with dairy-free versions.
- Gluten-Free Alternative – Use gluten-free Oreo cookies instead, and ensure your candy melts are also gluten-free.
- Low-Carb Version – Substitute the regular Oreo cookies with low-carb or keto-friendly dark chocolate cookies and use a sugar-free cream cheese.
- Budget Swap – For the candy melts, try using melting chocolate chips for a less expensive but still festive option.
- Mini Treats – Divide the Oreo mixture into smaller balls for bite-sized snacks that are perfect for events and children.
These variations allow you to adapt the recipe for any dietary needs, budget, or occasion while keeping the essence of what makes these Oreo balls so special. No matter the variation, the magic of the treat remains the same—it’s about creating something beautiful and delicious together.
How to Serve and Pair
Patriotic Oreo Balls are not only a treat but a canvas for presentation and pairing. For a Fourth of July gathering, place them in a patriotic-themed serving bowl or on a white platter dotted with red and blue confetti. They can be stacked in a tiered tray or placed in mini mason jars for added charm.
These balls pair especially well with a crisp lemonade or iced tea for a refreshing contrast to the richness of the candy coating. For a more indulgent option, a glass of cold milk or even a light vanilla soft serve complements the chocolate and cream cheese flavors beautifully.
When serving at a family barbecue, these Oreo balls can be arranged in patriotic bunting shapes for a celebratory, eye-catching display. They also make wonderful additions to dessert tables at weddings, birthday parties, or holiday gatherings, where their vibrant colors and fun shapes make them a centerpiece all on their own.
Storage and Reheating
Proper storage ensures your Patriotic Oreo Balls stay fresh and colorful for as long as possible. Here’s how to store them:
- Refrigerator: Store in an airtight container for up to 5 days. The candy coating should remain firm and glossy in the cooler temperature.
- Freezer: For longer storage, wrap individual Oreo balls in plastic wrap and store them in a sealed container for up to 2 months. Thaw in the refrigerator or at room temperature before serving.
- Room Temperature: These treats can be left out for up to 2 hours if it’s cool and dry in the kitchen, but the candy coatings may soften in warm or humid conditions.
- Reheating: Though these treats are best enjoyed at room temperature, if they’ve been frozen or refrigerated, let them sit out for 15-20 minutes to soften slightly—but do not heat in the microwave or oven. Microwaving can cause the coatings to become rubbery or melt unevenly.
Always store these Oreo balls away from strong-smelling foods, as the candy and cream cheese can absorb odors over time.
Frequently Asked Questions
Can I substitute regular chocolate for the candy melts?
Absolutely—regular chocolate chips can be used in place of candy melts, though they require tempering for the best results. To make dipping easier and less sticky, you can add a bit of oil or shortening to the melted chocolate to help it coat the Oreo balls smoothly.
How do I know when the candy melts are ready?
The candy melts should be fully melted and smooth, with no lumps or streaks when stirred. If using the microwave, heat in 30-second increments, stirring in between, until they reach a glossy, fluid texture.
My Oreo balls are cracking when I dip them—what did I do wrong?
This usually happens when the candy melts are too warm or the Oreo balls are not chilled enough. Ensure that your Oreo balls are well-chilled and that the candy melts are not overheated. You can also reduce the temperature during melting for better results.
Can I make these ahead of time?
Yes! These Oreo balls can be shaped and stored in the refrigerator up to 24 hours before coating. Just make sure they are covered to prevent them from drying out. Store them in an airtight container and refrigerate until you’re ready to dip and decorate.
How can I customize the flavors of these Patriot Oreo Balls?
You can experiment with different coatings and toppings, such as adding a hint of vanilla extract to the cream cheese base or using flavored candy melts. Consider adding a sprinkle of cocoa powder inside the mixture for a deeper flavor, or try using festive toppings like edible metallic stars.
Conclusion
Patriotic Oreo Balls are a delightful blend of flavor, color, and celebration—an easy yet impressive dessert that brings joy to any setting. Whether you’re hosting a summer barbecue or preparing a special gathering, these sweet little bites are sure to be a hit with everyone at the table.
Print
Patriotic Oreo Balls: A Sweet Celebration in Every Bite
- Prep Time: 1 hour
- Cook Time: 0 minutes
- Total Time: 3 hours
- Yield: 30 Oreo balls 1x
- Category: Dessert
- Method: No-Bake
- Cuisine: American
- Diet: Vegetarian
Description
Patriotic Oreo Balls are festive no-bake treats made with Oreo crumbs, cream cheese, red and blue candy coating, white drizzle, and star sprinkles.
Ingredients
- 1 family size package Oreo cookies
- 8 ounces cream cheese, softened to room temperature
- 12 ounces red candy melts
- 12 ounces blue candy melts
- 1/3 cup white melting wafers
- White star confetti sprinkles, for topping
Instructions
1. Line two baking trays with parchment paper and set aside.
2. Place the Oreo cookies in a food processor or high-speed blender and pulse into fine crumbs.
3. In a large mixing bowl, beat the softened cream cheese with a hand mixer on high speed until smooth.
4. Add the Oreo crumbs and mix on medium speed until well combined.
5. Using a 1.5-inch cookie scoop, scoop even-sized balls, then roll them smooth in the palms of your hands.
6. Place the rolled balls evenly on the prepared baking trays.
7. Refrigerate the trays for 2 hours, or freeze for 15-20 minutes if short on time.
8. Remove one tray of Oreo balls from the refrigerator.
9. Melt the blue candy melts in a double boiler over low heat, or in a microwave-safe bowl on low, stirring every 30 seconds until smooth.
10. Use a fork to dip one ball at a time completely into the blue coating.
11. Lift the fork and tap to remove excess coating, then place the ball back on the tray.
12. Immediately sprinkle with white star confetti.
13. Refrigerate the blue-coated Oreo balls until the coating sets.
14. Remove the second tray of Oreo balls from the refrigerator.
15. Melt the red candy melts in a clean double boiler over low heat, stirring every 30 seconds until smooth.
16. Use a fork to dip each ball completely into the red coating.
17. Lift and tap to remove excess coating, then place each ball back on the tray.
18. Melt the white wafers in a small piping bag in 30-second microwave increments, massaging the bag between intervals.
19. Snip a small piece from the tip of the bag and drizzle white lines over the red-coated Oreo balls.
20. Return the Oreo balls to the refrigerator for 10 minutes to finish setting.
21. Keep refrigerated until ready to serve.
Notes
For best results, use softened cream cheese so it blends smoothly with the Oreo crumbs.
If the coating becomes too thick, rewarm it gently and stir until smooth.
Freeze the Oreo balls briefly instead of chilling for 2 hours when short on time.
Keep refrigerated until serving so the filling stays firm.
Nutrition
- Serving Size: 1 Oreo ball
- Calories: N/A
- Sugar: N/A
- Sodium: N/A
- Fat: N/A
- Saturated Fat: N/A
- Unsaturated Fat: N/A
- Trans Fat: N/A
- Carbohydrates: N/A
- Fiber: N/A
- Protein: N/A
- Cholesterol: N/A