Peanut butter cookie bars are a revelation in simplicity and pure, unadulterated comfort. They arrive in our kitchens like a warm hug, a promise of sweet indulgence that’s as deeply satisfying as it is easy to create. This recipe is more than just a dessert; it’s a vessel for memories, a reflection of quiet afternoons spent with loved ones, and the comforting aroma that can transform any ordinary day into something truly special.
Like many cherished recipes passed down through generations, this one carries a whisper of my childhood. I remember my grandmother, her hands dusted with flour, patiently teaching me the delicate art of creaming butter and sugar, her voice a soothing melody against the hum of her old stand mixer. These peanut butter cookie bars are an echo of those moments, a way to keep those connections alive and share that same warmth with you. Each bite is a testament to the enduring magic of simple ingredients coming together to create pure joy.
What is Peanut Butter Cookie Bars?
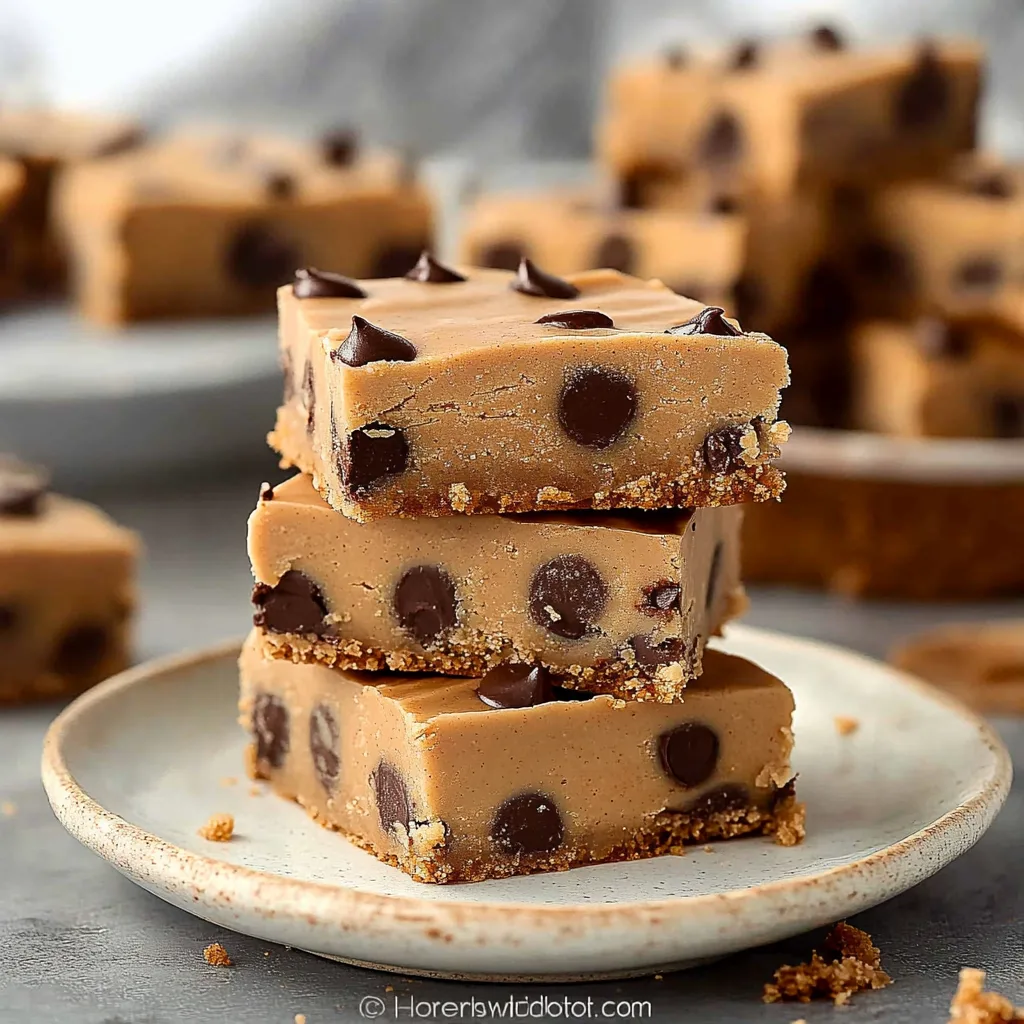
Peanut butter cookie bars are a delightful take on the classic peanut butter cookie, transformed into a convenient bar form baked in a rectangular pan. Imagine the beloved taste and texture of a perfect peanut butter cookie—slightly crisp around the edges, wonderfully chewy in the center, with that unmistakable sweet and nutty flavor profile—all condensed into an easy-to-cut bar. They often are studded with generous amounts of melty chocolate chips, creating little pockets of bliss within the rich peanut butter base.
This humble dessert doesn’t necessarily trace its origins to a single grand tradition but rather to a collective love for nostalgic flavors and the desire for fuss-free treats perfect for sharing. It’s the kind of recipe that feels universally comforting, a crowd-pleaser that appeals to all ages. The beauty lies in its straightforwardness: it’s a cookie experience without the need for individual scooping and shaping, making it ideal for gatherings or when you simply crave a substantial, chewy, peanut butter-infused delight.
Reasons to Try Peanut Butter Cookie Bars
There are so many reasons why this peanut butter cookie bar recipe has captured my heart, and I know it will capture yours too. First and foremost, the flavor is simply irresistible. It’s that perfect marriage of creamy, salty peanut butter and sweet, rich brown sugar, enhanced by the delightful melty pockets of chocolate. It’s a comforting taste that feels like coming home, a simple pleasure that never fails to bring a smile.
Beyond the incredible taste, these bars are a dream for home cooks who appreciate both ease and delicious results. They require minimal fuss, come together quickly in one pan, and deliver a consistent, satisfying texture that’s a step above your average cookie. Whether you’re a seasoned baker or just starting your culinary journey, this recipe is incredibly forgiving and rewarding, making it perfect for busy weeknights, family dessert projects, or as a thoughtful treat to share with friends.
Ingredients Needed to Make Peanut Butter Cookie Bars
- 1 cup unsalted butter (softened to room temperature)
- 1 cup creamy peanut butter
- 1½ cups light brown sugar (tightly packed)
- ½ cup granulated sugar
- 1 large egg + 1 large egg yolk (at room temperature)
- 2 teaspoons vanilla extract
- 2¾ cups all-purpose flour
- 1 teaspoon cornstarch
- ½ teaspoon baking powder
- ¼ teaspoon salt
- 2 tablespoons milk (any kind works)
- 2 cups chocolate chips (semisweet or milk chocolate, or a mix!)
Instructions to Make Peanut Butter Cookie Bars – Step by Step
Step 1: Preparing Your Kitchen and Pan
Begin by preheating your oven to 350°F (175°C). This ensures the oven is at the perfect temperature when your batter is ready, leading to even baking. For the pan, a 9×13 inch baking pan is ideal. I like to line mine with parchment paper, creating a “sling” that extends slightly over the edges. This makes lifting the baked bars out so much easier later on, ensuring clean cuts and fewer broken pieces to mend.
Step 2: Creating the Creamy Peanut Butter Base
In a large mixing bowl, combine the softened unsalted butter, creamy peanut butter, light brown sugar, and granulated sugar. Use your hand mixer on medium speed to cream these ingredients together until they become wonderfully light and fluffy. This step is crucial for developing a tender texture in your bars, as it incorporates air which will leaven the cookie base. Take your time here; it’s like coaxing the ingredients into a harmonious union.
Step 3: Enriching the Batter with Eggs and Vanilla
Now, gently mix in the large egg, the extra egg yolk, and the pure vanilla extract. Adding an extra yolk contributes richness and chewiness, giving the bars that irresistible gooey texture. Mix until just combined, being careful not to overmix at this stage. The mixture should look smooth and well-incorporated, holding together beautifully.
Step 4: Whisking Together the Dry Ingredients
In a separate medium bowl, whisk together the all-purpose flour, cornstarch, baking powder, and salt. Whisking the dry ingredients ensures that the leavening agents (baking powder) and salt are evenly distributed throughout the flour. This is a small but significant step that prepares the dry components to perfectly complement the wet mixture, ensuring consistent lift and flavor in every bite.
Step 5: Combining Wet and Dry Mixtures
Gradually add the whisked dry ingredients into the wet peanut butter mixture. Use low speed on your mixer or a spatula to combine them until the flour is *just* incorporated. It’s important not to overmix here; overmixing can develop the gluten in the flour too much, leading to tougher bars. Stop mixing as soon as you no longer see streaks of flour.
Step 6: Adding the Milk for Perfect Consistency
Pour in the milk and stir again until the mixture is smooth and well-incorporated. The milk helps to bring the dough together to the perfect consistency, making it pliable and easy to spread. This gives the dough the right moisture balance for chewy, tender bars.
Step 7: Folding in the Chocolatey Treasures
Now for the best part: gently fold in the chocolate chips. Whether you prefer the classic sweetness of milk chocolate or the slightly more sophisticated flavor of semisweet, this addition is pure indulgence. Use a spatula or a wooden spoon to distribute them evenly throughout the dough. Don’t be shy – more chocolate is always a good idea!
Step 8: Spreading the Batter into the Pan
Transfer the rich, chocolate-studded batter to your prepared 9×13 inch baking pan. Use a sturdy spatula to spread it evenly across the bottom, pressing it gently into all the corners. Ensuring an even layer is key for consistent baking, so take a moment to make sure the surface is smooth.
Step 9: Baking to Golden Perfection
Bake in the preheated oven for 35 to 40 minutes, or until the edges are just beginning to turn a beautiful golden brown. You can test for doneness by inserting a toothpick into the center; it should come out clean or with just a few moist crumbs attached. Avoid overbaking, as this will result in dry bars. The residual heat will continue to cook the bars slightly as they cool.
Step 10: Cooling and Cutting for Perfect Servings
This is perhaps the hardest part – allowing the bars to cool completely in the pan on a wire rack. Patience is a virtue, especially when it comes to these bars! Cooling allows them to set up properly, ensuring you can cut them into neat, clean squares without them crumbling apart. Once fully cooled, use the parchment sling to lift them out, then slice them into your desired bar size.
Chef’s Tips for a Perfect Result
- Use room-temperature ingredients: Softened butter and room-temperature eggs and egg yolk cream together more effectively, creating a lighter, airier cookie base that leads to tender bars.
- Don’t overmix the flour: Mix the flour mixture into the wet ingredients until just combined. Overmixing develops gluten, which can make your bars tough instead of delightfully chewy.
- A parchment sling is your best friend: Lining the pan with parchment paper that hangs over the sides makes removing the baked bars incredibly easy and ensures clean cuts.
- Press the dough firmly into the pan: Especially in the corners, pressing the dough evenly ensures that the edges bake at the same rate as the center, preventing unevenly baked or burnt edges.
- Watch for the visual cues: The edges should be just beginning to turn golden brown. A few moist crumbs on a toothpick are ideal, indicating they’re cooked through but still delightfully chewy.
- Chill before slicing: For the cleanest, most professional-looking cuts, allow the bars to cool completely and then chill them in the refrigerator for at least 30 minutes before slicing.
Variations and Substitutions
Vegan Option:
- Replace the butter with vegan butter sticks.
- Substitute the egg and egg yolk with a flax egg (1 tablespoon flaxseed meal mixed with 3 tablespoons water, let sit for 5 minutes) or a commercial egg replacer.
- Ensure your chocolate chips are dairy-free, and they will taste just as wonderful!
Gluten-Free Alternative:
- Swap the all-purpose flour for a good quality 1:1 gluten-free baking flour blend. You might need to add an extra tablespoon or two of flour if the dough seems too wet, as GF flours absorb moisture differently.
Low-Carb Version:
- Use your favorite low-carb flour blend (like almond or coconut flour) and a sugar substitute (like erythritol or monk fruit) for the sugars. Adjust liquid amounts as needed, as these flours behave differently. Omit the added chocolate chips or use sugar-free chocolate chips.
Budget Swap:
- While creamy peanut butter offers the best texture, crunchy peanut butter can be used if that’s what you have on hand; it will add a pleasant nuttiness and crunch. Using generic brands for butter, flour, and chocolate chips can also help keep costs down without sacrificing too much flavor.
Nut-Free Alternative:
- For a delicious nut-free option, substitute the peanut butter with sunflower seed butter or tahini. Ensure your chocolate chips are nut-free as well.
How to Serve and Pair
These decadent peanut butter cookie bars are wonderfully versatile. Serve them slightly warm for ultimate gooeyness, or at room temperature for a firmer texture. They are perfect for any occasion, from casual family desserts and potluck contributions to more festive gatherings like birthdays, holidays, or bake sales. Imagine them as a comforting treat after a long day, alongside a steaming mug of coffee or a tall glass of cold milk.
For a touch of elegance, you might lightly dust the tops with powdered sugar or drizzle them with melted chocolate. They pair beautifully with a scoop of vanilla bean ice cream for a truly indulgent dessert experience. Their rich flavor also complements the deep notes of a dark roast coffee or a soothing herbal tea, making them a delightful afternoon pick-me-up.
Storage and Reheating
Refrigerator:
Store cooled peanut butter cookie bars in an airtight container in the refrigerator for up to 5 days. This method helps maintain their chewy texture and prevents them from drying out, especially in warmer climates. They tend to firm up slightly when chilled, which can make slicing even cleaner.
Freezer:
For longer storage, wrap individual bars or a whole pan (once completely cooled) tightly in plastic wrap, then in aluminum foil or place in a freezer-safe container. They can be frozen for up to 3 months. Thaw them at room temperature for a few hours before serving.
Room Temperature:
If you plan to enjoy them within 2-3 days, storing them in an airtight container at room temperature is perfectly fine. This allows them to maintain their soft, chewy texture. Keep them away from direct sunlight or heat, which can cause them to become greasy or stale.
Reheating:
To revive their fresh-baked warmth, reheat individual bars or slices in a toaster oven or a conventional oven at a low temperature (around 300°F or 150°C) for 5-10 minutes until warm. Microwaving is an option for quick reheating, but be cautious as it can sometimes make the texture slightly tougher. A few seconds in the microwave should suffice for a warm and gooey treat.
Frequently Asked Questions (FAQ)
Can I use crunchy peanut butter instead of creamy?
Yes, you can absolutely use crunchy peanut butter in this recipe. It will add a delightful textural contrast and an even more pronounced peanut flavor to your bars. The overall chewiness might be slightly affected, but the taste will remain wonderfully peanutty.
How do I know when peanut butter cookie bars are perfectly baked?
The bars are ready when the edges are just beginning to turn golden brown, and the center looks set but still slightly soft. A toothpick inserted into the center should come out with a few moist crumbs attached, not completely clean or wet batter. This indicates they are cooked through but will remain chewy.
My bars turned out dry, what did I do wrong?
Dry bars are often a result of overbaking or overmixing the flour. Be sure to bake only until the edges are lightly golden and remove them when a few moist crumbs cling to the toothpick. Also, resist the urge to mix the flour more than just until it’s incorporated to keep the texture tender.
Can I prepare the peanut butter cookie bar batter ahead of time?
Yes, you can prepare the batter a day in advance. Cover it tightly and store it in the refrigerator. You may need to let it soften slightly at room temperature for about 30 minutes before spreading it into the pan for even baking, as the butter will be firmer.
What are the best ways to customize or serve these bars?
These bars are wonderful as is, but you can elevate them by adding different types of chocolate chips (white, dark, butterscotch), swirl in some caramel, or sprinkle sea salt on top before baking. Serving them warm with ice cream or a glass of cold milk enhances their comfort food appeal.
CONCLUSION
These peanut butter cookie bars are a testament to the simple joys found in the kitchen, offering a perfect balance of chewy, nutty, and chocolatey perfection. The aroma alone evokes feelings of warmth and home, making them an irresistible treat for any occasion. Give this recipe a try and discover the comforting magic that lies within each delightful bite – the signature nutty sweetness is truly unforgettable.