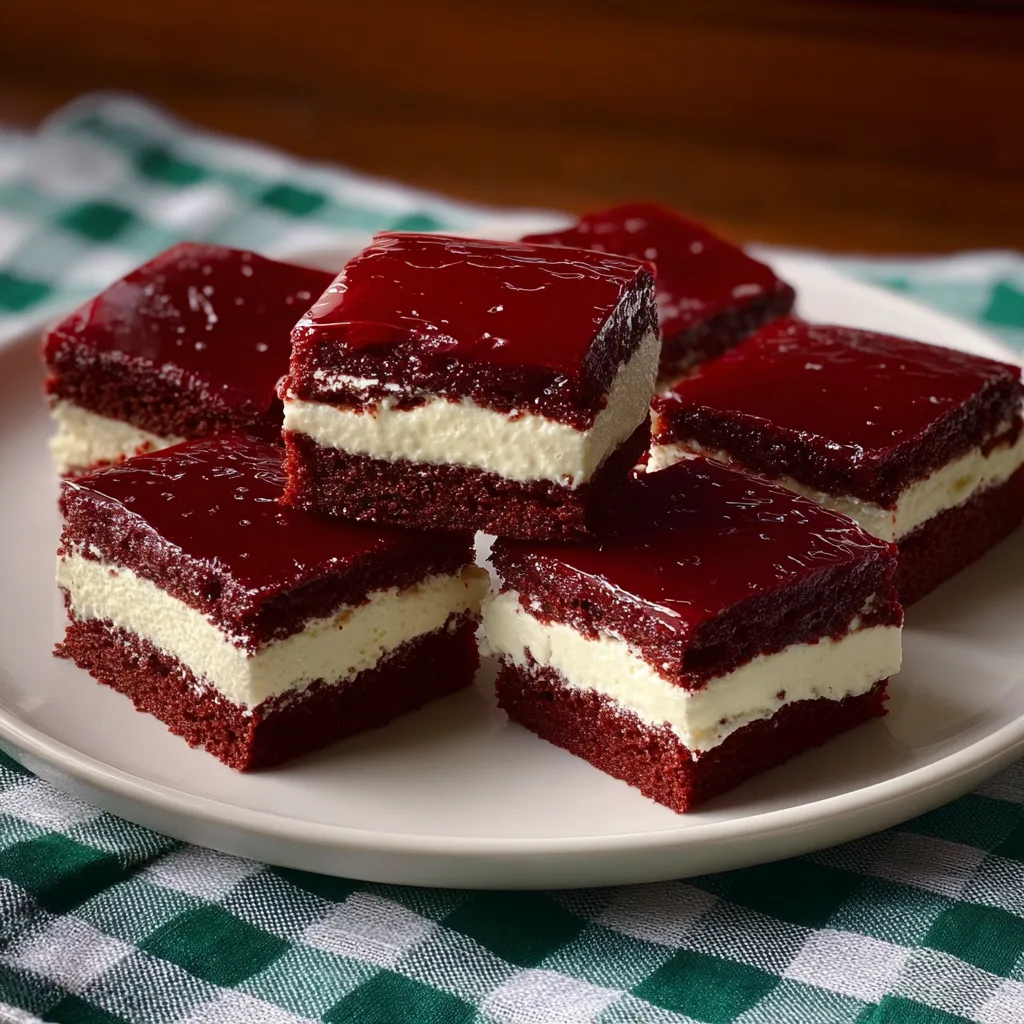
Red velvet ice cream sandwiches are a dream made real, a perfect marriage of tender, slightly tangy red velvet cake and luxuriously cold, sweet vanilla ice cream. They capture the essence of a classic flavor combination, transforming it into a handheld delight that brings a smile to anyone’s face. This is more than just a dessert; it’s a memory waiting to happen, a moment of pure, unadulterated joy that unfolds with every bite.
There’s something deeply comforting about the taste of red velvet, especially when paired with the cool, smooth embrace of ice cream. It’s a texture and flavor play that speaks to childhood afternoons and simpler times. Making these red velvet ice cream sandwiches brings those feelings right into your kitchen, allowing you to share a piece of that comfort with loved ones. It’s a way to bake love into every slice.
What is Red Velvet Ice Cream Sandwiches?
Red velvet ice cream sandwiches are a delightful frozen confection that takes the familiar flavors of red velvet cake and marries them with creamy vanilla ice cream, all nestled between two layers of soft, homemade cake. They offer a unique dessert experience, elevating the humble ice cream sandwich into something truly special. The signature mild cocoa flavor and vibrant red hue of the cake, combined with the classic sweetness of vanilla ice cream, create a harmonious balance that is both nostalgic and excitingly new.
Originating from the popular red velvet cake, this dessert takes those beloved characteristics and transforms them into a portable, shareable treat. It’s designed for those who adore the slight tang and rich flavor of red velvet but crave the cool, satisfying texture of ice cream. This recipe uses a simple box cake mix as a foundation, making it incredibly accessible while still delivering a gourmet result that feels truly homemade and heartfelt.
Reasons to Try Red Velvet Ice Cream Sandwiches
Why should you make these red velvet ice cream sandwiches? For starters, they are an absolute joy to create and even more of a joy to eat. The process itself is wonderfully therapeutic, like a quiet afternoon spent with your thoughts and a bowl of comforting ingredients. The resulting treat is perfect for birthday parties, summer gatherings, or simply when you need a special pick-me-up that feels like a warm hug.
These are incredibly beginner-friendly, proving that delicious, homemade desserts don’t need to be complicated. The flavors are universally loved, making them a guaranteed crowd-pleaser for all ages. Imagine the delight on your children’s faces, or the contented sigh of a friend as they savor this unique combination. They are a testament to how simple ingredients, thoughtfully combined, can create moments of pure happiness and connection.
Ingredients Needed to Make Red Velvet Ice Cream Sandwiches
To bring these delightful red velvet ice cream sandwiches to life, you’ll need a few key ingredients that work together beautifully.
- 1 box red velvet cake mix
- 2 large eggs (ensure they are at room temperature for best incorporation)
- 1/2 cup (1 stick) unsalted butter, softened
- 1 teaspoon pure vanilla extract
- 1/4 teaspoon kosher salt
- 1 gallon vanilla ice cream, softened (leave it out on the counter for about 20-30 minutes until spreadable but not melted)
Instructions to Make Red Velvet Ice Cream Sandwiches – Step by Step
Following these steps will guide you toward creating these utterly delicious red velvet ice cream sandwiches, a treat that feels both elegant and wonderfully comforting.
Step 1: Prepare Your Baking Pans and Oven
Begin by preheating your oven to 350°F (175°C), a gentle warmth that’s perfect for baking this tender cake. Line a large, rimmed baking sheet, about 9×13 inches, with parchment paper. This parchment paper is your best friend; it ensures the cake lifts cleanly and makes a world of difference when it comes time to handle the baked layers.
Step 2: Mix the Red Velvet Batter
In a spacious bowl, combine the contents of the red velvet cake mix. Add your room-temperature eggs, the softened butter, pure vanilla extract, and the pinch of kosher salt. Gently mix everything together until it’s just evenly combined. Don’t overmix; you want to keep the batter tender. The mixture will be quite thick, almost like a cookie dough, which is exactly what you’re aiming for.
Step 3: Bake the Red Velvet Cake Layer
Carefully spread this wonderfully thick batter evenly over the prepared baking sheet. Use a spatula or the back of a spoon, perhaps lightly greased, to ensure an even layer reaching all the corners. Pop it into your preheated oven and let it bake for about 18 to 20 minutes. You’ll know it’s ready when a toothpick inserted into the center comes out clean, and the edges are set.
Step 4: Cool and Prepare for Assembly
Once baked, remove the sheet cake from the oven and let it cool completely in the pan. This is a crucial step for its structure. Patience is key here; a warm cake will lead to melted ice cream disasters. Once it’s fully cooled, gently use the parchment paper to lift the cake from the pan. Then, carefully cut the large cake rectangle in half crosswise, creating two equally sized large rectangles.
Step 5: Assemble the Ice Cream Sandwich Masterpiece
Take one of your cooled cake halves and place it, parchment side down if you’re keeping it on, onto a clean surface or a fresh piece of parchment paper positioned on a baking sheet. Generously spread the softened vanilla ice cream evenly over this cake layer, reaching close to the edges. Then, carefully place the second cake half on top of the ice cream, aligning the edges as best as you can to create one large, magnificent ice cream sandwich.
Step 6: Freeze and Slice with Care
Now, it’s time for the freezing magic. Place the entire assembled sandwich, on its baking sheet, into your freezer. Let it freeze until the ice cream is wonderfully firm, which usually takes about 2 hours. This firming-up period is essential for clean slicing. Once firm, remove it from the freezer and with a sharp knife, slice the large sandwich into individual squares. Serve these beautiful red velvet ice cream sandwiches immediately to capture that perfect contrast of soft cake and frozen ice cream.
Chef’s Tips for a Perfect Result
- Ensure your butter is truly softened, not melted, for the best batter consistency.
- Don’t overbake the cake layer; a slightly softer cake yields a more tender ice cream sandwich.
- Soften your ice cream just enough to be spreadable, avoiding a runny mess.
- Using a hot knife dipped in hot water can help slice the frozen cake cleanly.
- Work quickly when assembling to prevent the ice cream from melting too much.
- Freeze the assembled sandwich on a flat surface to ensure even thickness.
Variations and Substitutions
Chocolate Red Velvet Alternative
What to change: Use a chocolate cake mix and add a few tablespoons of cocoa powder to the red velvet mix for a deeper flavor profile.
How it impacts flavor or texture: This variation adds a richer, more intense chocolate note, complementing the creamy vanilla ice cream beautifully.
Cream Cheese Frosting Swirl
What to change: Mix a small amount of softened cream cheese with powdered sugar and a splash of milk to create a simple frosting. Swirl this into the softened vanilla ice cream before spreading.
How it impacts flavor or texture: This adds a delightful tang and creamy swirl, reminiscent of classic red velvet cake pairings, enhancing the overall richness.
Gluten-Free Option
What to change: Substitute a good quality gluten-free red velvet cake mix and ensure all other ingredients (like vanilla extract) are certified gluten-free.
How it impacts flavor or texture: The texture might be slightly different depending on the GF mix, but the flavor will remain wonderfully similar, appealing to those with gluten sensitivities.
Dairy-Free Delight
What to change: Use a dairy-free red velvet cake mix, and substitute your favorite dairy-free butter alternative and a carton of high-quality dairy-free vanilla ice cream.
How it impacts flavor or texture: This makes the treat accessible for those avoiding dairy, with a texture and flavor very close to the original, depending on the quality of the dairy-free substitutes used.
How to Serve and Pair
These red velvet ice cream sandwiches are a showstopper on their own, but they also pair wonderfully with a glass of cold milk, a steaming cup of coffee, or even a rich hot chocolate for a decadent treat. For an extra touch of elegance, you can dust the sides with a little powdered sugar or sprinkle them with festive, edible glitter just before serving. They are perfect for summer BBQs, birthday celebrations, holiday gatherings, or any occasion where you want to bring a little extra magic and comfort to the table.
Storage and Reheating
Refrigerator
Store any leftover red velvet ice cream sandwiches in an airtight container in the refrigerator for up to 2-3 days. While they will soften slightly, they remain delicious for a quick treat. It’s best to eat them before the cake layer becomes too soggy.
Freezer
For longer storage, wrap individual sandwiches tightly in plastic wrap, then place them in a freezer-safe bag or airtight container. They will keep well in the freezer for up to 1 month, maintaining their best texture and flavor. This makes them perfect for having a sweet treat ready whenever a craving strikes.
Room Temperature
These are best enjoyed immediately after freezing when the ice cream is firm. Leaving them at room temperature for too long will cause the ice cream to melt excessively, and the cake will become too soft and potentially fall apart.
Reheating
Reheating is not necessary or recommended for these ice cream sandwiches, as they are meant to be enjoyed cold and frozen.
Frequently Asked Questions (FAQ)
Can I use a different flavor of cake mix for these ice cream sandwiches?
While red velvet is classic, you can certainly experiment with other cake mix flavors like chocolate or vanilla for a different twist. The key is to ensure the cake mix yields a tender but sturdy cake layer to hold the ice cream.
How do I know when the red velvet cake layer is fully baked?
The red velvet cake layer is done when a toothpick inserted into the center comes out clean, and the edges are set and beginning to pull away slightly from the sides of the baking sheet. Avoid overbaking to maintain tenderness.
My ice cream is melting too quickly while assembling, what can I do?
To prevent melting, work swiftly and ensure your ice cream is just softened, not overly melted. You can also chill your baking sheet in the freezer for about 15-20 minutes before you start assembling the sandwich.
Can I prepare these red velvet ice cream sandwiches ahead of time for a party?
Absolutely! These are perfect for making ahead. Once assembled, freeze them until firm, then slice and store them in an airtight container in the freezer. They will be ready to serve whenever needed.
What are the best ways to customize or decorate these red velvet ice cream sandwiches?
You can add a drizzle of white chocolate ganache, sprinkle the edges with mini chocolate chips or festive sprinkles while the ice cream is still soft, or even dust them with a bit of powdered sugar before serving for an elegant touch.
CONCLUSION
These red velvet ice cream sandwiches are a delightful creation, blending the comforting warmth of red velvet cake with the cool joy of vanilla ice cream. They’re a beautiful way to bring a touch of homemade magic and heartfelt sweetness into any moment. Embrace the simple pleasure of creating these, and discover the irresistible charm that makes them a cherished treat.
Print
Red Velvet Ice Cream Sandwiches
- Prep Time: 20
- Cook Time: 12
- Total Time: 120
- Yield: 12 ice cream sandwiches 1x
- Category: desserts
- Method: Baking
- Cuisine: American
- Diet: Vegetarian
Description
These homemade ice cream sandwiches blend tender red velvet cake with luxurious vanilla ice cream. The cake’s slight tang and vivid color create a nostalgic treat perfect for gatherings or personal indulgence. Simple, crowd-pleasing, and delightfully retro!
Ingredients
1 ½ cups all-purpose flour
¾ cup unsweetened cocoa powder
1 teaspoon baking soda
⅓ cup buttermilk
2 tablespoons white vinegar
¾ cup salted butter, softened
1 ½ cups granulated sugar
1 large egg
1 teaspoon vanilla extract
8 ounces semisweet chocolate chips (halal-certified)
2 cups vanilla ice cream (non-dairy if preferred)
Instructions
Preheat oven to 350°F (177°C)
Mix flour, cocoa powder, and baking soda in a bowl
Beat butter and sugar until fluffy
Add egg, vanilla extract, buttermilk, and vinegar; mix until smooth
Gradually incorporate dry ingredients
Fold in chocolate chips for the dough
Scoop 12 large balls of dough onto a baking sheet lined with parchment paper
Bake 10–12 minutes until edges are firm
Let cookies cool completely on a wire rack
Take 2 scoops of vanilla ice cream and place between two cookies
Place on a baking sheet and refrigerate until firm, at least 1 hour
Serve chilled and enjoy the nostalgic flavor combination
Notes
Use halal-certified chocolate and oil-free butter to maintain dietary standards
For a richer texture, add ¼ cup milk to the dough
Cookies can be made up to 2 days ahead and frozen
Ideal as make-ahead desserts for summer events or special family moments
Nutrition
- Serving Size: 1 sandwich
- Calories: 350
- Sugar: 20g
- Sodium: 180mg
- Fat: 18g
- Saturated Fat: 10g
- Carbohydrates: 45g
- Fiber: 1g
- Protein: 4g
- Cholesterol: 30mg


