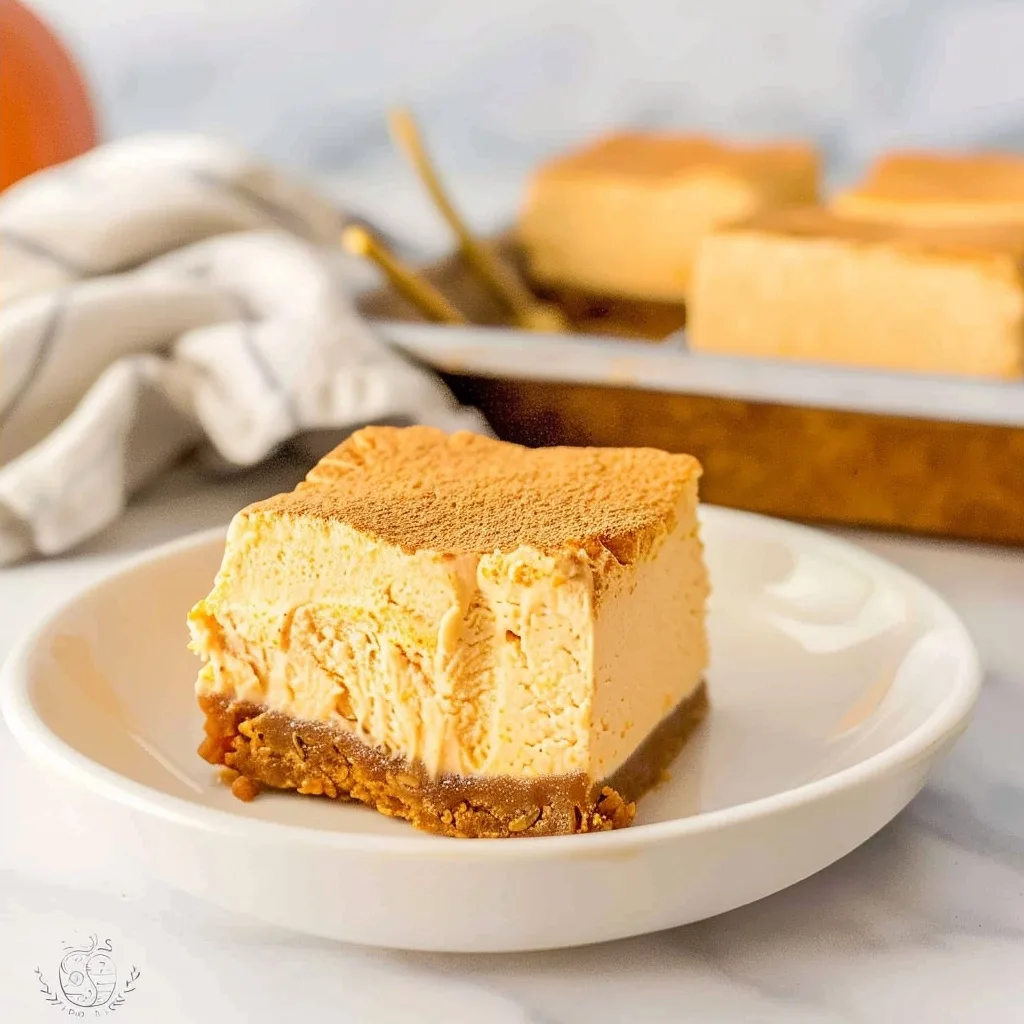
No-Bake Pumpkin Cheesecake Bars
This fall season will not be complete without these no-bake pumpkin cheesecake bars! These mouse like bars have the perfect pumpkin flavor and a crunchy gingersnap cookie crust, making it the perfect Thanksgiving dessert. The best part is that this recipe is completely no-bake leaving you plenty of oven space for the rest of your holiday recipes!
There’s something truly magical about the flavors of autumn, a time when the air grows crisp and the world glows with a warm, golden light. It’s in these moments that I often find myself drawn to the kitchen, seeking comfort and connection through the simple act of creating something delicious. These no-bake pumpkin cheesecake bars are born from that very feeling—a desire to capture the essence of fall in a treat that’s both elegant and incredibly easy to make. They remind me of cozy evenings spent with loved ones, the scent of spices filling the air, and the quiet joy of sharing a homemade dessert.
This recipe, passed down through generations with a few cherished tweaks, embodies the spirit of home cooking. It’s about embracing simple ingredients and transforming them into something truly special, a testament to the love and care that goes into every bite. The absence of baking means more time to savor the moments that matter most, making it an ideal centerpiece for any autumn celebration or a simple, comforting indulgence on a quiet afternoon.
What is No-Bake Pumpkin Cheesecake Bars?
No-Bake Pumpkin Cheesecake Bars are a delightful dessert creation that captures all the quintessential flavors of autumn without requiring any oven time. Imagine a creamy, dreamy pumpkin-spiced cheesecake filling nestled atop a sweet, crunchy gingersnap crust. This treat offers a wonderful textural contrast, from the crumbly base to the smooth, rich topping, all infused with the warm, inviting taste of pumpkin and spices.
These bars are a modern twist on a classic cheesecake, reimagined for ease and convenience. They embody the comforting essence of fall, carrying the aromatic spices like cinnamon and allspice that instantly evoke cozy memories. The magic lies in its simplicity, allowing busy home cooks or those looking for a less labor-intensive dessert to still create a show-stopping treat that tastes utterly divine.
Reasons to Try No-Bake Pumpkin Cheesecake Bars
There are so many wonderful reasons to bring these no-bake pumpkin cheesecake bars into your kitchen. First and foremost, their incredible ease of preparation is a game-changer. Without the need for baking, you save precious oven space during busy holiday cooking periods and eliminate the worry of over or under baking. This makes them perfect for beginner bakers or anyone who appreciates a delicious dessert that comes together with minimal fuss.
Beyond the practicality, the flavor profile is simply irresistible. The combination of the slightly spicy gingersnap crust with the velvety smooth, warmly spiced pumpkin cheesecake filling is pure autumnal bliss. They are wonderfully versatile, serving beautifully at Thanksgiving gatherings, fall potlucks, or simply as a comforting treat to enjoy with a warm cup of tea on a chilly afternoon. Each bite is a little piece of cozy comfort, designed to bring smiles and create shared moments.
Ingredients Needed to Make No-Bake Pumpkin Cheesecake Bars
For the Gingersnap Crust:
- 2 cups gingersnap cookie crumbs (about 35-40 cookies)
- 6 tablespoons unsalted butter, melted
- ¼ cup packed light brown sugar
For the Pumpkin Cheesecake Filling:
- 1 ½ cups heavy whipping cream, very cold
- 2 (8-ounce) blocks cream cheese, softened to room temperature
- ½ cup packed light brown sugar
- ½ cup granulated white sugar
- 1 cup pumpkin purée (NOT pumpkin pie filling)
- ½ teaspoon ground cinnamon
- ¼ teaspoon ground allspice
- 1 teaspoon pure vanilla extract
Instructions to Make No-Bake Pumpkin Cheesecake Bars – Step by Step
Step 1: Prepare the Gingersnap Crust Base
Begin by crafting the foundation for our delicious bars. Take your gingersnap cookies and pulse them in a food processor until they’ve transformed into fine crumbs, resembling coarse sand. If you don’t have a food processor, you can place the cookies in a sturdy zip-top bag and crush them with a rolling pin. Next, in a medium mixing bowl, combine these lovely gingersnap crumbs with the melted butter and the ¼ cup of packed light brown sugar. Stir everything together until the mixture is evenly moistened, resembling wet sand that holds together when you gently squeeze it.
Step 2: Form the Crust in the Pan
Prepare your 13×9 inch baking dish by lining it with parchment paper. Make sure the parchment paper hangs over the sides, creating easy “handles” for lifting the finished cheesecake out later. This thoughtful step will make serving and cleanup so much simpler. Now, pour the gingersnap crumb mixture into the prepared dish. Using your clean hands or the bottom of a flat glass, gently but firmly press the crumbs into an even layer across the bottom of the pan, creating a neat, compact crust. Once pressed, place this dish into the refrigerator to chill and set while you prepare the creamy cheesecake filling.
Step 3: Whip the Cream to Perfection
In a clean, dry bowl of your stand mixer fitted with the whisk attachment, pour the very cold heavy whipping cream. Begin beating the cream on medium-high speed. Watch it closely as it transforms from liquid to foamy, then thick. Continue until stiff peaks form – this means that when you lift the whisk, the cream holds its shape and the peaks stand straight up without drooping. This step typically takes about 5 minutes. Be careful not to overbeat, or you’ll end up with butter!
Step 4: Create the Velvety Cheesecake Filling
Gently scrape the whipped cream into a separate bowl and set it aside for a moment. Now, switch to the paddle attachment on your stand mixer. Add the softened cream cheese to the mixer bowl and beat it on medium speed until it’s wonderfully smooth and free of lumps. This is where the magic starts to happen. Add the pumpkin purée, both the light brown sugar and granulated white sugar, the warming cinnamon, allspice, and the pure vanilla extract. Scrape down the sides and the bottom of the bowl with a spatula a couple of times to ensure every bit of cream cheese is incorporated into the flavorful pumpkin mixture.
Step 5: Gently Fold in the Whipped Cream
Now it’s time to bring everything together. Take the bowl of reserved whipped cream and gently add it to the pumpkin cream cheese mixture. Using a spatula, carefully fold the whipped cream into the pumpkin base. The key here is to be gentle to keep the filling light and airy. Continue folding until just combined, taking care not to overmix, which can deflate the creaminess we’ve worked so hard to achieve. You want a beautifully consistent, smooth, and luscious filling.
Step 6: Assemble and Chill the Bars
Retrieve the chilled crust from the refrigerator. Gently pour the luscious pumpkin cheesecake filling over the set gingersnap crust. Use your spatula to spread the filling evenly, creating a smooth, uniform surface right to the edges of the pan. Cover the dish loosely with plastic wrap or foil. Place the entire dish back into the refrigerator and let it chill for a minimum of 6 to 8 hours, or ideally overnight. This extended chilling time is crucial for the cheesecake to set properly, developing its signature creamy texture and allowing the flavors to meld beautifully.
Step 7: Slice and Serve Your Masterpiece
Once the cheesecake bars have set firm, it’s time to reveal them. Carefully run a thin, sharp knife along the inside edges of the pan to loosen the cheesecake from the sides. This small step ensures a clean release. Then, using the parchment paper overhangs as handles, gently lift the entire cheesecake block out of the baking dish and transfer it to a cutting board. For the cleanest cuts, use a large, sharp knife and wipe it clean with a damp paper towel between each slice. Cut the cheesecake into 20 bars (approximately 5 rows by 4 rows). Serve chilled, perhaps with a dollop of extra whipped topping or a sprinkle of cinnamon, and watch the smiles appear!
Chef’s Tips for a Perfect Result
- Ensure your cream cheese is truly softened to room temperature; this is vital for achieving a smooth, lump-free filling. It should yield easily to gentle pressure.
- Use cold heavy cream directly from the refrigerator for whipping. Cold cream whips up faster and to a more stable volume.
- When folding the whipped cream into the pumpkin mixture, use a gentle motion with a spatula, as if you’re lifting from the bottom and turning over the top, to preserve the airiness.
- Always use pure pumpkin purée, not pumpkin pie filling, as the latter contains added sugar and spices that can alter the final flavor balance.
- Allow ample chilling time. Overnight is best, as it ensures the cheesecake is fully set and easy to slice cleanly, with a perfect texture that melts in your mouth.
- Wipe your knife clean with a damp cloth between each slice for beautifully neat edges that make your bars look professionally made.
Variations and Substitutions
Gluten-Free Alternative
For those seeking a gluten-free treat, simply swap the gingersnap cookies for your favorite gluten-free cookies that have a similar spiced flavor profile. Many brands offer excellent gluten-free gingersnaps or spiced shortbread cookies that will work beautifully to create a delicious gluten-free crust.
Spice Level Adjustment
If you prefer a more pronounced spice flavor, feel free to increase the cinnamon and allspice slightly, or add a pinch of ground nutmeg or ginger to the filling. Conversely, if you like a milder spice, reduce the quantities or omit the allspice for a softer pumpkin essence.
Dairy-Free Option
To make these bars dairy-free, substitute the cream cheese with a high-quality dairy-free cream cheese alternative and use a full-fat coconut cream (the thick part from a chilled can) instead of heavy whipping cream. Ensure the dairy-free cream cheese is softened and well-blended to achieve a smooth texture.
Nutty Crust Variation
For a different texture and flavor in the crust, consider adding about ½ cup of finely chopped pecans or walnuts to the gingersnap crumb mixture. This adds a lovely crunch and nutty depth that pairs wonderfully with pumpkin.
How to Serve and Pair
These no-bake pumpkin cheesecake bars are a celebration on a plate, perfect for any autumn gathering. Serve them chilled, allowing their creamy texture to truly shine. A simple dollop of freshly whipped cream or a swirl of caramel sauce on top elevates them beautifully. For a festive touch, a light dusting of cinnamon or a few toasted pecan pieces adds elegance.
They pair wonderfully with a warm mug of spiced apple cider or a hot cup of coffee, the perfect companions for a cozy afternoon treat. These bars are an ideal dessert for Thanksgiving, Christmas, or any fall-themed celebration, bringing warmth and sweetness to your table.
Storage and Reheating
Refrigerator
Store any leftover no-bake pumpkin cheesecake bars in an airtight container or tightly covered with plastic wrap in the refrigerator. They will stay delightfully fresh and creamy for up to 3-4 days. Keeping them well-covered helps prevent them from absorbing any other odors from the fridge.
Freezer
For longer storage, these bars freeze remarkably well. Wrap individual bars or the entire block tightly in plastic wrap, then in a layer of aluminum foil, or place them in a freezer-safe airtight container. They can be frozen for up to 1-2 months. Thaw them slowly in the refrigerator overnight for the best texture.
Room Temperature
Due to the cream cheese and dairy content, it is best to keep these bars refrigerated and avoid leaving them at room temperature for extended periods (more than 2 hours) to maintain their quality and ensure food safety.
Reheating
These bars are designed to be served chilled and do not require reheating. If they have been frozen and thawed, they should be served cold directly from the refrigerator. Trying to reheat them could alter their delicate, creamy texture.
Frequently Asked Questions (FAQ)
Can I substitute graham crackers for gingersnaps in this recipe?
Yes, you can substitute graham crackers for gingersnaps if needed. Graham cracker crumbs will create a slightly milder, sweeter crust, while gingersnaps offer a warming spiced undertone that complements the pumpkin filling beautifully.
How do I know when the no-bake pumpkin cheesecake bars are ready?
The bars are ready when the filling is firm to the touch and no longer appears wet or jiggly. They should hold their shape when sliced. The minimum chilling time of 6-8 hours, or ideally overnight, ensures they are properly set.
My cheesecake filling is lumpy, what went wrong?
Lumps usually occur if the cream cheese was not fully softened to room temperature before mixing. Ensure your cream cheese is soft enough to yield to gentle pressure; this allows it to incorporate smoothly with the other ingredients.
Can I make these no-bake pumpkin cheesecake bars ahead of time?
Absolutely! These bars are perfect for making ahead. They need at least 6-8 hours to chill and set, so making them the day before or even two days ahead is recommended and ideal for busy schedules.
What are the best toppings or additions for these bars?
For serving, consider a swirl of caramel sauce, a dollop of freshly whipped cream, a sprinkle of cinnamon or pumpkin pie spice, or some toasted chopped pecans. A drizzle of white chocolate could also be a delicious addition.
CONCLUSION
These no-bake pumpkin cheesecake bars are a testament to the joy of effortless, flavorful desserts. They offer a creamy, spiced delight that’s perfect for any autumn occasion, bringing comfort and sweetness with every bite. Give these easy bars a try and discover the irresistible charm of pumpkin and cream cheese bliss—it’s a taste that truly captures the heart of the season.
Print
No-Bake Pumpkin Cheesecake Bars
- Prep Time: 20
- Total Time: 20
- Yield: 24 bars 1x
- Category: desserts
- Method: No-Bake
- Cuisine: American
- Diet: Vegetarian
Description
These no-bake pumpkin cheesecake bars combine a crunchy gingersnap crust with a creamy pumpkin-spiced cream cheese filling. Perfect for fall gatherings or cozy evenings, they require no oven and deliver all the autumnal warmth of a classic cheesecake in a convenient bar form.
Ingredients
2 cups crushed gingersnap cookies
1/2 cup melted unsalted butter
1/4 cup brown sugar
16 oz cream cheese, softened
1/3 cup granulated sugar
1 cup canned pumpkin puree
1 tsp vanilla extract
1/4 tsp pumpkin pie spice
1/2 cup cold milk
Instructions
Line a 9×13-inch pan with parchment paper.
Mix gingersnap crumbs, melted butter, and brown sugar. Press into the pan.
Refrigerate crust for 30 minutes.
Beat cream cheese and granulated sugar until smooth. Mix in pumpkin puree, vanilla, pumpkin pie spice, and milk.
Pour filling over chilled crust and smooth the surface.
Chill for at least 4 hours or overnight before slicing into bars.
Notes
Chill crust before adding filling to prevent cracking
Store in an airtight container in the fridge for up to 5 days
Top with whipped cream or a sprinkle of cinnamon before serving
Nutrition
- Serving Size: 1 bar
- Calories: 150
- Sugar: 9g
- Sodium: 650mg
- Fat: 11g
- Saturated Fat: 6g
- Carbohydrates: 14g
- Fiber: 0.4g
- Protein: 4g
- Cholesterol: 50mg


