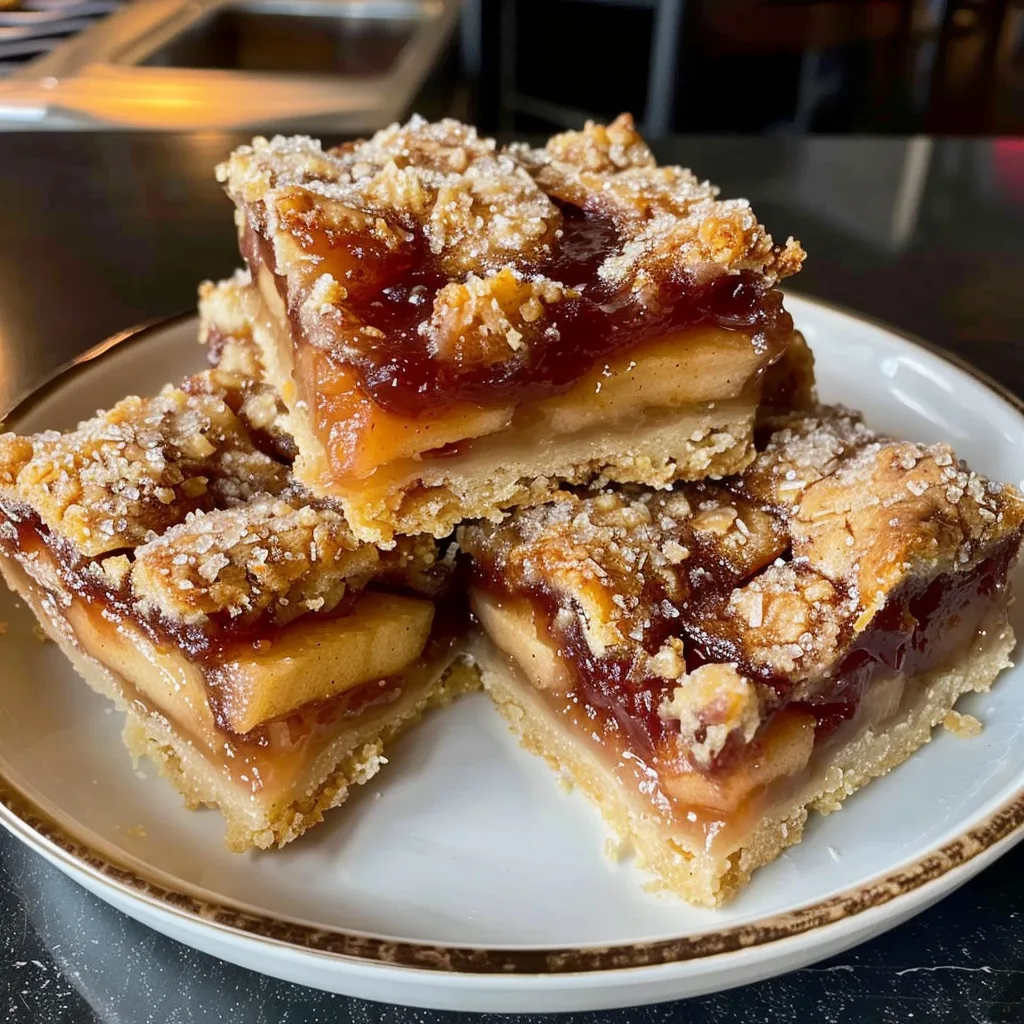
Chewy apple pie bars capture the gentle comfort of a grandmother’s kitchen, blending tender, buttery crust with the warm, spiced sweetness of orchard-fresh fruit. These bars offer the nostalgic scent of cinnamon-dusted apples drifting through a home, turning a quiet afternoon into a celebration of simple pleasures. When we bake with intention, we find a way to anchor ourselves, creating small, edible memories that linger long after the last crumb has vanished.
Creating the perfect chewy apple pie bars is about balancing the texture of a crisp, buttery base with the soft nature of slow-cooked apples. It is a humble process that rewards patience, inviting you to slow down as you peel and chop the fruit, letting the rhythm of the kitchen become a meditation. This recipe serves as a gentle reminder that some of the most profound joys arrive in the form of a golden-brown square, warm from the oven and ready to be shared with those we hold dear.
What is Chewy Apple Pie Bars Recipe?
This recipe is an elevated take on the classic apple pie, transformed into a portable, handheld format that maintains all the comforting integrity of a traditional rustic dessert. Unlike a standard pie which can often be cumbersome to slice and serve, these bars provide a perfect ratio of soft, spiced fruit filling to a rich, buttery crust that holds its shape beautifully. It is designed for those moments when you crave the soul-warming flavor of baked apples but want the ease of a simple, crowd-pleasing treat.
The secret lies in the base, which serves a dual purpose as both the foundation and the crumbly topping. Using a mix of tart Granny Smith and sweet Fuji apples allows the filling to possess a complex, balanced depth that stands up well to a generous dusting of cinnamon and nutmeg. It is a recipe rooted in the tradition of home baking, where the focus remains on high-quality pantry staples coming together to create something much greater than the sum of its parts.
Reasons to Try Chewy Apple Pie Bars
You should try this recipe because it simplifies the often stressful task of perfect crust-making without compromising on the authentic, buttery taste we all love. It is perfectly suited for busy afternoons, family gatherings, or those quiet weekends when you simply want the comfort of a warm oven and a house filled with the aroma of cinnamon and apples. The yield is generous, making it an ideal choice for bringing to neighbors or gifting to friends to let them know they are thought of.
Beyond the ease of preparation, these bars are incredibly versatile and forgiving, making them a fantastic project for beginning bakers or families cooking together. There is something deeply grounding about pressing the crumbly dough into the pan, a task that connects us to our past while providing a creative outlet in the present. Whether you are seeking a meditative baking session or a quick dessert solution, this dish offers a warm, reliable connection to the heart of home cooking.
Ingredients Needed to Make Chewy Apple Pie Bars
- 2 ½ cups all-purpose flour (spooned and leveled for accuracy)
- ¾ cup granulated sugar (for the perfect amount of sweetness)
- ½ cup packed brown sugar (to add a hint of molasses-rich depth)
- 1 cup unsalted butter, softened (use high-quality butter for the richest crust)
- 1 teaspoon baking powder (to give the base a slight lift)
- ½ teaspoon salt (to balance the sweetness)
- 3 medium apples, peeled and chopped (a mix of Granny Smith and Fuji works beautifully)
- 1 ½ teaspoons ground cinnamon (the soul of the recipe)
- ¼ teaspoon ground nutmeg (for a warm, earthy finish)
- 1 tablespoon fresh lemon juice (to brighten the apples)
- ⅓ cup granulated sugar (for the filling)
- 1 tablespoon all-purpose flour (to thicken the juices)
Instructions to Make Chewy Apple Pie Bars – Step by Step
Step 1: Begin by preheating your oven to 350°F (175°C). Carefully grease a 9×13 inch baking pan with a little butter or line it with parchment paper for easy removal later. Taking this moment to prepare your workspace allows the baking process to flow smoothly, keeping the experience calm and focused.
Step 2: In a large mixing bowl, combine 2 ½ cups of flour, ¾ cup granulated sugar, ½ cup brown sugar, baking powder, and salt. Gently whisk these dry ingredients together until they are well combined, creating a uniform base for your dough.
Step 3: Cut in 1 cup of softened unsalted butter. You can use your fingers, a classic pastry cutter, or a low-speed electric mixer to work the butter into the flour until the mixture feels like damp, coarse sand with some larger, visible pea-sized bits of butter remaining.
Step 4: Once your crumb mixture is ready, set aside about 1 ½ cups for the topping. Press the remaining mixture firmly into the bottom of your prepared pan to create a dense, even crust. Bake this base for 12 minutes until it looks just set and turns a delicate, light golden color.
Step 5: While the foundation bakes, prepare the apple filling. In a medium bowl, combine your peeled and chopped apples with the remaining sugar, cinnamon, nutmeg, lemon juice, and the tablespoon of flour. Toss everything together until every slice of apple is glistening and evenly coated with warm spice.
Step 6: Carefully remove the pre-baked crust from the oven and spread the apple filling evenly over the top. Use a spatula or your hands to press the apples down slightly so they pack nicely into an even layer, which helps the bars hold their shape.
Step 7: Sprinkle the reserved 1 ½ cups of crumb topping over the apple layer, ensuring a beautiful, textured finish. Return the pan to the oven and bake for another 30 to 35 minutes until the topping is golden brown and the juices from the apple filling appear bubbly and rich.
Step 8: The hardest part is waiting. Allow the bars to cool completely in the pan on a wire rack before slicing. This interval is essential for the structure to fully set, ensuring you get perfect, clean squares every time.
Chef’s Tips for a Perfect Result
- Always use room-temperature butter; it incorporates more evenly into the flour, creating that signature tender, chewy crust rather than a grainy one.
- Pre-baking the base crust for at least 12 minutes is non-negotiable, as it acts as a barrier that prevents the apple moisture from making the bottom layer soggy.
- Do not rush the cooling process; slicing the bars while they are still warm will cause them to crumble, so give them at least an hour to find their structure.
- If your crumb topping begins to brown too quickly in the oven, simply tent it loosely with a piece of aluminum foil to allow the apples to continue cooking through.
Variations and Substitutions
- Gluten-Free Alternative: Swap the all-purpose flour for a high-quality 1:1 gluten-free baking blend that includes xanthan gum.
- Nutty Texture: Add ½ cup of finely chopped pecans or walnuts to the reserved crumb topping to introduce a toasted, crunchy element that pairs beautifully with the warm spices.
- Vegan Version: Use refined coconut oil in place of butter and a 1:1 plant-based milk or flax meal mixture if you need to bind the crust further, though the oil usually suffices for the crumb texture.
How to Serve and Pair
Serve these bars at room temperature for the best texture, perhaps with a slight warming in a low oven if you want that fresh-baked experience. They pair exceptionally well with a dollop of unsweetened whipped cream or a scoop of high-quality vanilla bean ice cream. They are a wonderful addition to a brunch spread, a quiet family dessert after a Sunday roast, or simply alongside a warm cup of herbal tea during a moment of mid-day reflection.
Storage and Reheating
Refrigerator
To keep the bars fresh for up to 5 days, store them in an airtight container in the refrigerator. Use parchment paper between layers to prevent them from sticking to each other.
Freezer
These bars freeze beautifully for up to three months. Wrap individual bars in plastic wrap, then place them in a freezer-safe bag or container to protect them from frost.
Room Temperature
You can keep them at room temperature for up to 2 days if stored in a cool area within an airtight container. Beyond this, transition to the refrigerator to preserve the quality of the apples.
Reheating
To regain that fresh-from-the-oven warmth, place a bar on a baking sheet and heat in a 300°F oven for 5 to 7 minutes. Avoid the microwave if possible, as it can soften the crust too much.
Frequently Asked Questions (FAQ)
Can I substitute a different fruit in this recipe?
You can successfully substitute the apples with pears or a combination of stone fruits like peaches or plums, provided the fruit is sliced thinly to match the cooking time. Ensure you adjust the sugar if your chosen fruit is significantly sweeter or more tart than the apples specified.
How do I know when the bars are perfectly baked?
The bars are ready when the crumb topping has achieved a deep golden-brown color and you can see the apple juices bubbling through the edges of the crust. The filling should feel substantial, and the topping should be firm to the touch.
My crust turned out soggy, what did I do wrong?
A soggy crust is usually caused by not pre-baking the base long enough or by not allowing the finished bars to cool completely before slicing. Always ensure you press the crust firmly into the pan to create a solid foundation before adding the moisture-rich apples.
Can I assemble these bars the night before?
You can certainly assemble the components a few hours in advance, but for the best texture, it is recommended to bake them fresh right before you plan to serve them. If you must prep early, keep the dry crust mixture and the fruit filling separate until you are ready to assemble for the oven.
What is the best way to customize the flavor profile?
To customize the flavor, try adding a half-teaspoon of ground ginger or cardamom to the apple mixture for a more sophisticated, warming spice profile. You can also lightly brush the baked top with a simple apricot glaze for a professional, shiny finish that enhances the fruit flavor.
Conclusion
Chewy apple pie bars are a testament to the idea that the heartiest desserts are often built on simple, honest ingredients and a bit of love. By taking the time to layer these flavors properly, you create a treat that nurtures both the body and the spirit during any season. Let this recipe be a gentle invitation to slow down, preheat your oven, and enjoy the beautiful, timeless rhythm of creating beauty in your own kitchen.
Print
Chewy Apple Pie Bars
- Prep Time: 20
- Cook Time: 40
- Total Time: 60
- Yield: 18 servings 1x
- Category: desserts
- Method: Baking
- Cuisine: American
- Diet: Vegetarian
Description
Experience the nostalgic comfort of a grandmother’s kitchen with these chewy apple pie bars. Featuring a buttery, crumbly crust that doubles as a topping, these bars are filled with a perfectly balanced blend of tart Granny Smith and sweet Fuji apples, generously spiced with cinnamon and nutmeg. They offer all the warmth of a classic apple pie in a convenient, handheld form, making them the perfect soul-warming treat for family gatherings or cozy afternoons at home.
Ingredients
3 cups all-purpose flour
1 cup granulated sugar
1 teaspoon baking powder
1/2 teaspoon salt
1 cup cold unsalted butter, cubed
1 large egg, lightly beaten
3 Granny Smith apples, peeled and chopped
3 Fuji apples, peeled and chopped
1/2 cup brown sugar
1 tablespoon lemon juice
1 tablespoon ground cinnamon
1/4 teaspoon ground nutmeg
Instructions
Preheat your oven to 375°F (190°C) and grease a 9×13 inch baking pan.
In a large bowl, whisk together the flour, granulated sugar, baking powder, and salt.
Cut the cold butter into the dry mixture using a pastry cutter or your fingers until the texture resembles coarse crumbs.
Stir in the beaten egg until a crumbly dough forms.
Press two-thirds of the mixture firmly into the bottom of the prepared pan.
In another bowl, toss the chopped apples with brown sugar, lemon juice, cinnamon, and nutmeg.
Spread the apple mixture evenly over the bottom crust.
Sprinkle the remaining dough crumbs over the top of the apple layer.
Bake for 35 to 40 minutes or until the top is golden brown and the apples are tender.
Allow to cool completely in the pan before slicing into bars.
Notes
Ensure your butter is cold to achieve the optimal crumbly texture. You can serve these slightly warm with a scoop of vanilla ice cream for an extra indulgent dessert. Store any leftovers in an airtight container at room temperature for up to 3 days.
Nutrition
- Serving Size: 1 bar
- Calories: 260
- Sugar: 22g
- Sodium: 110mg
- Fat: 11g
- Saturated Fat: 7g
- Carbohydrates: 38g
- Fiber: 2g
- Protein: 3g
- Cholesterol: 40mg


