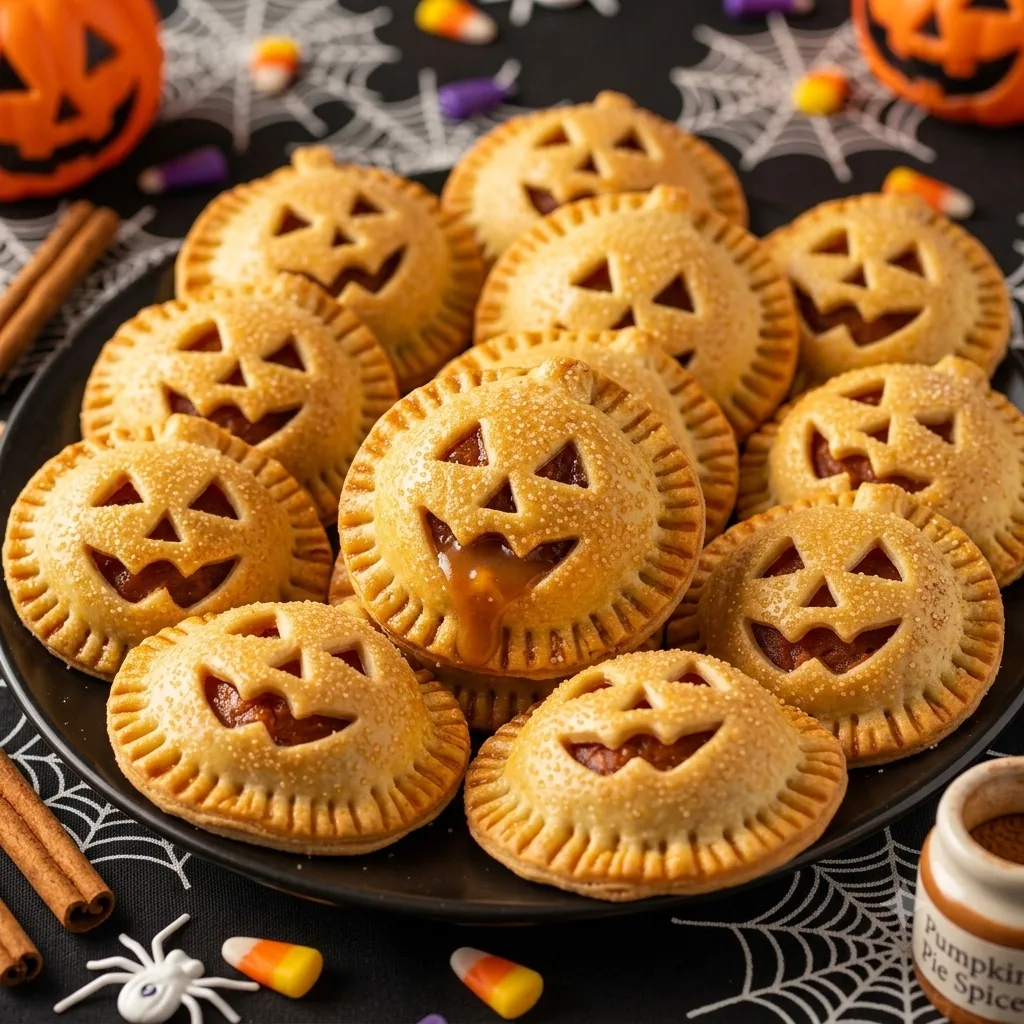
Jack-o’-Lantern Hand Pies bring a touch of childhood magic and the comforting scent of autumn into your kitchen. These delightful treats turn a simple seasonal fruit pastry into a festive experience that celebrates the spirit of gathering and shared joy. Watching a plain circle of dough transform into a smiling pumpkin face feels like capturing a little bit of magic, a reminder of the quiet, beautiful traditions my grandmother taught me while we baked together during the crisp October months.
Bringing Jack-o’-Lantern Hand Pies to your holiday table creates an atmosphere of warmth and connection that guests will truly feel. Whether you are hosting a small neighborhood party or simply enjoying a slow evening at home, these pastries are the perfect vessel for autumnal flavor and heartfelt memories. They remind us that food is not just about sustenance, but about the stories we tell and the smiles we share while sitting around a cozy kitchen table.
What is Jack-o’-Lantern Hand Pies?
Jack-o’-Lantern Hand Pies are individual, portable turnovers shaped to resemble the iconic carved pumpkins of Halloween. The base is crafted from a flaky, buttery pie crust, while the interior is filled with a spiced apple mixture that evokes the classic taste of a harvest orchard. They are a labor of love that merges the rustic charm of traditional baking with the playful spirit of the season.
What makes these pies truly unique is the artistic detail on the top crust. By carving simple shapes for eyes and a mouth before assembly, the steam escapes during baking, and the result is a beautifully expressive little pie. It is a simple technique that elevates a standard dessert into a centerpiece, perfect for those who appreciate the intersection of culinary craft and festive storytelling.
Reasons to Try Jack-o’-Lantern Hand Pies
You should try making Jack-o’-Lantern Hand Pies because they are as fun to create as they are to eat. They serve as a wonderful activity to share with family, allowing everyone to get creative with the facial expressions of their pumpkins. It is a slow, grounding process that turns the busy energy of the holiday season into a moment of calm and creative focus.
Beyond the charm, these pies are incredibly practical for hosting. Because they are individually portioned, you do not need to worry about slicing a large pie or dealing with messy servers. They are sturdy enough to be enjoyed while mingling, and their nostalgic flavor profile appeals to both children and adults alike, making them a reliable crowd-pleaser for any autumn gathering.
Ingredients Needed to Make Jack-o’-Lantern Hand Pies
- 2 store-bought or homemade pie crusts (chilled for easier handling)
- 1 can apple pie filling (look for a cinnamon-spiced variety)
- 1 large egg (beaten with a splash of water for a perfect golden sheen)
- 2 tablespoons orange sanding sugar (adds a festive sparkle and extra crunch)
Instructions to Make Jack-o’-Lantern Hand Pies – Step by Step
Step 1: Begin by rolling out your chilled pie crusts on a lightly floured surface. Using a circular cookie cutter or a small bowl, cut out an even number of shapes. You will need two circles for every pie, one for the bottom base and one for the top lid that will feature the jack-o’-lantern face.
Step 2: Take half of your circles and gently carve out the eyes and a mouth. I like to use a small paring knife for this, creating little triangles for the eyes and a crescent or jagged shape for the smile. Take your time here, as this is where the personality of your pies really comes to life.
Step 3: Spoon a generous tablespoon of apple pie filling into the center of the solid crust circles. Be careful not to overfill, as you want to ensure the edges seal perfectly without the filling bubbling out during the heat of the oven.
Step 4: Place the carved ‘face’ pieces over the filling. Using the tines of a fork, crimp the edges of the bottom and top crusts together firmly. This creates a beautiful decorative seal that keeps all that sweet, spiced goodness inside where it belongs.
Step 5: Carefully transfer your pies to a baking sheet lined with parchment paper. Brush the top of each pie generously with your egg wash, ensuring you reach the edges. Finally, sprinkle the orange sanding sugar over the top for that festive, glittering finish that catches the light so beautifully.
Step 6: Bake in a preheated oven at 375°F until the crust is golden brown and the edges are perfectly crisp. Allow them to cool slightly on the baking sheet before serving, as the apple filling will be quite hot when it first comes out of the oven.
Chef’s Tips for a Perfect Result
- Keep your dough cold: Always handle your pie crust while it is chilled to ensure the butter creates those lovely, flaky layers.
- Don’t overstuff: Adding too much filling can cause the pies to burst in the oven; a little goes a long way.
- Seal the edges thoroughly: Pressing firmly with a fork is not just for decoration, it is essential to preventing leaks.
- Use quality spices: If your canned filling tastes a bit flat, stir in a pinch of fresh cinnamon or nutmeg to brighten the flavor.
Variations and Substitutions
Vegan Option: Replace the egg wash with a light brushing of almond milk and maple syrup. Use a vegan-certified pie crust to ensure the ingredients align with your dietary choices without sacrificing the golden finish.
Gluten-Free Alternative: Substitute the standard wheat-based crust with a high-quality gluten-free pastry mix. Ensure it has enough xanthan gum to remain pliable, as gluten-free doughs can be more fragile when carving the faces.
Budget Swap: If you are short on time or funds, you can use canned peach or cherry filling instead of apple. The results are just as festive, offering a vibrant burst of color when seen through the carved eyes and mouths.
How to Serve and Pair
Serve these hand pies warm alongside a mug of spiced apple cider or a robust black tea. They are perfect for an afternoon tea party or a late-night treat after a brisk evening walk. For an extra touch of indulgence, place a small bowl of lightly sweetened whipped cream nearby for dipping.
Storage and Reheating
Refrigerator: Store any leftover pies in an airtight container for up to three days. They will stay fresh, though the crust may lose a little bit of its original crispness over time.
Freezer: These pies freeze beautifully. Wrap them individually in plastic wrap and place them in a freezer-safe bag for up to one month. Thaw them in the refrigerator overnight before reheating.
Reheating: For the best results, reheat the pies in a 350°F oven for about 10 minutes until warmed through and crisp. The microwave is an option for convenience, but the oven is the best way to restore that initial flaky texture.
Frequently Asked Questions (FAQ)
Can I use homemade pie filling?
Yes, homemade apple filling works beautifully and often provides a fresher flavor. Just ensure you cook your apples until tender before filling, as they will not soften significantly inside the pastry during the short bake time.
How do I know when the pies are fully baked?
The pies are done when the crust turns a deep, golden brown and the filling begins to bubble slightly through the carved face openings. Keep a close watch in the final minutes to ensure the edges do not darken too quickly.
Why is my dough breaking when I try to carve the face?
If the dough is breaking, it is likely too soft or warm. Simply place the cutout circles back into the refrigerator for ten minutes to firm up the butter before using your knife to carve the features.
Can I assemble these the night before?
You can assemble the pies and store them on a tray in the refrigerator overnight. Wait to apply the egg wash and sanding sugar until just before you slide them into the oven to ensure the best texture.
What is the best way to customize these for other holidays?
You can easily adapt this technique by changing the cookie cutter shape and the carving design. Use a heart for Valentine’s Day or a star for the holidays, adjusting the filling to match the season.
Conclusion
Jack-o’-Lantern Hand Pies are a wonderful way to bring a sense of nostalgia and sweetness into your home during the autumn season. Whether you are baking for friends or enjoying a quiet moment, the simple joy of these treats is sure to brighten your day. I hope you find as much peace and happiness in the baking process as I do, savoring the comforting cinnamon aroma that fills your kitchen with every batch.
Print
Jack-o’-Lantern Hand Pies
- Prep Time: 20
- Cook Time: 20
- Total Time: 40
- Yield: 8 hand pies 1x
- Category: desserts
- Method: Baking
- Cuisine: American
- Diet: Vegetarian
Description
These delightful Jack-o’-Lantern Hand Pies bring a touch of autumn magic to your kitchen. Each portable pastry features a flaky, buttery crust filled with spiced apple goodness and carved with expressive faces that let steam escape while baking. They are the perfect individual treat for seasonal gatherings, offering a nostalgic flavor profile that appeals to all ages. Easy to handle and fun to decorate, these pies turn a simple baking session into a heartwarming tradition of creativity, connection, and festive, harvest-inspired joy.
Ingredients
2 pie crusts, chilled
1 can (21 oz) cinnamon-spiced apple pie filling
1 large egg
1 tablespoon water
2 tablespoons orange sanding sugar
Instructions
Preheat your oven to 400°F (200°C) and line a baking sheet with parchment paper.
Roll out the chilled pie dough on a floured surface and cut out an even number of circles using a round cookie cutter or a small bowl.
On half of the circles, use a small paring knife to carve out two triangles for eyes and a jagged mouth to create a jack-o’-lantern face.
Place a generous spoonful of apple pie filling into the center of the remaining plain circles, leaving a small border around the edge.
Brush the edges of the filled circles with the egg wash (egg beaten with water), then place a carved top piece over each filling.
Press the edges together firmly with a fork to seal the hand pies completely.
Brush the entire surface of each hand pie with the remaining egg wash and sprinkle with the orange sanding sugar.
Place the pies on the prepared baking sheet and bake for 18 to 22 minutes, or until the pastry is golden brown and crisp.
Cool on a wire rack for at least 10 minutes before serving.
Notes
Ensure the dough stays cold; if it gets too soft, chill in the refrigerator for 10 minutes before carving or baking. You can use a kitchen scale to ensure even filling distribution. Store leftovers in an airtight container at room temperature for up to two days or reheat in the oven for a crispy texture.
Nutrition
- Serving Size: 1 pie
- Calories: 280
- Sugar: 12g
- Sodium: 210mg
- Fat: 14g
- Saturated Fat: 6g
- Carbohydrates: 36g
- Fiber: 2g
- Protein: 3g
- Cholesterol: 35mg