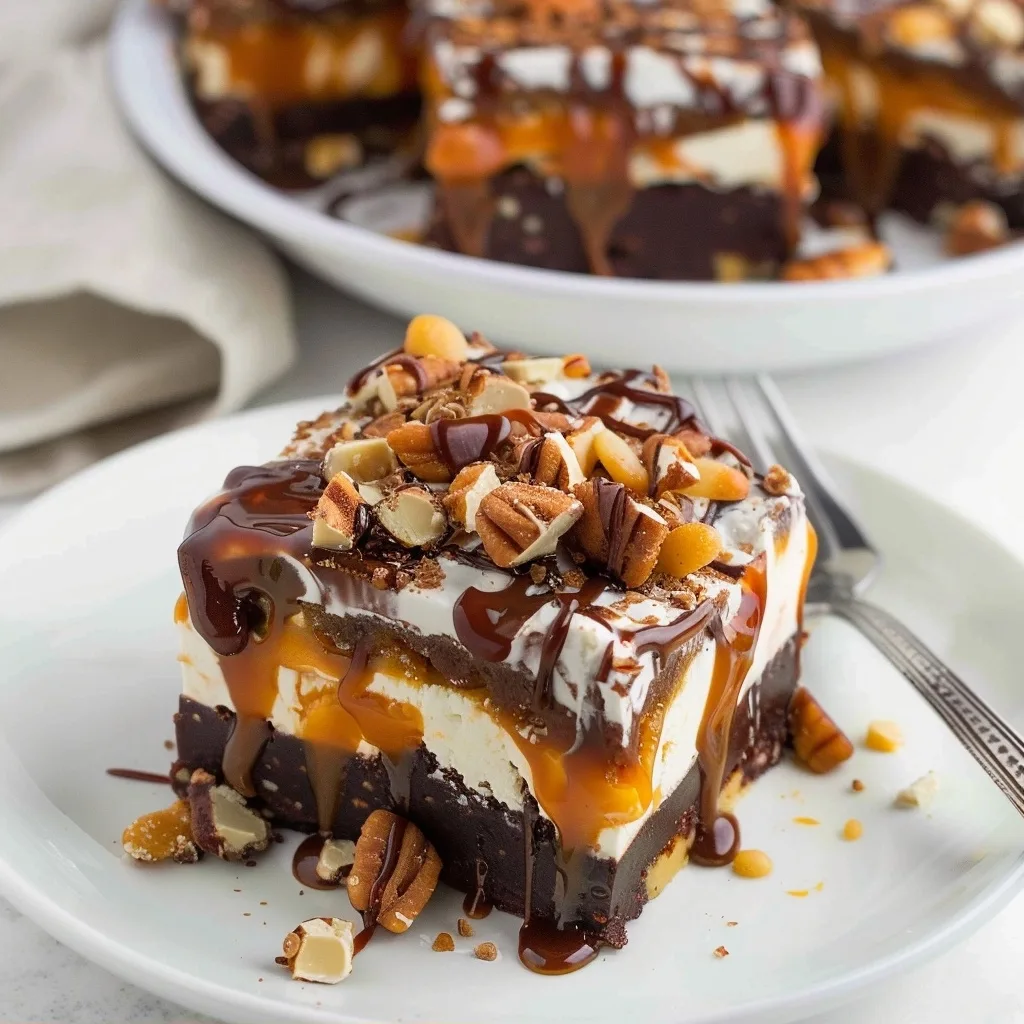
No Bake Turtle Dream Bars bring a sense of quiet nostalgia to the kitchen, reminiscent of those slow Sunday afternoons spent watching sunlight filter through the window as we whisked together something sweet for the ones we love. This dessert captures the essence of a classic turtle candy, blending crunchy pecans, buttery caramel, and rich chocolate into a dreamy, layered experience that requires no oven at all. It is a gentle reminder that we can create meaningful memories without needing complex equipment or hours of intense labor, allowing us to focus more on the connection that food brings to our tables.
These treats have become a favorite in my home, especially when life feels a bit too fast and we need a grounding moment of indulgence. Whether you are preparing them for a family gathering or simply treating yourself after a long week, the harmony of flavors in these No Bake Turtle Dream Bars offers a soothing comfort that only a homemade dessert can provide. Each layer is thoughtful and purposeful, creating a final product that feels both sophisticated and deeply familiar to anyone who takes a bite.
What is No Bake Turtle Dream Bars?
No Bake Turtle Dream Bars are a layered dessert masterpiece that bypasses the heat of the oven entirely, making them an ideal choice for warmer days or times when you prefer not to manage a hot kitchen. The base begins with a foundation of crushed chocolate Oreo cookies and melted butter, providing a firm, cocoa-rich anchor for the layers to come. Above this foundation, we build a light and airy cheesecake-inspired layer, followed by a thick, velvety chocolate pudding that anchors the rich profiles of the dessert.
The signature turtle flavor profile is achieved through a generous drizzle of decadent caramel sauce and a scattered handful of toasted pecan pieces. By incorporating elements like Cool Whip or a stabilized whipped cream, the bars achieve a texture that is simultaneously light, fluffy, and incredibly indulgent. It is a dessert born from the spirit of simplicity, where every ingredient plays a vital role in balancing sweetness with a slight, nutty crunch.
Reasons to Try No Bake Turtle Dream Bars
The primary joy of these bars lies in their remarkable ease of assembly, as they require no baking skills or specialized pastry experience. They are perfect for busy home cooks who want to provide a homemade treat without spending their entire evening by the stove. Because the process is straightforward, it is also a wonderful recipe to introduce to children or those who are just beginning their journey into the culinary arts, fostering a sense of accomplishment with every step.
Beyond the simplicity, the flavor profile is universally loved and incredibly versatile. The combination of chocolate, caramel, and pecans is a timeless trio that appeals to both children and adults alike, making it a reliable staple for potlucks, parties, or weekend family celebrations. The fact that this recipe can be prepared in advance and tucked away in the freezer means you always have a comforting dessert ready to pull out when unexpected guests arrive or when the heart simply craves something sweet and meaningful.
Ingredients Needed to Make No Bake Turtle Dream Bars
-
20 chocolate sandwich cookies with filling (finely crushed)
-
4 tablespoons unsalted butter (melted)
-
3.9 ounces instant chocolate pudding mix
-
1 1/2 cups cold milk (use whole milk for best texture)
-
6 ounces cream cheese (softened to room temperature for smooth blending)
-
1/2 cup confectioners’ sugar
-
1/2 teaspoon pure vanilla extract
-
8 ounces whipped topping or homemade stabilized whipped cream (divided into two portions)
-
1 cup pecan pieces (divided)
-
1/3 cup, plus 2 tablespoons caramel sauce (divided)
-
Chocolate sauce (for final drizzling)
Instructions to Make No Bake Turtle Dream Bars – Step by Step
Step 1: Start by preparing your 8-inch by 8-inch square baking dish. Line it with parchment paper, allowing the edges to overhang slightly. This simple step is an act of kindness to your future self, as it ensures you can lift the entire block out of the pan once set and achieve perfectly clean, professional-looking squares every time.
Step 2: In a food processor, pulse the chocolate sandwich cookies until they become fine, uniform crumbs. In a medium microwave-safe bowl, melt the butter and gently stir in the cookie crumbs until the mixture resembles wet sand. Press this mixture firmly into the bottom of your prepared pan to create a dense, even base, then tuck the pan into the freezer to chill for 30 minutes while you prepare the next layers.
Step 3: In a medium bowl, whisk the instant chocolate pudding mix with the cold milk. It is important to stick to 1 1/2 cups of milk instead of the usual 2 cups listed on the box, as this creates a thicker, more stable pudding that will not bleed into the other layers. Once whisked, set it aside in the refrigerator to firm up.
Step 4: In a separate mixing bowl, beat the softened cream cheese until it is perfectly smooth and creamy. Gradually add the confectioners’ sugar and vanilla extract, beating until fully combined. Using a rubber spatula, gently fold in one cup of your whipped topping, ensuring a light, airy consistency before spreading this cheesecake mixture evenly over your chilled cookie crust.
Step 5: Carefully spread the prepared chocolate pudding over the cheesecake layer. It is a slow, meditative process, so take your time to ensure the edges are covered, creating distinct layers that look beautiful when sliced later. Drizzle 1/3 cup of the caramel sauce over the pudding and sprinkle with 3/4 cup of the pecan pieces.
Step 6: Finally, dollop the remaining whipped topping over the pecans and spread it gently until the surface is smooth. Place the dish back into the freezer for at least two hours to allow everything to set firmly. Before serving, drizzle with the remaining caramel and chocolate sauces, garnish with the leftover pecans, and slice into squares to enjoy.
Chef’s Tips for a Perfect Result
-
Use room-temperature cream cheese: It incorporates 30% better into the sugar without leaving those frustrating little lumps in your cheesecake layer.
-
Measure your milk precisely: Since this is a no-bake dessert, keeping the pudding ratio thicker is essential for the bars to maintain their shape when sliced.
-
Chill the whisk and bowl: If making your own whipped cream, chilling your equipment beforehand helps the cream whip to stiff peaks much faster.
-
Line the pan properly: Using parchment paper ensures your hard work doesn’t stick to the bottom, allowing for that clean lift when you are ready to serve.
-
Toast your pecans: For an extra depth of flavor, lightly toast your pecan pieces in a dry skillet for three minutes before adding them to the bars.
Variations and Substitutions
-
Gluten-Free Alternative: Replace the standard chocolate sandwich cookies with gluten-free chocolate sandwich cookies, ensuring they are crushed into a fine consistency for the crust.
-
Dairy-Free Option: Substitute the cream cheese with a dairy-free cream cheese block, use a coconut-based whipped topping, and ensure the pudding mix is dairy-free, using an almond or oat milk base.
-
Nut-Free Version: If you have guests with allergies, simply omit the pecans and replace them with toasted sunflower seeds or roasted pumpkin seeds for that necessary crunch.
-
Lower-Sugar Swap: Use sugar-free instant pudding, a keto-friendly confectioners’ sugar substitute, and sugar-free caramel sauce to significantly reduce the sugar content without sacrificing the dessert’s soul.
How to Serve and Pair
Serve these bars chilled straight from the refrigerator or freezer, as the temperature contrast makes the caramel and chocolate feel particularly luxurious. They pair beautifully with a warm, unsweetened cup of coffee or a delicate black tea, which helps balance the richness of the cheesecake and caramel layers. For special occasions, serve them on a simple white platter with a few fresh berries on the side to provide a bright, acidic counterpoint to the deep cocoa flavors.
Storage and Reheating
Refrigerator
Keep these bars stored in an airtight container in the refrigerator for up to 3 days. Ensure the lid is tight to prevent the whipped topping from absorbing other flavors from your fridge.
Freezer
For longer storage, these bars thrive in the freezer for up to two weeks. Wrap the container tightly in plastic wrap to prevent ice crystals, and allow them to thaw for about 10 minutes at room temperature before serving for the best texture.
Reheating
Because this is a frozen or chilled dessert, reheating is not recommended. If they are too firm, simply let them rest on the counter for a few moments so the caramel softens and the cream layers become velvety once again.
Frequently Asked Questions (FAQ)
Can I substitute the instant pudding for homemade cooked pudding?
Yes, you can use homemade pudding, but you must ensure it is chilled completely and thick enough to hold its shape before layering. Instant pudding is recommended here primarily because its quick-setting stabilizers help the bars hold their structural integrity without baking.
How do I know when the bars are perfectly set?
The bars are set when the top layer of whipped topping feels firm to the touch and the pudding layer no longer slides when you tilt the pan. A minimum of two hours in the freezer is usually sufficient for the ingredients to firm up, though three hours will ensure the cleanest slices.
My caramel layer became runny, is that okay?
It is perfectly normal for the caramel to soften once the bars are removed from the freezer and start coming up to room temperature. If you find it too messy, you can freeze the bars for an extra hour or drizzle the caramel immediately before serving rather than during the layering process.
Can I assemble these a day before I need them?
These bars are actually better when prepared a day in advance, as it allows the cookie base to soften slightly and the flavors to meld together perfectly. Keep them in the freezer until about 20 minutes before you plan to serve them to ensure they are at the ideal consistency.
How can I customize the flavors in these bars?
You can easily customize this recipe by swapping the chocolate pudding for butterscotch or vanilla pudding to create an entirely different flavor experience. Adding a pinch of flaky sea salt over the final drizzle of caramel also creates a sophisticated salted turtle profile that enhances the sweetness.
Conclusion
No Bake Turtle Dream Bars are a heartfelt invitation to slow down and savor the sweetness of the present moment. With their harmonious blend of crunchy crust, velvety pudding, and decadent caramel, they offer a comforting experience that feels as good as it tastes. I hope you find the same joy in assembling these layers as I do, and that they bring a touch of peace and sweetness to your table whenever you choose to share them.
Print
No Bake Turtle Dream Bars
- Prep Time: 20
- Total Time: 260
- Yield: 12 bars 1x
- Category: desserts
- Method: No Bake
- Cuisine: American
- Diet: Vegetarian
Description
Indulge in these effortless No Bake Turtle Dream Bars, a nostalgic layered dessert featuring a crisp chocolate cookie crust, a light and airy cheesecake-inspired layer, and a velvety chocolate pudding base. Topped with rich caramel sauce and toasted, crunchy pecans, this treat captures the classic turtle flavor profile without the need for an oven. Perfect for warm days or busy schedules, these bars offer a sophisticated yet deeply comforting experience that is sure to become a favorite for family gatherings and quiet moments of indulgence alike.
Ingredients
24 Oreo cookies, crushed
6 tablespoons unsalted butter, melted
8 ounces cream cheese, softened
1/2 cup powdered sugar
2 cups whipped topping, thawed
2 boxes (3.4 oz each) instant chocolate pudding mix
3 cups cold milk
1/2 cup caramel sauce
1 cup pecans, toasted and chopped
Instructions
Combine crushed Oreo cookies with melted butter and press firmly into the bottom of a 9×13 inch pan. Chill in the refrigerator for 10 minutes.
In a medium bowl, beat softened cream cheese with powdered sugar until smooth, then fold in 1 cup of the whipped topping.
Spread the cream cheese mixture evenly over the chilled cookie crust.
In a separate bowl, whisk the instant chocolate pudding mix with the cold milk for 2 minutes until thickened, then spread over the cream cheese layer.
Top with the remaining whipped topping and spread evenly.
Drizzle the caramel sauce generously over the top and sprinkle with toasted pecan pieces.
Refrigerate for at least 4 hours, or until firm, before slicing and serving.
Notes
Ensure the cream cheese is at room temperature to avoid lumps. Toasting the pecans lightly in a dry pan before chopping enhances their nutty flavor. Keep refrigerated until the very moment of serving to maintain the structure of the layers.
Nutrition
- Serving Size: 1 bar
- Calories: 320
- Sugar: 28g
- Sodium: 350mg
- Fat: 18g
- Saturated Fat: 8g
- Carbohydrates: 38g
- Fiber: 2g
- Protein: 4g
- Cholesterol: 30mg


