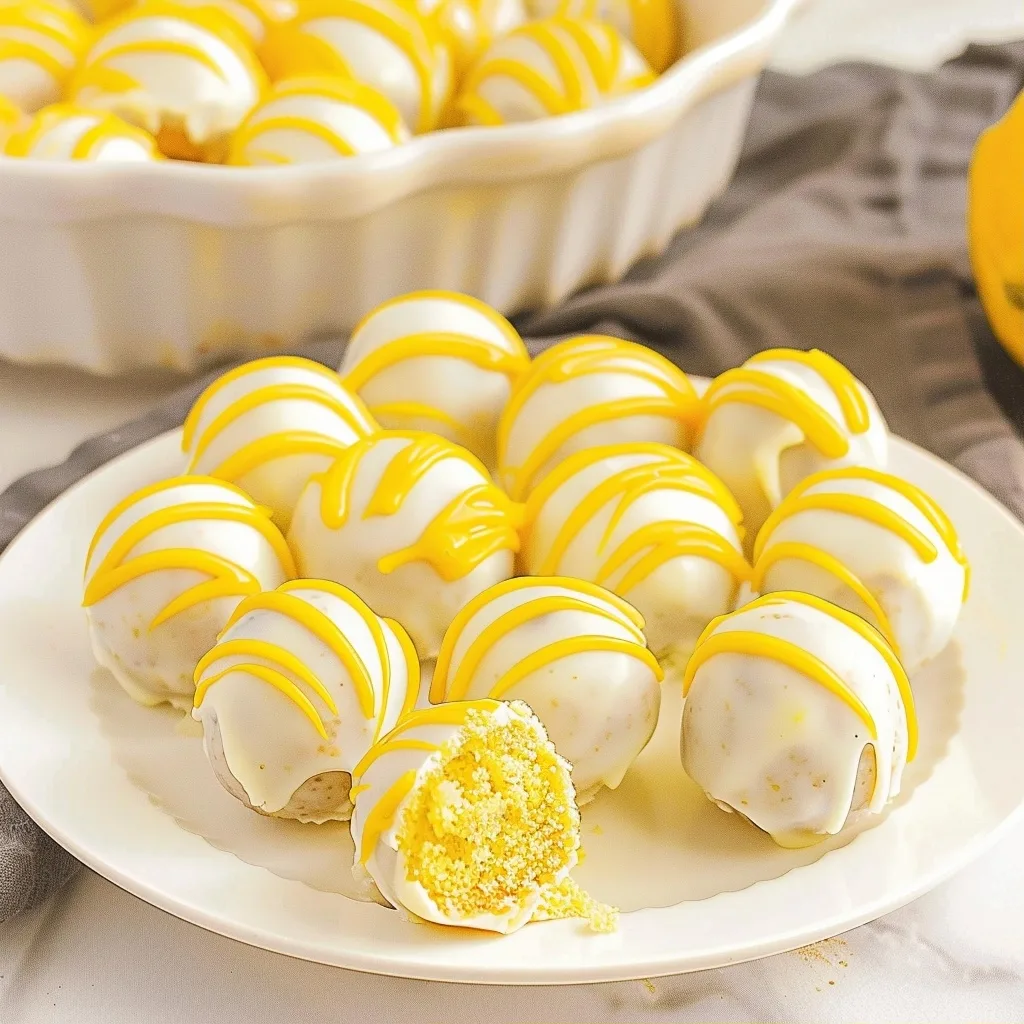
An Easy Lemon Cake Balls Recipe for Every Occasion
An easy lemon cake balls recipe is the kind of kitchen companion that holds the sunshine of a summer afternoon in every single bite. There is something profoundly grounding about taking a simple cake, transforming it into something new, and sharing that labor of love with those who matter most. Just like the afternoons I spent watching my grandmother stir batter in our sun-drenched kitchen, this recipe reminds us that food is about connection, patience, and the joy of creating something sweet from scratch.
These treats strike the perfect balance between a tender, citrus-infused cake center and a crisp, velvety chocolate shell. Whether you are prepping for a festive celebration or simply seeking a quiet, meditative baking project on a rainy Tuesday, this easy lemon cake balls recipe is designed to be as healing to make as it is delightful to eat.
What is an Easy Lemon Cake Balls Recipe?
At its heart, this dish is a sophisticated evolution of the classic cake pop, stripped of the stick and elevated by high-quality ingredients. It begins with a standard lemon cake base that, once cooled and crumbled, is folded into a luxurious amount of softened cream cheese. This marriage of tart lemon crumb and creamy, tangy cheese creates a dense, fudgy texture that feels far more indulgent than your average dessert.
Originating from the ingenuity of home bakers who wanted to reduce waste while maximizing flavor, these bites have become a staple of comfort baking. The combination of vibrant citrus zest notes and the smoothness of vanilla melting wafers makes it a unique centerpiece for tea parties or family gatherings. It is a humble recipe that honors the tradition of repurposing simple pantry staples into something truly magical.
Reasons to Try This Easy Lemon Cake Balls Recipe
Beyond their bright, refreshing flavor profile, these cake balls are incredibly versatile for busy home cooks who crave a homemade touch without the stress. Because they require chilling time, they are the ideal make-ahead dessert, allowing you to focus on hosting once your guests arrive. The process of rolling and dipping is rhythmic and soothing, providing a rare opportunity to step away from the digital world and engage fully with your senses.
This recipe is also a wonderful entry point for beginners who may feel intimidated by elaborate layer cakes. There is no need for perfect piping or complex assembly; the charm of these balls lies in their uniform, elegant appearance and their melt-in-your-mouth quality. They are perfectly sized for portion control, making them an excellent option for school lunches, office treats, or a light evening indulgence after a long day.
Ingredients Needed to Make Easy Lemon Cake Balls
- 15.25 ounce lemon cake mix (boxed variety is perfect for this)
- 1 cup water (filtered if possible for purity)
- 1/2 cup vegetable oil (or melted coconut oil for a lighter touch)
- 3 large eggs (at room temperature)
- 8 ounces cream cheese (softened to room temperature for a lump-free texture)
- 16 ounces Ghirardelli vanilla melting wafers
- ¾ cup yellow candy melts (for that vibrant pop of color)
Instructions to Make Easy Lemon Cake Balls – Step by Step
Step 1: Begin by preheating your oven to the temperature recommended on your cake mix box. Line two baking sheets with parchment paper, which ensures easy cleanup later. In a large mixing bowl, combine your lemon cake mix, water, vegetable oil, and eggs. Whisk them together until the batter is smooth and aromatic, then pour the mixture into a greased baking dish and bake according to the package instructions. Allow the cake to cool completely on a wire rack, as a warm cake will melt the cream cheese rather than binding with it.
Step 2: Once the cake has reached room temperature, use your hands to crumble it into fine, even pieces directly within the pan. In a separate bowl, beat the softened cream cheese with an electric mixer until it is light, fluffy, and completely smooth. Gradually fold the crumbled cake into the cream cheese, mixing on low speed until a thick, uniform dough forms. Use a rubber spatula to scrape the sides, ensuring every bit of moisture is incorporated into the cake base.
Step 3: Using a 1 ½ inch cookie scoop, portion out the mixture into even balls. Roll each portion between your palms until smooth and rounded, then place them on your prepared baking sheets. Once all the balls are formed, place them in the refrigerator to chill for at least 2 hours. This step is essential because it firms up the structure, making them much easier to dip without falling apart.
Step 4: Melt your vanilla wafers using a double boiler or a microwave set to low power, stirring frequently to ensure a silky consistency. Working one at a time, use a fork to dip each chilled cake ball into the white chocolate, tapping the fork against the side of the bowl to let the excess drip away. Place the coated balls back onto the parchment paper to set.
Step 5: Finally, melt your yellow candy melts in a small piping bag or a plastic zip-top bag, using 30-second intervals in the microwave to avoid scorching. Massage the bag between intervals to keep the contents smooth. Carefully snip a tiny corner from the bag and drizzle the yellow coating over your white-coated balls in a decorative pattern. Return them to the refrigerator for about 10 minutes to allow the finish to harden completely before serving.
Chef’s Tips for a Perfect Result
- Use room-temperature eggs and cream cheese, as they incorporate 30% better into the mixture, creating a smoother, more consistent dough.
- Always chill your cake balls for the full two hours, as this ensures they hold their shape perfectly when you submerge them in the warm chocolate coating.
- When melting your wafers, add a tiny drop of vegetable oil if the mixture appears too thick, which helps achieve a professional-looking glossy finish.
- Gently tap your fork against the rim of the bowl after dipping; this removes the excess chocolate that could otherwise create an uneven base.
Variations and Substitutions
- Gluten-Free Alternative: Swap the standard lemon cake mix for a high-quality gluten-free lemon cake blend, ensuring you adjust the liquid ratios as noted on the package for the best crumb.
- Vegan Option: Replace the eggs with flax eggs and use a dairy-free cream cheese alternative and vegan white chocolate melting chips for a plant-based version that maintains the same zest.
- Budget Swap: If you cannot find Ghirardelli wafers, high-quality white almond bark or white baking chocolate bars melted with a teaspoon of coconut oil will produce a similarly luxurious result.
How to Serve and Pair
Serve these cake balls on a chilled marble platter or a vintage lace doily to highlight their bright, cheerful appearance. They pair beautifully with a delicate Earl Grey tea or a glass of chilled sparkling water with a slice of fresh lemon. They are the perfect “grab-and-go” dessert for spring luncheons, garden showers, or as a vibrant post-dinner treat when you want something light yet memorable.
Storage and Reheating
Refrigerator: Keep your cake balls in an airtight container for up to one week. The cool temperature helps maintain the structural integrity of the cream cheese center, keeping them fresh and flavorful.
Freezer: These store exceptionally well in the freezer for up to three months. Place them in a single layer in a freezer-safe bag, ensuring they are tightly sealed to prevent freezer burn.
Room Temperature: Avoid leaving these out for extended periods, especially in warm weather, as the chocolate coating may soften and the cream cheese center can lose its ideal texture. Serve directly from the refrigerator for the best experience.
Frequently Asked Questions (FAQ)
Can I use a different flavor of cake mix?
Yes, you can substitute the lemon mix for any flavor, such as vanilla, strawberry, or yellow cake, though lemon offers a unique, refreshing profile.
How do I know when the cake balls are properly chilled?
They are ready when they feel firm to the touch and the surface is dry, indicating the cream cheese has fully set inside the cake crumb.
Why did my chocolate coating crack after dipping?
Cracking usually happens if the cake balls were too cold when dipped or if the chocolate was overheated, causing it to lose its flexibility.
Can I assemble these a day before a party?
Absolutely, preparing them the day before allows the flavors to meld beautifully, making them taste even better when served the next day.
How can I make them look more professional?
Use a high-quality chocolate piping bag for your drizzle and consider adding a tiny sprinkle of lemon zest on top of the wet chocolate for a beautiful finish.
Conclusion
This easy lemon cake balls recipe is a testament to how simple ingredients can create moments of genuine joy in our busy lives. I encourage you to take the time to roll these yourself, savoring the citrus aroma as it fills your home with light and warmth. The signature brightness of the lemon combined with the creamy, velvety interior makes this a dessert you will want to return to again and again.
Print
Easy Lemon Cake Balls
- Prep Time: 30
- Cook Time: 30
- Total Time: 90
- Yield: 24 cake balls 1x
- Category: desserts
- Method: Baking
- Cuisine: American
- Diet: Vegetarian
Description
Bright, refreshing, and indulgent, these easy lemon cake balls capture the essence of sunshine in a single bite. Made from a moist lemon cake base blended with creamy, tangy cream cheese and enrobed in a velvety white chocolate shell, these treats are perfect for tea parties or quiet moments of indulgence. They offer a sophisticated, fudgy texture that is simple to prepare yet looks like a professional confection. Enjoy the rhythmic process of crafting these delightful, citrus-infused bites for your next gathering.
Ingredients
1 box (15.25 oz) lemon cake mix
1 cup water
1/2 cup vegetable oil
3 large eggs
8 oz cream cheese, softened
2 cups white chocolate melting wafers
1 tsp lemon zest (optional for garnish)
Instructions
Preheat oven to 350°F (175°C) and grease a 9×13 inch baking pan.
Prepare the cake mix according to the package instructions using water, oil, and eggs.
Bake as directed on the box and allow to cool completely.
Once cool, crumble the cake into a large bowl using your hands or a fork.
Add the softened cream cheese to the crumbled cake and mix until a dough-like consistency forms.
Roll the mixture into 1-inch balls and place them on a parchment-lined baking sheet.
Freeze the balls for 30 minutes to firm up.
Melt the white chocolate wafers in a microwave-safe bowl in 30-second intervals until smooth.
Dip each chilled cake ball into the melted chocolate, coating evenly, and return to the parchment paper.
Allow the chocolate to set completely before serving.
Notes
Keep the cake balls stored in an airtight container in the refrigerator for up to one week.
You can add a tiny bit of lemon extract to the cream cheese mixture for extra zing.
If the chocolate is too thick, stir in a teaspoon of vegetable oil to thin it out.
Nutrition
- Serving Size: 1 cake ball
- Calories: 195
- Sugar: 18g
- Sodium: 160mg
- Fat: 10g
- Saturated Fat: 4g
- Carbohydrates: 26g
- Fiber: 0g
- Protein: 2g
- Cholesterol: 30mg


