Reeses Peanut Butter Cup Pie is more than just a dessert; it’s a warm embrace in a dish, a joyful celebration of classic flavors that always brings a smile to faces gathered around the table. It’s the kind of treat that whispers old memories and creates new ones, echoing the comforting aromas that filled my childhood kitchen. This no-bake wonder is so simple, yet so profoundly satisfying, a testament to how sometimes the most beloved flavors just need a little love to become something truly magical. Imagine the sheer delight as you and your loved ones discover the symphony of creamy peanut butter and rich chocolate in every bite, a true testament to the magic that happens when simple ingredients are brought together with care. The anticipation when it emerges from the chill, perfectly set and ready to be shared, is a feeling unlike any other, a sweet promise that good things are about to happen.
In our busy lives, finding moments of peace and connection can feel like a treasure. For me, the kitchen has always been that sanctuary, a place where the gentle hum of the mixer or the quiet whisking of ingredients can soothe the soul. This Reeses Peanut Butter Cup Pie recipe is born from that very spirit. It’s designed for those who cherish tradition, for those who believe food is a language of love, and for anyone who finds comfort in the rich, familiar taste of Reese’s. It’s a recipe that doesn’t ask for complicated techniques, but instead, invites you to slow down, to savor the process, and to create something that feels like a warm hug. It’s a way to share a piece of that heart and home, one delicious slice at a time. Get ready to fall in love with this dessert; it’s a keeper.
What is Reeses Peanut Butter Cup Pie?
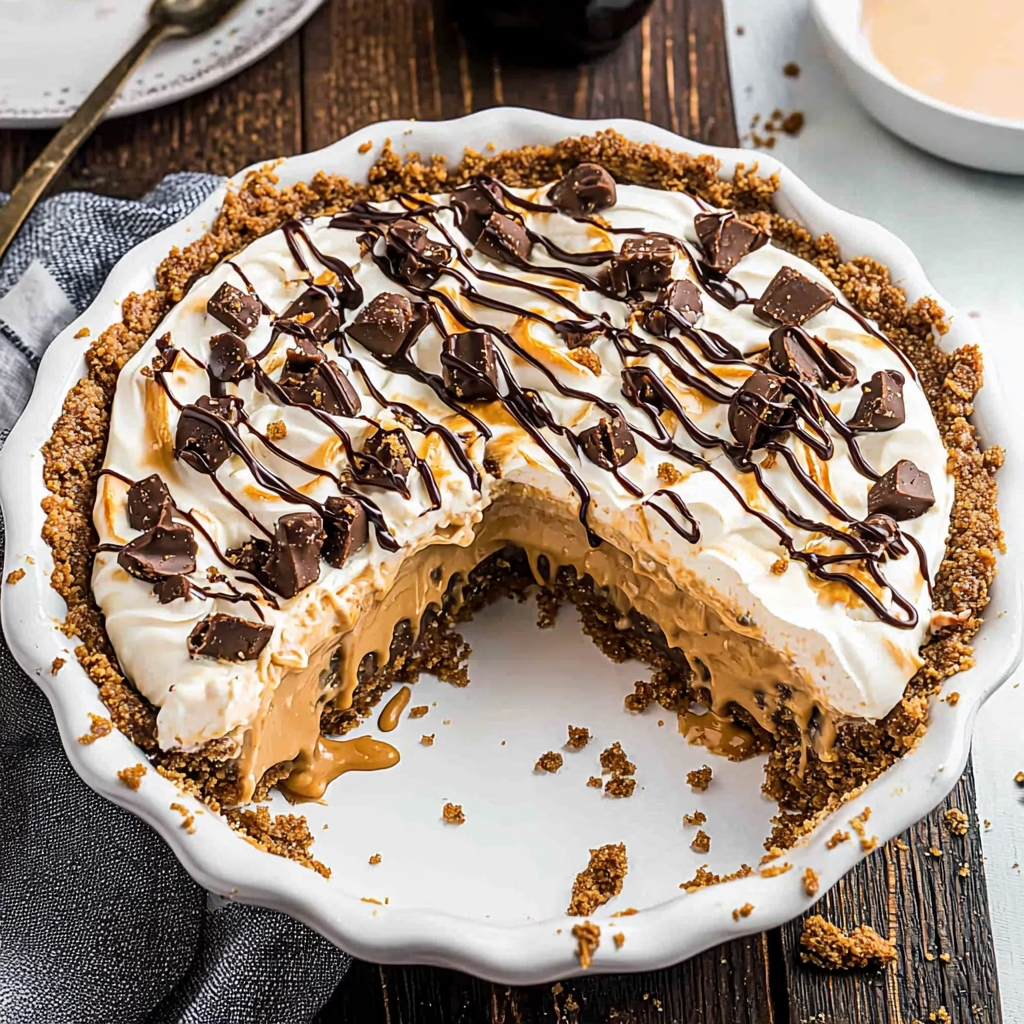
Reeses Peanut Butter Cup Pie is a beloved no-bake dessert that captures the iconic, irresistible combination of creamy peanut butter and rich chocolate, all nestled within a crisp cookie crust. It’s a modern classic, a tribute to the universally adored Reese’s Peanut Butter Cups that many of us grew up with. This pie transforms that beloved candy bar experience into a luscious, chilled dessert, perfect for any occasion that calls for a touch of indulgence and a whole lot of happiness. It’s a delightful twist on traditional pies, offering a smooth, velvety texture from its creamy peanut butter and cream cheese filling, topped with a generous swirl of whipped cream and more delightful peanut butter cups.
While it doesn’t have a single, ancient origin story like some traditional recipes, this pie owes its existence to the enduring popularity of peanut butter and chocolate as a dream team. It emerged as home cooks sought to replicate their favorite candy’s flavor in an elegant, shareable dessert format, especially with the convenience of no-bake recipes. The beauty lies in its simplicity and its powerful flavor profile – the sweet, slightly salty peanut butter filling perfectly complements the bittersweet chocolate notes from the chopped candies and the crust. It’s a dessert designed to be fuss-free yet incredibly decadent, making it a go-to for birthday parties, holiday gatherings, or simply as a way to add a little extra sweetness to a regular Tuesday evening. It’s like bottling sunshine and chocolatey happiness into a single, delightful pie.
Reasons to Try Reeses Peanut Butter Cup Pie
There are so many heartwarming reasons why this Reeses Peanut Butter Cup Pie deserves a spot in your recipe collection. First and foremost, the taste is simply divine – it’s a harmonious blend of creamy peanut butter and rich chocolate that appeals to almost everyone. It’s wonderfully easy to make, requiring no oven time, which means less stress and more time spent enjoying the company of loved ones, or simply taking a quiet moment for yourself. This makes it an ideal choice for beginner bakers, busy individuals, or anyone looking for a show-stopping dessert without the fuss of traditional baking. The simple joy it brings is truly priceless.
This pie is also incredibly versatile and always a crowd-pleaser. Whether you’re hosting a family reunion, bringing a dish to a potluck, or just craving a sweet treat, this Reeses Peanut Butter Cup Pie is guaranteed to be a hit. Its no-bake nature makes it perfect for warmer months when you don’t want to heat up the kitchen, and it can be made ahead, freeing you up on the day of your event. The sheer comfort and nostalgia it evokes, reminiscent of childhood treats and happy times, adds an emotional layer that elevates it beyond just dessert. It’s a way to share love and create tangible, happy memories, woven with familiar and beloved flavors.
Ingredients Needed to Make Reeses Peanut Butter Cup Pie
To create this slice of peanut butter and chocolate heaven, you’ll gather a few key ingredients. For the delightful cookie crust, you will need:
- 24 Oreo cookies (ensure they include their creamy filling)
- 4 tablespoons butter (melted)
For the luscious pie filling, you will need:
- 8 ounces cream cheese (softened to room temperature – this is crucial for a smooth texture!)
- ½ cup creamy peanut butter (your favorite brand works beautifully)
- ¾ cup powdered sugar (for sweetness and that signature airy texture)
- 1 teaspoon vanilla extract (a touch to enhance the flavors)
- 8 ounces frozen whipped topping (thawed – store-bought or homemade works wonderfully)
- 12 to 14 ounces mini Reese’s Peanut Butter Cups (divided – about half for the filling and the rest for topping, chopped for better distribution)
And for that beautiful final touch, the garnish:
- 8 ounces whipped topping (additional for topping)
- Mini Reese’s Peanut Butter Cups (remaining ones, some whole for decoration, some chopped)
- Hot fudge topping (optional, for drizzling)
- Melted peanut butter (optional, for drizzling)
Instructions to Make Reeses Peanut Butter Cup Pie – Step by Step
Let’s begin by creating the foundation for our masterpiece, the no-bake Oreo pie crust. Take your 24 Oreo cookies, complete with their delightful filling, and pulse them in a food processor until they transform into fine, cohesive crumbs. This usually takes about 30 to 45 seconds of gentle blending. Once you have your crumbs, transfer them into a large mixing bowl. Now, add the 4 tablespoons of melted butter to the crumbs, stirring gently until every crumb is beautifully coated. Alternatively, you can add the melted butter directly to the food processor and pulse a few times until the mixture resembles wet sand. This process ensures a crust that holds together beautifully, offering that satisfying crispness to contrast the creamy filling.
Next, it’s time to shape our crust. Take this buttery crumb mixture and press it firmly and evenly into the bottom of an ungreased 9-inch pie dish. I find using a ¼ cup dry measuring cup with a flat bottom to be the perfect tool for this; it helps to create a smooth, even surface and packs the crumbs tightly. Ensure you press all the way to the edges and up the sides slightly, creating a lovely vessel for our delicious filling. Once your crust is beautifully pressed into place, we need to give it a moment to firm up and get ready. To do this, carefully place the pie dish into the freezer for at least 30 minutes. This chilling time is essential for setting the crust, ensuring it holds its shape and provides a sturdy base when you’re ready to add the filling.
While our crust is getting happily chilled, let’s prepare the heart of the pie: the decadent filling. In the bowl of a stand mixer, or using a hand mixer and a large bowl, combine the 8 ounces of very softened cream cheese, ½ cup of creamy peanut butter, and ¾ cup of powdered sugar. Beat these ingredients together on medium speed until they are wonderfully creamy, smooth, and fluffy, with no lumps in sight. This smooth consistency is key to a luscious pie. Once you’ve achieved that perfect creaminess, add the 1 teaspoon of vanilla extract and mix just until it’s well combined, adding a subtle depth to the peanut butter and chocolate notes.
Now comes the moment to lighten and fluff up our filling, and to add those beloved Reese’s pieces! Gently fold in the 8 ounces of thawed whipped topping. It’s important to do this by hand with a spatula, using a gentle folding motion, to maintain the airy texture of the whipped topping. Don’t overmix; you want to preserve that delightful lightness. Finally, fold in about half of your chopped mini Reese’s Peanut Butter Cups – you want enough to get those wonderful chocolate and peanut butter pockets throughout the filling, but save plenty for topping! Once everything is just combined, your glorious filling is ready.
With the crust perfectly chilled and the filling ready to go, it’s time to bring them together. Carefully spoon the creamy peanut butter filling over the chilled Oreo crust. Spread it out evenly using your spatula, ensuring it reaches all the corners and edges, creating a beautiful, smooth surface. Now, this luscious creation needs time to set and allow all those wonderful flavors to meld together. Cover the pie loosely with plastic wrap and place it back into the refrigerator. It’s important to let it chill for at least 4 hours, but for the most beautifully set pie that slices cleanly, I highly recommend chilling it overnight. This patience will be richly rewarded when you see how perfectly it holds its shape.
Finally, the moment of truth and artistry: garnishing your Reeses Peanut Butter Cup Pie. Once the pie has chilled thoroughly and is beautifully set, it’s time to make it visually stunning. Spoon or pipe the remaining 8 ounces of whipped topping over the surface of the pie, creating beautiful swirls and peaks. The key to those gorgeously clean slices often mentioned is to place the pie in the freezer for about an hour *after* topping it with whipped cream, but *before* slicing. This final chill firms it up just enough. Arrange the reserved whole and chopped mini Reese’s Peanut Butter Cups artfully over the whipped topping. For an extra touch of indulgence, consider drizzling with warm hot fudge topping and a swirl of melted peanut butter just before serving. Slice with a sharp knife, wiping it clean between cuts for the neatest presentation. This final touch makes it truly irresistible!
Chef’s Tips for a Perfect Result
- Use room-temperature cream cheese: This is essential for achieving a silky-smooth, lump-free filling that blends seamlessly with the peanut butter and powdered sugar.
- Don’t overmix the whipped topping: Gently fold it in to maintain its airy structure, which creates a lighter, fluffier pie filling.
- Chill consistently: Allow the pie at least 4 hours to set, but overnight chilling is highly recommended for the best texture and easiest slicing.
- Prep the crust properly: Pressing the crumbs firmly and freezing the crust ensures it stays intact and provides a delightful textural contrast.
- Chop the peanut butter cups: Chopping about half of the peanut butter cups for the filling helps distribute their delightful flavor and texture throughout the pie.
- Consider a final freeze before slicing: Chilling the fully assembled and topped pie in the freezer for about an hour before serving helps create those clean, bakery-style slices.
Variations and Substitutions
Decadent Double Chocolate Crust
- What to change: Substitute half of the Oreo cookies with chocolate wafer cookies or even chocolate graham crackers.
- Suggested substitute: Use 12 Oreo cookies and 12 chocolate wafer cookies.
- How it impacts flavor or texture: This variation deepens the chocolate notes, making the crust even more intensely chocolatey, without significantly altering its texture.
Peanut Butter Lover’s Dream Filling
- What to change: Incorporate more peanut butter or a different type of peanut butter into the filling.
- Suggested substitute: Increase creamy peanut butter to 2/3 cup, or swirl in 2-3 tablespoons of crunchy peanut butter for texture.
- How it impacts flavor or texture: This will intensify the peanut butter flavor and add a slightly different mouthfeel, depending on the type of peanut butter used.
Gluten-Free Alternative
- What to change: Swap the Oreo cookies for a gluten-free chocolate cookie or graham cracker crust.
- Suggested substitute: Use a store-bought or homemade gluten-free chocolate cookie crust.
- How it impacts flavor or texture: The flavor will be very similar, though some gluten-free crusts might be slightly more crumbly or have a different crispness. Ensure all other ingredients are also gluten-free.
Healthier-ish Option
- What to change: Opt for lighter versions of key ingredients.
- Suggested substitute: Use light cream cheese, a natural peanut butter with less added sugar, and a sugar-free whipped topping. For the crust, consider a graham cracker crust made with less butter and potentially oats.
- How it impacts flavor or texture: This will reduce the overall sweetness and fat content. The texture might be slightly less rich and creamy, but it still offers a delicious peanut butter and chocolate experience.
How to Serve and Pair
Serving this magnificent Reeses Peanut Butter Cup Pie is all about showcasing its delicious layers and irresistible charm. For a truly elegant presentation, make sure the pie is well-chilled for clean slices. Top generously with whipped cream, creating soft peaks or elegant swirls. Then, artfully arrange whole and chopped mini Reese’s Peanut Butter Cups over the top. A final drizzle of warm hot fudge or melted peanut butter adds an extra touch of decadence that guests will adore. This pie is perfect for any celebration, from birthdays and anniversaries to holiday gatherings and casual get-togethers. It’s also a guaranteed hit for any dessert potluck or family dinner, always bringing a smile and a sense of comfort.
When it comes to pairing, this pie stands wonderfully on its own but also complements a variety of beverages. A cold glass of milk is a classic pairing that enhances the creamy, chocolatey flavors. For adults, a rich, dark coffee or a dessert wine with notes of chocolate or caramel can also be a delightful accompaniment. If you’re serving it at a party, consider pairing it with fresh berries like raspberries or strawberries, which offer a tart contrast to the pie’s sweetness. This thoughtful addition can add a burst of freshness and color to the dessert table.
Storage and Reheating
Refrigerator
Leftover Reeses Peanut Butter Cup Pie will keep beautifully when stored in the refrigerator. Keep it covered tightly with plastic wrap or in an airtight container to prevent it from absorbing odors from other foods in the fridge. It’s best enjoyed within 4 to 5 days of making. Chilling helps maintain its delightful creamy texture and keeps the crust crisp.
Freezer
This no-bake pie freezes exceptionally well, making it a perfect make-ahead dessert! Wrap the chilled, uncut pie tightly in a layer of plastic wrap, followed by a layer of aluminum foil or place it in a freezer-safe container. It can be stored in the freezer for up to 1 month. This is a great way to always have a delicious, ready-to-serve dessert on hand for unexpected guests or sweet cravings. The flavors can deepen and meld nicely during freezing.
Room Temperature
It’s best to avoid storing this pie at room temperature for extended periods. Due to the cream cheese and whipped topping, it should be kept chilled to maintain its texture and ensure food safety. If the pie has been out for more than 2 hours, it’s recommended to return it to the refrigerator.
Reheating
This Reeses Peanut Butter Cup Pie is designed to be served cold or chilled, so reheating is generally not necessary. If you are reheating a slice from the freezer, simply transfer it to the refrigerator to thaw for several hours or overnight. Alternatively, you can let it sit at room temperature for about 30-60 minutes until it reaches your desired chilled consistency. Avoid microwaving, as this will melt the filling and ruin the texture. The beauty of this pie is its effortless, no-heat serving!
Frequently Asked Questions (FAQ)
Can I substitute the peanut butter in this pie?
Yes, you can substitute the creamy peanut butter with crunchy peanut butter for added texture, or even try a different nut butter like almond butter or cashew butter for a unique flavor twist.
How do I know when my Reeses Peanut Butter Cup Pie is ready to serve?
The pie is ready when the filling is firm to the touch and has set completely. This typically occurs after at least 4 hours of chilling in the refrigerator, or overnight for optimal firmness.
My pie filling is lumpy, what did I do wrong?
Lumpy filling is usually caused by not softening the cream cheese enough. Ensure your cream cheese is at true room temperature and beaten until completely smooth before adding other ingredients.
Can I make this pie crust ahead of time?
Absolutely! You can prepare the Oreo crumb crust up to 2 days in advance and store it, covered, in the refrigerator. You can also freeze the crust for up to a month if you need to prep even further ahead.
What are the best ways to customize this pie?
You can customize this pie by adding different candies into the filling, using a flavored whipped topping, or swirling in chocolate ganache. Consider adding a layer of caramel sauce before the topping for extra indulgence.
CONCLUSION
This Reeses Peanut Butter Cup Pie is a dreamy, creamy, no-bake masterpiece that perfectly captures the joy of its iconic namesake. It’s a dessert meant to be shared, bringing smiles and sweet memories to any occasion. The irresistible combination of smooth peanut butter and rich chocolate makes every bite an absolute delight, a true testament to comfort and flavor.
Print
Reeses Peanut Butter Cup Pie
- Prep Time: 10 minutes
- Cook Time: 0 minutes
- Total Time: 4 hours 40 minutes
- Yield: 10 slices 1x
- Category: Dessert
- Method: No-Bake
- Cuisine: American
- Diet: Vegetarian
Description
No Bake Peanut Butter Cup Pie is a creamy, fluffy peanut butter cheesecake pie loaded with Reese’s peanut butter cups in a homemade Oreo cookie crust.
Ingredients
Homemade Oreo Cookie Crust
- 24 Oreo cookies, with filling
- 4 tablespoons butter, melted
Pie Filling
- 8 oz cream cheese, softened to room temperature
- 1/2 cup creamy peanut butter
- 3/4 cup powdered sugar
- 1 teaspoon vanilla
- 8 oz frozen whipped topping, thawed
- 12–14 oz mini Reese’s peanut butter cups, divided
Garnish
- 8 oz whipped topping
- Mini Reese’s peanut butter cups
- Hot fudge topping
- Melted peanut butter
Instructions
1. Pulse the Oreos, including the filling, in a food processor until fine crumbs form.
2. Add the crumbs to a large bowl, then stir in the melted butter until the crumbs are well coated.
3. Press the mixture into the bottom and sides of an ungreased 9-inch pie dish.
4. Place the crust in the freezer for 30 minutes to set.
5. In a stand mixer or with electric beaters, beat the softened cream cheese, peanut butter, and powdered sugar until creamy, smooth, and fluffy.
6. Add vanilla and mix until combined.
7. Fold in 8 oz whipped topping and chopped mini peanut butter cups.
8. Spread the filling into the chilled Oreo crust.
9. Refrigerate until completely chilled, at least 4 hours or overnight.
10. Top with additional whipped topping and chopped or whole mini Reese’s peanut butter cups.
11. Slice and drizzle with hot fudge topping and melted peanut butter, if desired.
Notes
Classic Oreo cookies work best for the crust. Avoid Thins, Double Stuff, or Mega Stuff cookies.
Salted or unsalted butter can be used in the crust.
For a baked Oreo crust, bake at 350°F for 10 minutes, then cool completely before filling.
Use room temperature cream cheese for the smoothest filling.
Freeze the crust before filling to help it stay firm.
Chill the pie for at least 4 hours for clean slices.
For bakery-style slices, freeze the topped pie for about 1 hour before serving.
Store refrigerated for 4-5 days or freeze for up to 1 month.
Nutrition
- Serving Size: 1 serving
- Calories: 575
- Sugar: 42g
- Sodium: 412mg
- Fat: 36g
- Saturated Fat: 15g
- Unsaturated Fat: 19g
- Trans Fat: 0.2g
- Carbohydrates: 58g
- Fiber: 3g
- Protein: 10g
- Cholesterol: 41mg