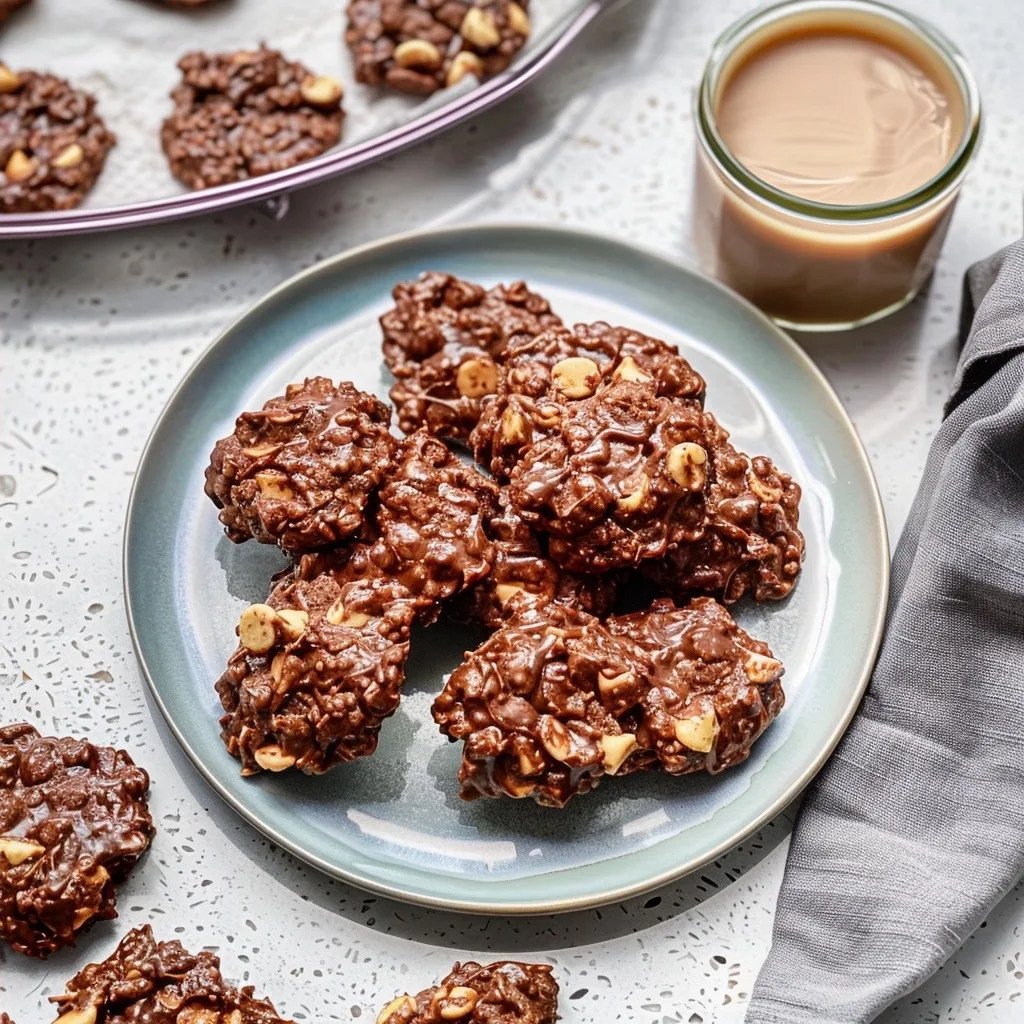
Classic No Bake Cookies: A Childhood Favorite
Classic no bake cookies are more than just a recipe; they’re a warm hug from the past, a sweet whisper of simpler times. These little rounds of joy, with their fudgy chocolatey center and hint of peanut butter, hold a special place in so many hearts. I remember my grandmother, her hands dusted with flour and a gentle smile, stirring this very mixture on her stovetop. The aroma would fill her small kitchen, a promise of instant gratification for a watchful grandchild.
This recipe is a testament to how uncomplicated ingredients can create something so wonderfully comforting and utterly delicious. It’s the kind of treat that brings people together, a shared experience built around sweet memories. Whether you’re revisiting a beloved childhood favorite or discovering it for the first time, these classic no bake cookies are guaranteed to bring a smile.
What is Classic No Bake Cookies?
Classic no bake cookies are a quick and incredibly easy cookie concoction, made without an oven. They get their signature fudgy texture and rich flavor from being cooked briefly on the stovetop before being dropped onto parchment paper to set. The magic lies in the perfect balance of sugar, cocoa, butter, and milk, brought together with creamy peanut butter and hearty oats.
Originating likely from the early 20th century, these cookies became a pantry staple for busy families looking for a fast, no-fuss dessert. They embody a kind of resourceful deliciousness, transforming simple pantry staples into a delightful treat. The combination of chocolate and peanut butter is timeless, evoking nostalgia for many and pure indulgence for all.
Reasons to Try Classic No Bake Cookies
The beauty of these classic no bake cookies lies in their sheer simplicity and speed. In under 30 minutes, you can have a batch of delightful treats ready to enjoy, a stark contrast to traditional baking which requires oven preheating and lengthy cooling times. This makes them perfect for those moments when a sweet craving strikes unexpectedly or when you need a crowd-pleasing dessert in a pinch.
They are also a fantastic option for beginner bakers or for involving children in the kitchen. The stovetop process is engaging and less intimidating than oven-based baking, and the results are so consistently satisfying. Plus, their adaptability means you can tailor them to your liking, ensuring everyone finds a reason to love them. They’re a truly democratic treat, accessible and beloved by all.
Ingredients Needed to Make Classic No Bake Cookies
To create these childhood treasures, you’ll only need a few pantry staples. Gather these simple items, and you’ll be on your way to cookie bliss in no time. The key is using good quality ingredients to ensure the best flavor.
- 2 cups granulated sugar
- ½ cup milk (any kind works, from whole to skim)
- ¼ cup unsweetened cocoa powder
- ½ cup butter (unsalted is preferred, but salted works too)
- ½ cup creamy peanut butter (regular, commercial style is best; avoid natural)
- ½ teaspoon vanilla extract
- 3 cups old-fashioned oats (rolled oats; avoid instant oatmeal)
Instructions to Make Classic No Bake Cookies – Step by Step
Creating these delightful treats is a joyful process, much like weaving a memory into existence. The gentle bubbling on the stovetop and the transformation of simple ingredients into a sweet, cohesive mixture is truly magical.
Step 1: Prepare Your Baking Sheets
Begin by lining two large baking sheets with parchment paper or silicone baking mats. This simple step is crucial; it prevents your beautiful cookies from sticking and makes for effortless cleanup, allowing you to focus entirely on the joy of creation. Having them ready beforehand means you can swiftly transfer the cookies once they’re perfectly mixed.
Step 2: Combine the Base Ingredients
In a sturdy, large saucepan, whisk together the granulated sugar, milk, and unsweetened cocoa powder. Take a moment to really blend them well. This initial combination sets the stage for the rich, chocolatey foundation of your cookies, ensuring a smooth texture and deep flavor.
Step 3: Melt in the Butter
Add the butter to the saucepan with the sugar mixture. Place the saucepan over medium-low heat. Allow the butter to melt gently, stirring occasionally, as it joins the other ingredients. This slow melting process helps everything meld together harmoniously before the next crucial step.
Step 4: Bring to a Boil
Now, increase the heat slightly and bring the mixture to a full, rolling boil, stirring regularly. You want to see vigorous bubbling across the entire surface of the liquid. This boiling stage is essential; it activates the sugar and creates the characteristic chewy, fudgy texture of your no-bake cookies. Patience here will be rewarded.
Step 5: The Minute of Boiling
Once the mixture reaches a steady, rolling boil, let it continue to boil rapidly for precisely 1 minute, maintaining constant stirring. This brief, intense cooking period caramelizes the sugars just enough to achieve the perfect consistency without burning. It’s a delicate balance, and this minute is where the magic truly happens to set the cookies.
Step 6: Infuse with Flavor
Remove the saucepan from the heat immediately after the minute of boiling. Stir in the creamy peanut butter and the pure vanilla extract with enthusiasm. The residual heat will melt the peanut butter into a smooth, luscious swirl, and the vanilla will lend its comforting aroma and depth of flavor.
Step 7: Incorporate the Oats
Gently fold in the old-fashioned oats into the warm, fudgy mixture. Stir until every single oat is thoroughly coated and the mixture is well-combined. The oats are what give these cookies their delightful chew and satisfying substance, transforming the liquid base into the familiar texture of no-bake cookies.
Step 8: Shape and Set
Working quickly while the mixture is still warm and pliable, drop rounded tablespoonfuls onto your prepared baking sheets. You can use two spoons or a cookie scoop for this. Allow the cookies to cool completely on the baking sheets, which usually takes about 20–30 minutes at room temperature, until they are set and no longer sticky.
Step 9: Chill for Perfection (Optional)
Once the cookies have firmed up, you can enjoy them immediately as they are. However, for an even firmer texture and a richer flavor that truly settles in, you might like to chill them in the refrigerator for a bit. This step isn’t strictly necessary, but it does enhance their delightful chewiness.
Chef’s Tips for a Perfect Result
- Use regular creamy peanut butter, not natural peanut butter. The oil separation in natural peanut butter can affect the cookie’s texture and cause it to spread too much.
- Measure your ingredients precisely, especially the sugar and cocoa powder, as they are key to achieving the correct texture and flavor balance.
- Don’t skip the rolling boil stage or reduce the boiling time. This step is crucial for cooking the sugar properly and ensuring the cookies set up firm.
- Stir constantly during the boiling phase to prevent scorching. The heat needs to be distributed evenly to create a smooth, consistent mixture.
- Remove from heat promptly. Overcooking after the initial boil can lead to dry or crumbly cookies.
- Work relatively quickly when dropping the cookies. As the mixture cools, it will thicken, making it harder to scoop and shape.
Variations and Substitutions
While the classic recipe is perfection, sometimes your pantry or your palate calls for a little twist. Here are a few delightful ways to make these cookies your own:
- Nut Butter Swap: Instead of peanut butter, try almond butter or cashew butter for a slightly different nutty profile. The consistency might vary slightly, so add a tablespoon less milk if the mixture seems too thin.
- Chocolate Chip Boost: For an extra burst of chocolate, stir in about ½ cup of semi-sweet or dark chocolate chips along with the oats. They will melt slightly, adding pockets of rich chocolate.
- Toasted Oats: Lightly toasting your old-fashioned oats in a dry skillet for a few minutes before adding them can deepen their flavor and add a subtle nutty note. Be careful not to burn them.
How to Serve and Pair
These classic no bake cookies are wonderfully versatile, perfect for any moment that calls for a touch of sweetness. Serve them at your next impromptu gathering, pack them for a school lunch treat, or simply enjoy one with your afternoon tea or coffee. They are a comforting accompaniment to a glass of cold milk, a timeless pairing that sparks pure joy.
Presentation can be as simple or as elaborate as you wish. Arrange them on a rustic wooden board for a charming touch, or serve them on a classic white plate. They are especially delightful during autumn gatherings, holiday cookie platters, or any casual get-together where a sense of comfort and togetherness is desired.
Storage and Reheating
Refrigerator
Stored in an airtight container, classic no bake cookies will keep beautifully in the refrigerator for up to 1 week. This is the best method to maintain their chewy texture and prevent them from becoming too soft.
Freezer
For longer storage, wrap individual cookies tightly in plastic wrap, then place them in a freezer-safe bag or container. They can be kept frozen for up to 2-3 months. Thaw them at room temperature for about 15-20 minutes before enjoying.
Room Temperature
While they can be stored at room temperature in an airtight container for 2–3 days, they may become softer, especially in warmer climates. If you prefer a firmer cookie, the refrigerator is your best bet.
Reheating
These cookies are best enjoyed without reheating, as they are designed to set at room temperature or chilled. If they have become too hard from refrigeration, you can gently warm them for just a few seconds in the microwave or on a very low oven setting to soften them slightly, but be cautious not to overdo it.
Frequently Asked Questions (FAQ)
Can I substitute quick oats for old-fashioned oats?
Yes, you can substitute quick oats for old-fashioned oats, but be aware that it may result in a slightly softer and chewier cookie. Quick oats absorb liquid faster and break down more easily during the cooking process.
How do I know when my classic no bake cookies are done?
The cookies are done when they have cooled and set to a firm, but still slightly chewy, texture. They should no longer feel sticky to the touch when gently pressed after about 20–30 minutes of cooling at room temperature.
My no bake cookies turned out too soft and crumbly, what happened?
This often happens if the sugar mixture wasn’t boiled long enough, preventing it from reaching the correct consistency, or if too much liquid was used. Ensure you reach a full rolling boil for the specified minute and stir frequently.
Can I make classic no bake cookies ahead of time?
Absolutely! These cookies are perfect for making ahead. Once cooled and set, store them in an airtight container at room temperature or in the refrigerator. They are even better the next day as the flavors meld.
What are the best ways to customize classic no bake cookies?
The best way to customize is by adding mix-ins like chocolate chips, shredded coconut, or chopped nuts when you add the oats. You can also experiment with different nut butters or a touch of sea salt on top for a sweet and salty finish.
CONCLUSION
Classic no bake cookies are a treasure trove of comfort and simplicity. They are a delightful way to invoke cherished memories and create new ones, bringing a touch of homemade magic to any occasion. Dive into this recipe and experience the irresistible charm of a perfectly balanced chocolate and peanut butter treat.
Print
Classic No Bake Cookies
- Prep Time: 10
- Cook Time: 10
- Total Time: 20
- Yield: 30 cookies 1x
- Category: desserts
- Method: Stovetop
- Cuisine: American
- Diet: Vegetarian
Description
A quick and nostalgic treat, these soft, fudgy no-bake cookies combine rich cocoa, creamy peanut butter, and rolled oats for a simple stovetop dessert. Perfect for satisfying cravings in just minutes.
Ingredients
2 cups granulated sugar
½ cup milk (non-dairy if preferred)
½ cup unsalted butter (halal-certified if required)
¾ cup unsweetened cocoa powder
1 cup creamy peanut butter (ensure no alcohol in processing)
3 cups rolled oats
Instructions
Combine sugar, cocoa, butter, and milk in a saucepan
Stir over medium heat until mixture reaches a rolling boil
Simmer for 1 minute, then remove from heat
Add peanut butter and stir until smooth
Let the mixture cool slightly until it thickens slightly
Stir in rolled oats
Drop rounded tablespoons of dough onto parchment paper
Allow cookies to set for 5-10 minutes before serving
Notes
For halal compliance, use plant-based milk and halal-certified butter
Quick oats may provide better texture adhesion
Store in a sealed container at room temperature for up to 2 days or refrigerate for 5 days
Nutrition
- Serving Size: 1 cookie
- Calories: 182
- Sugar: 16g
- Sodium: 140mg
- Fat: 8g
- Saturated Fat: 3g
- Carbohydrates: 23g
- Fiber: 1g
- Protein: 2g
- Cholesterol: 30mg


