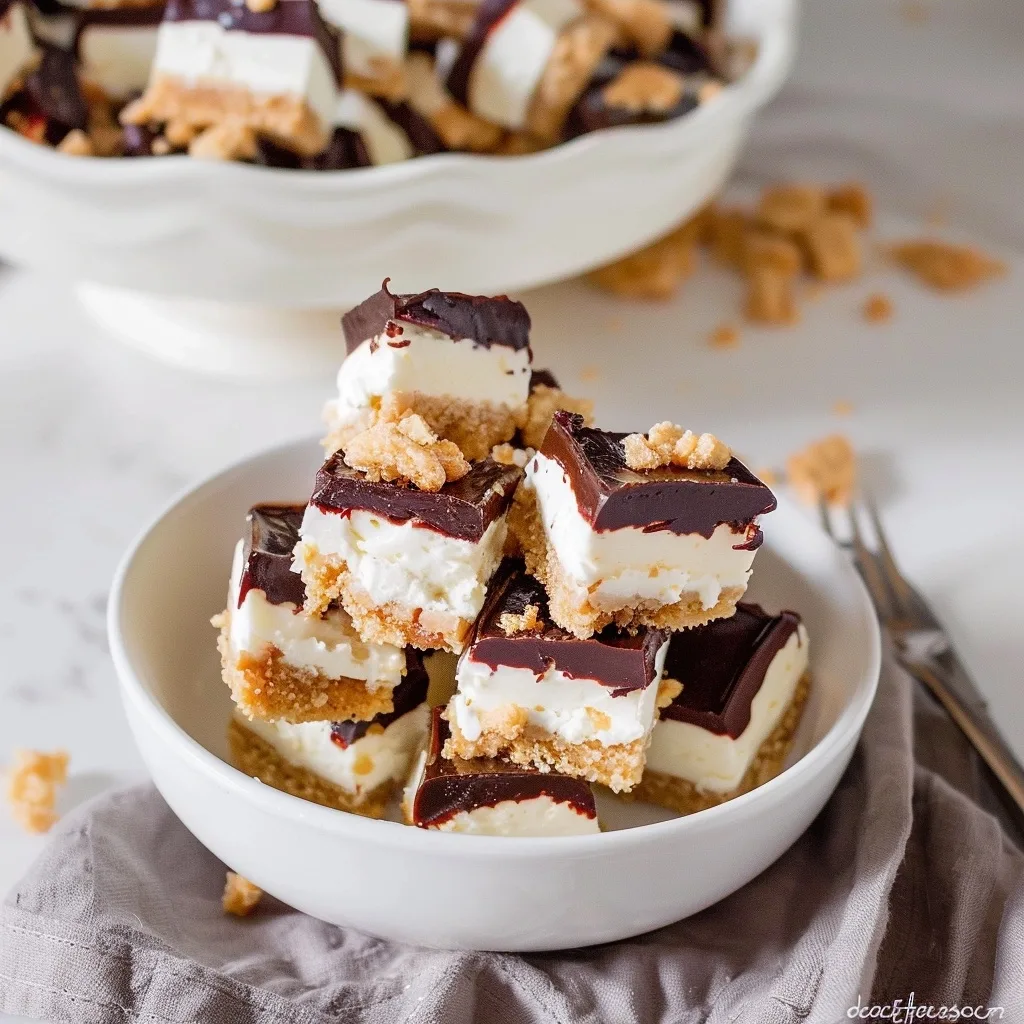
No bake cheesecake bites are a little piece of dessert heaven, conjured from simple ingredients and a sprinkle of kitchen magic. They are the whisper of a summer breeze on a warm afternoon, or the comforting hug of a winter evening, all rolled into one perfectly formed bite. For me, these little gems evoke memories of quiet afternoons spent with my grandmother, her hands dusting flour and sugar, her gentle hum a melody in the sunlit kitchen. This recipe is like that – simple, honest, and brimming with the kind of pure joy that only a truly good dessert can bring.
Making these no bake cheesecake bites is more than just following a recipe; it’s an act of self-care, a moment to slow down and create something beautiful. They’re perfect for those moments when a full-sized cheesecake feels too grand, or when you just need a small, decadent treat to brighten your day. Each bite is a creamy, dreamy promise, a little parcel of bliss ready to be savored. Let’s create something wonderful together.
What is No Bake Cheesecake Bites?
No bake cheesecake bites are precisely what they sound like: small, intensely satisfying portions of creamy, cool cheesecake that require absolutely no oven time. Unlike their baked counterparts, these delightful treats achieve their signature smooth and luscious texture through refrigeration or freezing, making them incredibly accessible even for novice bakers. They typically feature a crumbly, buttery crust—often made from crushed graham crackers—layered with a rich, tangy cream cheese filling, and sometimes finished with a luscious topping or dip.
The beauty of no bake cheesecake bites lies in their simplicity and versatility. They embody a spirit of effortless elegance, proving that you don’t need complex techniques or hours in front of a hot oven to create a truly show-stopping dessert. This style of cheesecake has roots in American baking, where convenience and flavor are often balanced with equal importance. It’s a dessert that feels both familiar and special, adaptable to countless variations and perfect for any gathering or quiet moment of indulgence.
Reasons to Try No Bake Cheesecake Bites
There are so many wonderful reasons why no bake cheesecake bites should become a staple in your recipe repertoire. Foremost among them is the sheer ease of preparation. With no baking involved, it’s a dessert that can be whipped up in mere minutes, making it perfect for spontaneous cravings or last-minute entertaining. The minimal effort required belies the incredible depth of flavor and luxurious texture you achieve, offering a delightful surprise for anyone who takes a bite.
These bites are also incredibly forgiving and wonderfully adaptable. They’re ideal for busy home cooks, families looking for a fun kitchen project with the kids, or anyone who wants to impress without the stress. Imagine a hot summer day, and you pull out these cool, creamy bites – pure bliss! They are a testament to the idea that the most delicious moments often come from the simplest creations, bringing joy and comfort without fuss.
Ingredients Needed to Make No Bake Cheesecake Bites
For the Graham Cracker Crust:
-
10 graham cracker sheets, finely crushed (about 1 1/2 cups worth of crumbs)
-
¼ cup (31 g) confectioners’ sugar
-
½ teaspoon kosher salt
-
6 Tbs (85 g) unsalted butter, melted
For the Cheesecake Filling:
-
2 cups (16 ounces or 450 g) block-style cream cheese, softened to room temperature
-
1 cup (120 g) confectioners’ sugar, sifted
-
1 teaspoon pure vanilla extract
For the Chocolate Coating:
-
2 cups (12 oz or 300 g) good quality chocolate chips (semisweet or dark work beautifully)
Instructions to Make No Bake Cheesecake Bites – Step by Step
Step 1: Let’s begin by preparing our cozy little home for these cheesecake wonders. Take a 9×9-inch baking pan and gently line it with parchment paper or aluminum foil, allowing some overhang on the sides – this will be our little helper when lifting the cheesecake out later. After lining, give it a quick spritz with nonstick cooking spray; this ensures everything releases beautifully.
Step 2: Now, into a large bowl, gather your crushed graham crackers, the fine confectioners’ sugar, and that hint of kosher salt. Pour over the melted unsalted butter. Using a spoon or spatula, stir this mixture with love until all the graham cracker crumbs have embraced the butter, creating a uniform, damp sand-like texture. This is the foundation of our treat.
Step 3: Transfer this delightful graham cracker mixture into your prepared pan. Take a flat-bottomed glass or the bottom of a measuring cup and press the crumbs firmly and evenly into the bottom of the pan. Think of it as tucking them in for a nice, settled rest. Once pressed, let this crust chill in the freezer for about 15 minutes to set firmly.
Step 4: While the crust is getting acquainted with the cold, let’s prepare the heart of our cheesecake. In the bowl of your stand mixer, or with a trusty hand mixer, beat the softened cream cheese until it’s wonderfully smooth and creamy. Gradually add the sifted confectioners’ sugar and that fragrant pure vanilla extract, continuing to beat until the filling is light, airy, and completely lump-free. It should feel like smooth velvet.
Step 5: Gently spread this luscious cream cheese filling evenly over the chilled graham cracker crust. Use a spatula to smooth the top, creating a pristine canvas for our next steps. Then, it’s time for another lovely chill; place the pan back into the freezer for at least two hours, or until the cheesecake is firm enough to slice cleanly. This patient waiting is key to perfect texture.
Step 6: Once the cheesecake is beautifully firm, carefully lift it out of the pan using the parchment paper overhang. Place it onto a clean cutting board. Now, with a very sharp knife, slice the cheesecake into roughly 1 1/2-inch wide strips, creating those lovely mini cheesecake bites. Wipe your knife clean between cuts if needed – this ensures each bite has a clean, crisp edge.
Step 7: Arrange these delightful cheesecake cubes on a tray lined with parchment paper. While they’re chilling in the refrigerator, let’s prepare the rich chocolate coating. Place your chocolate chips in a medium microwave-safe bowl. Microwave on 50% power for 90 seconds, stirring every 30 seconds, until the chocolate is completely melted, glossy, and smooth. Be patient; melted chocolate is a delicate joy.
Step 8: Now for the glorious finale! Take your chilled cheesecake bites and dip the top of each one into the melted chocolate. Let any excess chocolate artfully drip back into the bowl. Place the chocolate-dipped bites back onto the parchment-lined tray. Once all have been dipped, pop the tray back into the freezer for about 15 minutes to set the chocolate. Then, they are ready to be shared and savored!
Chef’s Tips for a Perfect Result
-
Ensure your cream cheese is truly softened to room temperature; cold cream cheese will result in a lumpy filling that doesn’t blend smoothly.
-
Sift your confectioners’ sugar for both the crust and the filling to avoid any grainy textures and achieve that signature silky smoothness.
-
Use block-style cream cheese rather than the spreadable tub variety. Block cream cheese has less added liquid and air, which is crucial for achieving a firm, sliceable texture.
-
Chill the cheesecake filling adequately before cutting; this is the most important step for clean slices and preventing the bites from falling apart.
-
When melting chocolate, use short intervals in the microwave and stir frequently. Overheating can cause chocolate to seize or become grainy, ruining its smooth coating.
-
Wipe your knife blade clean with a damp, warm cloth between each cut. This simple step guarantees perfectly clean edges for your cheesecake bites, making them look as professional as they taste.
Variations and Substitutions
Fruity Twists: For a burst of berry flavor, gently fold a few tablespoons of your favorite berry jam or a handful of fresh, finely chopped berries into the cream cheese filling before spreading. Just a little bit adds a beautiful swirl and a hint of fruity tartness.
Citrus Zest: Brighten up the filling by adding the zest of one lemon or lime to your cream cheese mixture. This subtle hint of citrus cuts through the richness beautifully and adds a refreshing note.
Chocolate Lover’s Dream: Swap half of the graham crackers for finely crushed chocolate cookies (like Oreos) in the crust. Or, add a tablespoon of unsweetened cocoa powder to the cream cheese filling for an extra layer of chocolatey depth.
White Chocolate Drizzle: Instead of dipping in dark or semisweet chocolate, use white chocolate for the coating. You can also drizzle melted dark chocolate over white chocolate-dipped bites for a classic marble effect.
Nutty Crunch: For added texture, mix finely chopped nuts such as walnuts, pecans, or almonds into the graham cracker crust mixture before pressing it into the pan.
Gluten-Free Alternative: Easily make these gluten-free by substituting the graham crackers with your favorite gluten-free graham crackers or crushed gluten-free cookies for the crust. Ensure all other ingredients are certified gluten-free.
How to Serve and Pair
These delightful no bake cheesecake bites are a pleasure to serve in so many ways. For a truly elegant presentation, arrange them on a decorative platter, perhaps sprinkled with a few fresh berries, a dusting of cocoa powder, or a delicate chocolate drizzle. They are perfect as a delightful end to a cherished family dinner, a sweet surprise for a potluck gathering, or a comforting treat during a quiet afternoon with a cup of herbal tea.
Pairing them with a refreshing glass of cold milk, a rich coffee, or a delightful sparkling cider enhances the creamy sweetness. They also work beautifully alongside a scoop of vanilla bean ice cream or a side of fresh fruit salad. Imagine them at a summer barbecue, a holiday gathering, or simply as a sweet moment of personal indulgence after a long day. Each bite embodies a feeling of home and heartfelt celebration.
Storage and Reheating
Refrigerator: Store your delicious no bake cheesecake bites in an airtight container in the refrigerator for up to 1 week. They’ll maintain their delightful creamy texture and fresh flavor here. Ensure the container is well-sealed to prevent them from absorbing other aromas in your fridge.
Freezer: For longer storage, place the bites in a single layer on a parchment-lined baking sheet and freeze until firm. Then, transfer them to a freezer-safe airtight container or heavy-duty freezer bag. Properly stored, they can be kept in the freezer for up to 1 month. They are wonderful when served straight from the freezer on a hot day.
Room Temperature: These bites are at their best when kept chilled. While they can sit out for a short time (perhaps 30-60 minutes) during serving, it’s best to avoid leaving them at room temperature for extended periods, especially in warm environments, to maintain their structure and freshness.
Reheating: Reheating is generally not necessary or recommended for no bake cheesecake bites, as they are designed to be enjoyed cold. If they have been frozen and you prefer them slightly softer than frozen but still chilled, simply allow them to thaw in the refrigerator for an hour or two before serving. Avoid any form of cooking or heating, as this will compromise their delicate texture.
Frequently Asked Questions (FAQ)
Can I substitute the cream cheese in these no bake cheesecake bites?
You can substitute block-style cream cheese with a high-fat, full-fat version for the best results. Using lighter or spreadable cream cheese can affect the firmness and texture of the finished bites.
How do I know when my no bake cheesecake bites are ready?
Your no bake cheesecake bites are ready when the cream cheese filling is firm to the touch and slices cleanly with a sharp knife. The chocolate coating should also be set and no longer soft.
My cheesecake bites are too soft, what went wrong?
If your bites are too soft, it’s likely due to insufficient chilling time, or perhaps the cream cheese wasn’t fully softened before mixing, leading to a looser batter. Ensure you freeze for the recommended duration.
Can I prepare the no bake cheesecake bites the day before?
Absolutely! No bake cheesecake bites are perfect for making ahead. Prepare them up to 2 days in advance and store them in an airtight container in the refrigerator until ready to serve or freeze.
What are the best ways to customize no bake cheesecake bites?
You can customize these bites by adding extracts like almond or mint to the filling, incorporating mini chocolate chips directly into the batter, or topping them with a drizzle of caramel or a sprinkle of sea salt before the chocolate sets.
conclusion
These no bake cheesecake bites are a tender embrace, a delightful shortcut to pure dessert joy. They offer a simple, elegant way to bring comfort and sweetness into your life, perfect for sharing or savoring solo. The irresistible combination of creamy filling and crisp crust, kissed by smooth chocolate, will leave you utterly enchanted.
Decadent No Bake Cheesecake Bites: A Sweet Escape
- Prep Time: 15
- Total Time: 15
- Yield: 24 cheesecake bites 1x
- Category: desserts
- Method: No-Bake
- Cuisine: American
- Diet: Vegetarian
Description
Delicate no-bake cheesecake bites with a buttery graham cracker crust, creamy cream cheese filling, and optional chocolate chip or fruit toppings. A simple, indulgent dessert requiring no oven work.
Ingredients
Crushed graham crackers 1 cup
Butter, melted 1/4 cup
Cream cheese (room temperature) 8 oz
Powdered sugar 1 cup
Vanilla extract 1 tsp
Chocolate chips or fruit of choice for topping
Instructions
Mix crushed graham crackers with melted butter to form a crumbly dough
Press mixture firmly into the cavities of a greased mini muffin tin
Refrigerate crust for 15 minutes to set
Combine cream cheese, powdered sugar, and vanilla extract until smooth and chilled for 1 hour
Spoon the cooled filling into each pre-formed crust, mounding slightly
Top with chocolate chips or sliced fruit
Refrigerate for 3-4 hours before serving
Notes
Press crust firmly into molds for best structure
For vegan option, use dairy-free cream cheese
Store in an airtight container in the refrigerator for up to 3 days
Nutrition
- Serving Size: 1 bite
- Calories: 200
- Sugar: 15g
- Sodium: 150mg
- Fat: 12g
- Saturated Fat: 7g
- Carbohydrates: 20g
- Fiber: 1g
- Protein: 4g
- Cholesterol: 30mg


