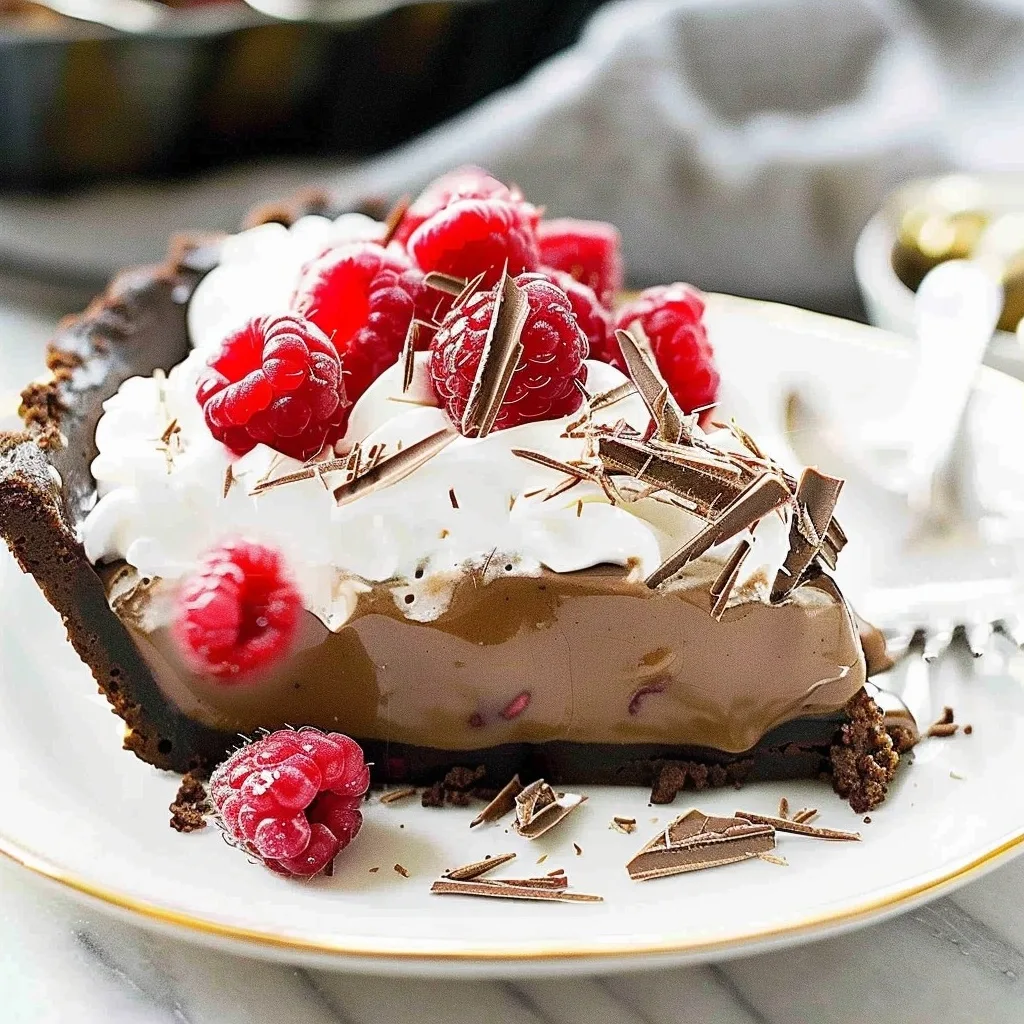
No Bake Chocolate Pudding Pie with Raspberries is more than just a dessert; it’s a whispered secret of comfort, a memory captured in a slice. It’s the kind of treat that feels like a warm hug on a chilly evening, or a burst of sunshine on a lazy afternoon. Imagining my mother and grandmother in the kitchen, their hands busy creating magic with simple ingredients, I feel a deep kinship with this recipe. It’s a promise of simple joy, a beautiful testament to how easily we can bring a sense of wonder into our everyday lives with little more than a few thoughtfully chosen items from our pantry. The ethereal combination of rich chocolate and tart raspberries, nestled in a surprisingly delightful crust, creates a moment of pure bliss, a sweet pause in the rhythm of life.
This No Bake Chocolate Pudding Pie with Raspberries carries that same spirit. It’s designed to be a sanctuary, a place where the worries of the day can melt away with every spoonful. The ease with which it comes together means more time for connection, for sharing stories around the table, or for simply savoring a quiet moment of peace. It’s a recipe that understands the heart’s desire for both effortless elegance and profound satisfaction, bringing those two beautiful elements together in a way that feels utterly natural and deeply nourishing. It’s a quiet joy, a tender affection expressed through the shared ritual of food, inviting you to taste the love woven into every layer.
What is No Bake Chocolate Pudding Pie with Raspberries?
At its heart, this No Bake Chocolate Pudding Pie with Raspberries is a celebration of texture and taste, a symphony of contrasting elements that harmonize beautifully. It’s a dessert that doesn’t demand hours in a hot oven, instead offering a cooler, quicker path to deep chocolatey indulgence. The magic lies in its layers: a crisp, subtly surprising popping cookie crust, a center of impossibly smooth and rich chocolate pudding, and a crown of vibrant, fresh raspberries that add a delightful tang. This creation is a modern classic, a testament to how we can elevate simple ingredients into something truly extraordinary, a dessert that feels both comforting and delightfully special.
The foundation of this pie is a clever cookie crust, where crushed cookies meet melted butter and a touch of surprising playful texture from popping candy. This isn’t just any chocolate pudding pie, though; the addition of fresh raspberries cuts through the richness, offering bursts of bright, fruity counterpoint. It’s this thoughtful balance, this dance between deep cocoa notes and the sharp zest of berries, that makes it so captivating. It’s a dessert designed to bring smiles, to spark conversation, and to leave a lasting impression because it’s made with care and a touch of playful innovation.
Reasons to Try No Bake Chocolate Pudding Pie with Raspberries
There are so many reasons why this No Bake Chocolate Pudding Pie with Raspberries will quickly become a cherished recipe in your repertoire. First and foremost, its sheer deliciousness is undeniable. The combination of silky chocolate pudding, a crunchy crust with a fun surprise, and the fresh zing of raspberries is pure dessert perfection. It’s the kind of flavor profile that appeals to everyone, promising satisfaction with every bite. Imagine the delighted gasps as your guests discover the popping candy in the crust – it’s a recipe designed for joyful moments and memorable experiences.
Beyond its exquisite taste, the ‘no-bake’ aspect makes it an absolute dream for busy home cooks or those who prefer to avoid the oven. It’s incredibly forgiving and straightforward, making it ideal for beginners who want to impress, or for anyone seeking a stress-free dessert solution. This pie is perfect for those sweltering summer days when the last thing you want is more heat from the oven, or for weeknights when you crave something sweet without the fuss. It’s a recipe that allows you to create something truly special with minimal effort, leaving you more time to connect with loved ones rather than being tied to the kitchen.
Ingredients Needed to Make No Bake Chocolate Pudding Pie with Raspberries
For the Popping Cookie Crust:
-
2 tablespoons strawberry flavored or unflavored popping candy (such as Pop Rocks)
-
2.5 ounces bittersweet chocolate, melted and cooled
-
½ tablespoon neutral oil (like vegetable or canola)
-
30 Oreo cookies (about 2 ½ standard sleeves), finely crushed
-
5 tablespoons unsalted butter, melted
For the Chocolate Filling:
-
40 grams cornstarch (about 1/3 cup)
-
150 grams granulated sugar (about 3/4 cup)
-
½ teaspoon salt
-
6 large egg yolks
-
2 ½ cups half and half OR 1 ½ cups whole milk plus 1 cup heavy cream
-
2 teaspoons pure vanilla extract
-
226 grams bittersweet chocolate (about 8 ounces), finely chopped
-
2 tablespoons unsalted butter
For the Whipped Cream Topping:
-
1 cup cold heavy cream (35% fat or higher)
-
⅛ teaspoon fine sea salt
-
50 grams granulated sugar (about 1/4 cup)
-
1 teaspoon pure vanilla extract
For Assembly:
-
455 grams fresh raspberries (about 2 pints), divided
-
Melted chocolate or shaved chocolate, for garnish (optional)
Instructions to Make No Bake Chocolate Pudding Pie with Raspberries – Step by Step
Step 1: Prepare the enchanting Popping Cookie Crust. Begin by gently coaxing the popping candy to life. In a small bowl, combine the melted bittersweet chocolate with the ½ tablespoon of oil, stirring until it’s smooth and well incorporated. Now, delicately fold in the popping candy. Be sure to handle it with care; we want its magic to be a surprise later! Set this curious mixture aside.
Step 2: In a food processor, transform the Oreo cookies into fine, sand-like crumbs. Pulse them until no large chunks remain. Add the 5 tablespoons of melted butter to the crumbs and process for just a few more pulses, until the mixture resembles damp sand and holds together when pressed. This forms the sturdy base of our delightful pie.
Step 3: Transfer the cookie crumb mixture to a clean bowl. Add the reserved chocolate and popping candy mixture. Using a spatula or your hands, gently fold everything together until it’s just combined. Avoid overmixing; we want to disperse the magical popping candy evenly without making it clump.
Step 4: Prepare your 9-inch pie dish or deep tart pan. Lightly butter the bottom and sides, then line the bottom with a circle of parchment paper for easy removal later. Spoon the cookie crumb mixture into the prepared pan. Using the bottom of a spoon or a flat-bottomed glass, gently press the crumbs evenly into the bottom and up the sides of the pan to form the crust. This is where patience pays off; try not to press too firmly, as this can prematurely activate the popping candy’s fizz. Once expertly formed, place the crust in the freezer to firm up. It needs at least an hour, but overnight is truly ideal for the best texture.
Step 5: Now, let’s craft the lusciously smooth Chocolate Pudding Filling. In a medium saucepan, whisk together the cornstarch, granulated sugar, and salt until they are thoroughly combined. This step ensures there are no dry pockets of cornstarch and sugar.
Step 6: Add the egg yolks to the dry ingredients and whisk vigorously until you achieve a smooth, cohesive paste. Gradually whisk in the half and half (or milk and cream combination) and the vanilla extract, ensuring that all the ingredients are fully incorporated and that there are absolutely no lumps. A well-blended base is key to a velvety pudding.
Step 7: Place the saucepan over medium heat. Cook the pudding, stirring or whisking almost constantly, for about 5 to 10 minutes, or until the mixture has noticeably thickened. It should coat the back of a spoon nicely. Keep a close eye on it; continuous stirring prevents the eggs from cooking unevenly and forming lumps. If any small lumps do appear, you can gently pour the pudding base through a fine-mesh sieve into a clean bowl to ensure ultimate smoothness.
Step 8: Once the pudding base has reached its luscious thickness, remove the saucepan from the heat. Immediately add the finely chopped bittersweet chocolate to the hot pudding. Stir gently and patiently until the chocolate is completely melted and beautifully incorporated, creating a rich, glossy chocolate base.
Step 9: Add the 2 tablespoons of butter to the chocolate pudding mixture. Continue to stir until the butter is fully melted and smoothly blended in, adding an extra layer of richness and sheen to the pudding. Allow this glorious chocolate pudding base to cool down completely. To prevent a skin from forming on top, whisk it occasionally as it cools, or cover it directly with plastic wrap, pressing the wrap onto the surface of the pudding.
Step 10: Just before you’re ready to assemble the pie, prepare the Whipped Cream Topping. In a cold bowl (metal bowls work best and chill faster), combine the cold heavy cream, sea salt, sugar, and vanilla extract. Using an electric mixer on medium speed, whip the cream until stiff peaks form. Stiff peaks mean that when you lift the beaters, the cream holds its shape and the peaks stand tall without collapsing. This part is best done right before serving to ensure the freshest, loftiest cream.
Step 11: Assemble your masterpiece. Remove the firmly chilled cookie crust from the freezer. Take about half of your fresh raspberries and arrange them in a single layer across the bottom of the crust. Laying them on their sides can help them create a gentle bed for the pudding. Gently scoop the cooled, luscious chocolate pudding over the raspberries, spreading it evenly to the edges of the crust with a spatula.
Step 12: Reserve the remaining fresh raspberries for decoration. Cover the pie with plastic wrap and refrigerate it for at least four hours, but overnight is truly best. This chilling time allows the pudding to set beautifully and ensures the flavors meld together perfectly.
Step 13: Just before serving, carefully remove the plastic wrap. Spread the freshly made whipped cream generously over the top of the set chocolate pudding. For an elegant touch, you can pipe a decorative border around the edge of the pie using a pastry bag fitted with an open star tip, or simply spread it as you prefer. Finally, artfully arrange the reserved fresh raspberries on top of the whipped cream. Add a sprinkle of shaved or melted chocolate if desired, and your spectacular No Bake Chocolate Pudding Pie with Raspberries is ready to be savored!
Chef’s Tips for a Perfect Result
-
Ensure your popping candy is fresh and stored in an airtight container before use; stale popping candy may lose its reactive fizz.
-
Chill your mixing bowl and beaters for the whipped cream for at least 15 minutes in the freezer; this helps the cream whip up faster and achieve stiffer peaks.
-
When crushing Oreo cookies, some prefer to remove the cream filling for a less sweet crust, though keeping it adds to the richness and color.
-
Don’t rush the cooling process for the chocolate pudding; a fully cooled pudding ensures the filling sets properly and doesn’t melt the whipped cream topping.
-
Use high-quality bittersweet chocolate for both the crust and the filling; its robust flavor will shine through and elevate the entire pie.
-
If you find lumps in your pudding base after cooking, passing it through a fine-mesh sieve before adding the chocolate is the easiest way to achieve a perfectly smooth texture.
Variations and Substitutions
-
Vegan Option: For a dairy-free delight, use dairy-free chocolate cookies (like some versions of Oreos) and dairy-free butter for the crust. For the filling, substitute full-fat coconut milk and a bit more cornstarch for the dairy. Use a vegan whipped topping or a coconut cream whip. The texture will be slightly different but still wonderfully rich.
-
Gluten-Free Alternative: Swap the Oreo cookies for your favorite gluten-free chocolate sandwich cookies or chocolate graham crackers. Crush them as directed, and you’ll have a delicious gluten-free crust. Ensure all other ingredients are certified gluten-free if needed.
-
Berry Blends: While raspberries bring a lovely tartness, feel free to mix them with other fresh berries like strawberries, blueberries, or blackberries. A combination can add beautiful color and a more complex fruity flavor profile.
-
Chocolate Intensity: If you prefer a less intense chocolate flavor, you can use semi-sweet chocolate instead of bittersweet chocolate in the filling. For an even richer, darker taste, consider using chocolate with a higher cocoa percentage.
-
Nutty Crust: For an added layer of flavor and texture, you can incorporate finely ground toasted nuts like almonds or pecans into the cookie crumb mixture. This would complement the chocolate beautifully.
How to Serve and Pair
This No Bake Chocolate Pudding Pie with Raspberries is a showstopper on its own, but a few thoughtful touches can elevate it further. Serve each slice cool, straight from the refrigerator, ensuring the pudding is perfectly set. A dollop of extra unsweetened whipped cream or a small quenelle of vanilla bean ice cream alongside can add another layer of indulgence. It pairs beautifully with a steaming mug of dark roast coffee or a delicate herbal tea, like peppermint or chamomile, to cleanse the palate.
For a truly elegant presentation, consider garnishing with a few extra fresh raspberries artfully placed around the dome of whipped cream, perhaps a delicate drizzle of melted dark chocolate, or even a dusting of cocoa powder. This pie is perfect for any occasion calling for a touch of joy – think birthday celebrations, casual gatherings with friends, holiday potlucks, or simply as a sweet reward after a long week.
Storage and Reheating
Refrigerator
Leftover No Bake Chocolate Pudding Pie with Raspberries is best stored in the refrigerator. Cover the pie tightly with plastic wrap or transfer any cut slices to an airtight container. It will keep well for up to 3 days, maintaining its creamy texture and fresh raspberry flavor. Ensure it’s well-covered to prevent it from absorbing other odors in the fridge.
Freezer
While this pie is designed to be enjoyed fresh, you can freeze it for longer storage. It’s best to freeze it before the whipped cream topping is added. Cover the pie tightly with plastic wrap, then a layer of aluminum foil. Freeze for up to 1 month. Thaw overnight in the refrigerator before adding the whipped cream and raspberries.
Room Temperature
Due to the fresh berries and dairy components, this pie should not be left at room temperature for more than 2 hours. Once set, refrigeration is essential to maintain its quality and safety.
Reheating
This pie is a no-bake dessert and is not intended to be reheated. The delicate pudding and fresh berries are best enjoyed chilled. Reheating would cause the pudding to break down and the crust to lose its crispness, so it is not recommended.
Frequently Asked Questions (FAQ)
Can I substitute the egg yolks in the pudding?
You can substitute egg yolks with a cornstarch slurry for thickening if needed, but the richness and creamy texture will be diminished. For a similar richness, consider using a combination of avocado or silken tofu blended until very smooth, though this will alter the flavor profile significantly.
How do I know if the chocolate pudding filling is thick enough?
The chocolate pudding filling is ready when it coats the back of a spoon, and you can draw a line through it with your finger that holds its shape. It should have a velvety, thick consistency, similar to traditional pudding or custard.
My popping candy isn’t popping, what went wrong?
The popping candy may have lost its potency if exposed to moisture or if it was old. Ensure you are using fresh popping candy and that it is not mixed into the crust mixture too early or handled excessively, as moisture and friction can cause it to pop prematurely.
Can I make the chocolate pudding filling a day in advance?
Yes, the chocolate pudding filling can be made up to 2 days in advance and stored in an airtight container in the refrigerator. Press plastic wrap directly onto the surface of the pudding to prevent a skin from forming before storing. Allow it to come to room temperature slightly before assembling the pie.
What’s the best way to serve this pie to my guests?
Serve this No Bake Chocolate Pudding Pie with Raspberries chilled, with a generous topping of fresh whipped cream and a scattering of fresh raspberries. You can also add a drizzle of melted dark chocolate or chocolate shavings for an extra touch of elegance.
CONCLUSION
This No Bake Chocolate Pudding Pie with Raspberries is a triumph of simple ingredients, offering a rich, creamy chocolate experience with the delightful surprise of popping candy and the bright burst of fresh berries. It’s a recipe born from love and simplicity, perfect for creating lasting memories in the heart of your home. The irresistible combination of deep chocolate, tangy raspberries, and that playful pop is a whisper of pure joy, a sweet invitation to savor life’s sweetest moments.
No Bake Chocolate Pudding Pie with Raspberries
- Prep Time: 15
- Total Time: 15
- Yield: 8 servings 1x
- Category: desserts
- Method: No-Bake
- Cuisine: American
- Diet: Vegetarian
Description
A luscious no-bake dessert with a crispy cookie crust, silky chocolate pudding core, and vibrant raspberry topping. Effortless to prepare and perfect for desserts or cozy gatherings.
Ingredients
1 1/2 cups graham cracker crumbs
1/3 cup melted butter
2 tbsp popping candy (optional)
1 box instant chocolate pudding mix (3.9 oz)
2 cups milk
1 tsp vanilla extract
2 cups fresh raspberries
1 tbsp powdered sugar (optional, for topping)
Instructions
Crush graham crackers in a bowl. Add melted butter and popping candy (if using). Mix until combined.
Press the mixture into a 9-inch pie dish, using the back of a spoon to compact.
Whisk pudding mix, milk, and vanilla extract in a bowl until no lumps remain.
Pour pudding into the crust and refrigerate for at least 2 hours.
Top chilled pie with fresh raspberries and a dusting of powdered sugar before serving.
Notes
Chill until firm for best results.
Substitute graham crackers with halal-certified crumbs if needed.
Storage: Refrigerate leftovers for up to 3 days.
Nutrition
- Serving Size: 1 slice
- Calories: 320
- Sugar: 22g
- Sodium: 300mg
- Fat: 12g
- Saturated Fat: 6g
- Carbohydrates: 48g
- Fiber: 2g
- Protein: 6g
- Cholesterol: 40mg


