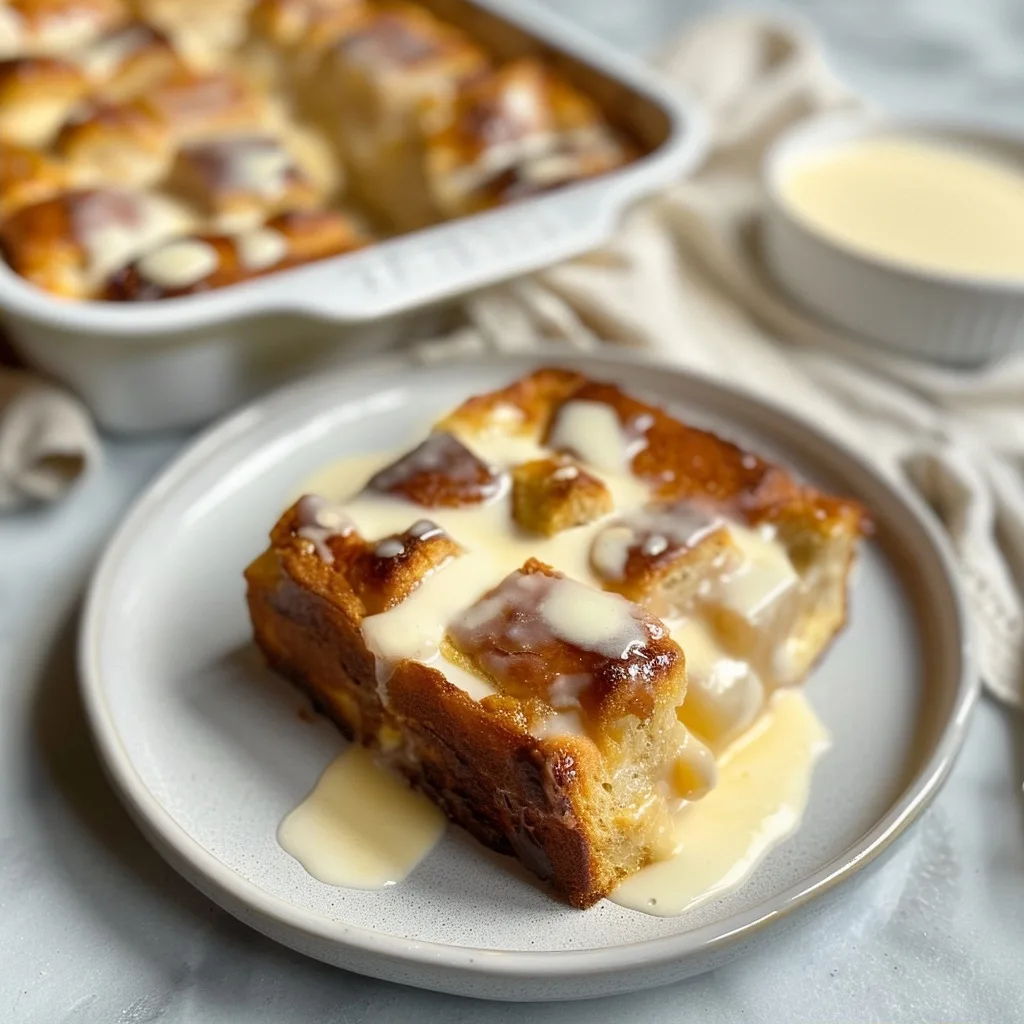
The Best Easy Vanilla Bread Pudding
Best easy vanilla bread pudding. It’s a phrase that whispers comfort, evokes memories of cozy kitchens, and promises a hug in dessert form. In our home, bread pudding isn’t just a treat; it’s a tradition, a way to transform simple, humble ingredients into something truly magical. It’s the kind of dish that feels both luxurious and deeply familiar, a delightful dance between sweet custard and pillowy bread that warms you from the inside out.
This recipe, crafted with love and a touch of nostalgia, aims to be your go-to for that perfect dessert. It celebrates the pure, comforting essence of vanilla, enhanced by the subtle sweetness of enriched bread. It’s a testament to how extraordinary simple ingredients can become when treated with care and intention, echoing the lessons passed down through generations. Let’s create something wonderful together.
What is Best Easy Vanilla Bread Pudding?
At its heart, a classic bread pudding is a beautiful resurrection of yesterday’s bread, reborn into a decadent dessert. It’s a dish with roots stretching back centuries, born from necessity and ingenuity, a way to make every last crumb count. Our version focuses on simplicity and pure flavor, using sweet, enriched bread like King’s Hawaiian rolls or brioche. These breads lend a tender crumb and a subtle sweetness that is simply divine when soaked in rich custard.
The magic happens in the custard base, a comforting blend of whole milk, heavy cream, eggs, and most importantly, pure vanilla extract. This mixture lovingly embraces the bread cubes, transforming them into a soft, yielding pudding with a beautifully golden, slightly caramelized crust. It’s this balance of textures and the comforting vanilla aroma that makes it a perennial favorite, a dessert that feels both familiar and special, perfect for any occasion.
Reasons to Try the Best Easy Vanilla Bread Pudding
Why add this recipe to your repertoire? Because it’s incredibly forgiving and remarkably delicious. It’s the kind of dessert that makes you feel like a kitchen hero without requiring advanced culinary skills. The ease of preparation, with minimal hands-on time, means you can whip it up even on a busy weeknight. Plus, it’s a fantastic way to use up slightly stale bread, turning what might be discarded into a treasure.
This best easy vanilla bread pudding is perfect for beginners taking their first steps into baking, for busy parents needing a crowd-pleasing dessert with little fuss, or for anyone craving a taste of pure comfort. It’s versatile enough for a casual family dinner or elegant enough for a special gathering. The warm, sweet, vanilla-infused aroma that fills your home as it bakes is an experience in itself, promising a deeply satisfying dessert that everyone will adore.
Ingredients Needed to Make the Best Easy Vanilla Bread Pudding
- 1 12-pack King’s Hawaiian Original Hawaiian Sweet Rolls (or 1 12-oz loaf of Brioche bread), ideally dried out overnight
- 3 tablespoons unsalted butter, plus more for greasing the pan (45g)
- 4 large eggs
- 2 large egg yolks
- 2 ½ cups whole milk (600g)
- 1 cup heavy cream (240g)
- ¾ cup granulated sugar (165g)
- 2 teaspoons pure vanilla extract
- Optional: pinch of salt
Instructions to Make the Best Easy Vanilla Bread Pudding – Step by Step
Step 1: Prepare Your Baking Dish and Bread
Begin by preheating your oven to 350°F (175°C). Take a 7×11 inch baking dish, ideally ceramic or glass, and generously brush the inside with butter. This step is crucial for preventing sticking and adding a subtle richness to the edges of your pudding. Now, let’s talk about the bread. If you’re using King’s Hawaiian rolls or brioche, it’s best if they are a day old and slightly dried out. This helps them absorb the custard beautifully without becoming mushy. Chop your rolls or bread into generous cubes, about 1.5 to 2 inches in size. Arrange these lovely cubes evenly in your prepared baking dish, creating a full, inviting bed for the custard.
Step 2: Whisk Together the Custard Ingredients
In a medium-sized, nonstick saucepan, combine the eggs, extra egg yolks, whole milk, heavy cream, granulated sugar, pure vanilla extract, and that optional pinch of salt if you’re using it. Take a whisk and whisk thoroughly, ensuring that the eggs and yolks are completely broken down and the sugar begins to dissolve into the liquids. You want a smooth, homogenous mixture, free of any streaks or lumps. This is the heart of your bread pudding, infusing it with creamy texture and sweet vanilla notes.
Step 3: Gently Warm the Custard Base
Place the saucepan with the custard mixture over medium-low heat on the stovetop. Stir gently and continuously as it warms. Your goal here is simply to melt the 3 tablespoons of butter and ensure it is fully incorporated into the custard. Do not let the mixture come to a boil or cook until it thickens significantly. The custard will continue to cook and set in the oven. Overcooking at this stage can lead to a texture reminiscent of scrambled eggs. Just until the butter is melted and everything is beautifully combined is all you need.
Step 4: Soak the Bread and Reserve Custard
Carefully pour the warm custard mixture all over the bread cubes in your baking dish. Use a spoon or spatula to gently press down on the bread, ensuring that every single piece is submerged and begins to soak up the rich liquid. You want to feel the bread yielding and absorbing. Now, this is an important step for creating a delightful sauce later: reserve about 1.5 to 2 cups of the custard mixture from the saucepan before pouring the rest over the bread. This reserved custard will become your luscious creme anglaise.
Step 5: Bake to Golden Perfection
Once the bread is thoroughly soaked and nestled in the custard, carefully transfer the baking dish to your preheated 350°F (175°C) oven. Let it bake for approximately 35 to 40 minutes. You’ll know it’s ready when the top is beautifully golden brown and the center is set but might still have a very slight wobble when you gently shake the dish. This slight wobble means it will continue to set as it cools, giving you that perfect pudding texture rather than a dry cake.
Step 6: Prepare the Creme Anglaise
While the bread pudding is baking, take the reserved custard mixture you set aside and return it to the stove over low heat. Stir constantly. Cook for just a few minutes until the sauce begins to thicken slightly. You’re looking for a coats-the-back-of-a-spoon consistency, similar to a thin crème brûlée topping. Be very patient and keep stirring to prevent scorching. Once it has reached the desired thickness, strain this sauce through a fine-mesh sieve. This extra step removes any potential tiny bits of cooked egg, ensuring a silky-smooth, beautiful creme anglaise.
Step 7: Serve and Enjoy Your Masterpiece
When the bread pudding comes out of the oven, let it rest for a few minutes. This allows it to set up perfectly. For serving, ladle generous portions of the warm bread pudding into bowls. Then, drizzle a good amount of your freshly made, warm creme anglaise over each serving. For a final touch of elegance and a hint of sweetness, dust lightly with powdered sugar. Serve immediately while it’s still warm, basking in the delightful aromas and comforting flavors. It’s a moment to savor.
Chef’s Tips for a Perfect Result
- Use Day-Old Bread: Stale bread absorbs the custard much better. If your bread is fresh, you can lightly toast cubed bread in a 350°F (175°C) oven for 3-5 minutes until slightly dry, but not browned, to achieve a similar effect.
- Gentle Heat for Custard: When warming the custard base, low and slow is key. Overheating can cause the eggs to curdle, resulting in a gritty texture. Melt the butter and combine ingredients without boiling.
- Don’t Overbake: Look for a golden-brown top and a center that’s just set. It should retain a slight wobble; it will continue to firm up as it cools. Overbaking leads to a dry pudding.
- Strain for Smoothness: Always strain your reserved custard for the creme anglaise. This ensures an impeccably smooth, restaurant-quality sauce, free from any tiny bits of cooked egg.
- Patience with Creme Anglaise: Making the creme anglaise requires constant stirring on low heat. This protects the delicate egg proteins from overcooking and yields a luxurious, silken sauce.
- Warm Serving is Best: Bread pudding, especially with its accompanying creme anglaise, is at its most comforting and delicious when served warm. This brings out the subtle spices and the rich custard notes.
Variations and Substitutions
-
Fruity Twist
What to change: Add fresh or dried fruit to the bread cubes before soaking.
Suggested substitute: A cup of fresh berries (like blueberries or raspberries) or ½ cup of raisins/dried cranberries.
How it impacts flavor: Introduces bursts of natural sweetness, tartness, and color, complementing the vanilla. Fresh berries might release juice, adding moisture. -
Chocolate Lovers’ Dream
What to change: Add chocolate chips or chunks to the bread mixture. You can also cocoa powder to the custard.
Suggested substitute: ½ cup of dark or semi-sweet chocolate chips, or 2 tablespoons of unsweetened cocoa powder whisked into the custard ingredients.
How it impacts flavor: Adds a rich, deep chocolate flavor that pairs wonderfully with vanilla and sweet bread. Cocoa powder may slightly alter the custard’s color and density. -
Spice It Up
What to change: Incorporate warm spices into the custard mixture.
Suggested substitute: ½ teaspoon of ground cinnamon and a pinch of nutmeg or cardamom.
How it impacts flavor: Adds warmth and complexity, creating a more aromatic and spiced profile that enhances the fall or winter feel. -
Dairy-Free Option
What to change: Substitute dairy milk and cream with non-dairy alternatives.
Suggested substitute: Use full-fat coconut milk (from a can) or oat milk for the milk and cream.
How it impacts flavor: Coconut milk will impart a subtle coconut flavor, while oat milk offers a neutral creaminess. Texture might vary slightly depending on the chosen plant-based milk. -
Gluten-Free Alternative
What to change: Use gluten-free bread.
Suggested substitute: Any sturdy gluten-free loaf or rolls, preferably one that bakes well.
How it impacts flavor: The flavor will remain the same, but the texture might be slightly different, as gluten-free breads can vary in their absorbency and structure. Ensure the bread is not too crumbly.
How to Serve and Pair
This best easy vanilla bread pudding is a celebration of comfort, best served warm. Its inherent sweetness and creamy texture make it a perfect standalone dessert. A generous drizzle of the accompanying vanilla creme anglaise is the classic pairing, adding an extra layer of silky decadence. For even more indulgence, consider a dollop of lightly sweetened whipped cream or a scoop of vanilla bean ice cream on the side.
Presentation can be simple yet elegant. Serve portions directly from the baking dish, or gently scoop into individual bowls. Dusting the top with a little powdered sugar or a sprinkle of cinnamon adds a lovely visual touch. This dessert is perfect for a cozy family dinner, a potluck gathering, a holiday brunch, or simply as a treat on a quiet afternoon when you need a moment of sweet reflection.
Storage and Reheating
Refrigerator
Once cooled, leftover bread pudding can be stored in an airtight container in the refrigerator for up to 3 to 4 days. Covering it well helps prevent it from drying out or absorbing other odors from the fridge. The texture might become slightly denser when chilled, but that’s perfectly normal.
Freezer
For longer storage, the bread pudding freezes beautifully. Wrap individual portions or the entire loaf tightly in plastic wrap, then in aluminum foil, or place in a freezer-safe airtight container. It can be stored in the freezer for up to 2 to 3 months. Ensure it’s well-sealed to prevent freezer burn.
Room Temperature
It’s best to store bread pudding in the refrigerator due to its custard base. Leaving it at room temperature for extended periods, especially in warm environments, is not recommended for food safety reasons.
Reheating
To reheat chilled bread pudding, the oven is your best friend. Place portions in an oven-safe dish, cover loosely with foil, and warm at 300°F (150°C) for 15-20 minutes, or until heated through. You can also gently reheat individual servings in the microwave on low power for about 30-60 seconds. For frozen bread pudding, thaw overnight in the refrigerator first before reheating, or bake directly from frozen at a slightly lower temperature (around 275°F or 135°C) for a longer duration, until warmed through.
Frequently Asked Questions (FAQ)
Q1: Can I substitute the bread in this recipe?
Yes, you can substitute the bread with other sturdy, slightly stale varieties. Challah, brioche, or even good quality white sandwich bread work well. Avoid soft, highly processed breads that can turn to mush. The key is a bread that can hold its shape when soaked.
Q2: How do I know when my bread pudding is done baking?
Your bread pudding is done when the top is golden brown and the center is set but has a slight wobble when gently shaken. A knife inserted near the center should come out mostly clean, with perhaps a few moist crumbs attached, but not wet batter.
Q3: My bread pudding came out too dry, what went wrong?
A dry bread pudding often results from overbaking or using bread that was too dry to begin with. Ensure you don’t go beyond the bake time suggested, and check for that characteristic slight wobble. Using a little more milk or cream in the custard base can also help add moisture if your bread is very stale.
Q4: Can I make this bread pudding ahead of time?
You can definitely assemble the bread pudding ahead of time. Pour the custard over the bread, cover, and refrigerate for up to 24 hours before baking. This allows the bread to soak even more deeply. Bake it just before you plan to serve it, as fresh is always best.
Q5: How can I customize my vanilla bread pudding for a special occasion?
To elevate it for a special occasion, consider adding a swirl of raspberry or caramel sauce to the custard before baking, or topping with toasted slivered almonds for crunch. A dusting of cocoa powder or edible flowers can also add a festive touch.
Best Easy Vanilla Bread Pudding
- Prep Time: 20
- Cook Time: 50
- Total Time: 70
- Yield: 12 servings 1x
- Category: desserts
- Method: Baking
- Cuisine: American
- Diet: Vegetarian
Description
Transform stale bread into a rich, custard-soaked dessert with pure vanilla flavor and a golden crust. A beginner-friendly recipe ideal for cozy nights and gatherings. Use enriched bread like brioche or day-old French rolls for maximum tenderness.
Ingredients
1 12-pack King’s Hawaiian rolls or brioche bread, sliced into cubes
2 cups whole milk
1 cup heavy cream
6 large eggs
3/4 cup granulated sugar
2 tablespoons pure vanilla extract
1/2 teaspoon ground cinnamon
Pinch of salt
Optional: 1/2 cup raisins or chopped walnuts
Optional: 1/4 cup caramel drizzle or maple glaze for topping
Instructions
Preheat oven to 325°F (165°C)
Cut bread into 1-inch cubes and arrange in a greased 9×13-inch baking dish
In a large bowl, whisk together milk, cream, eggs, sugar, vanilla, cinnamon, and salt until smooth
Pour custard mixture over bread cubes, ensuring all are submerged
Let sit for 20-30 minutes
Bake for 45 minutes to 50 minutes until golden and firm
Drizzle with caramel if desired and let cool slightly before serving
Notes
Use day-old bread for better custard absorption
Pour custard evenly to avoid dry spots
Add raisins/nuts during custard-soaking step for texture
If bread is still damp after baking, increase oven time by 5 minutes
Store leftovers in refrigerator for up to 4 days
Nutrition
- Serving Size: 1 slice (1/12 of recipe)
- Calories: 300
- Sugar: 25g
- Sodium: 180mg
- Fat: 12g
- Saturated Fat: 7g
- Carbohydrates: 38g
- Fiber: 1.2g
- Protein: 6g
- Cholesterol: 130mg


