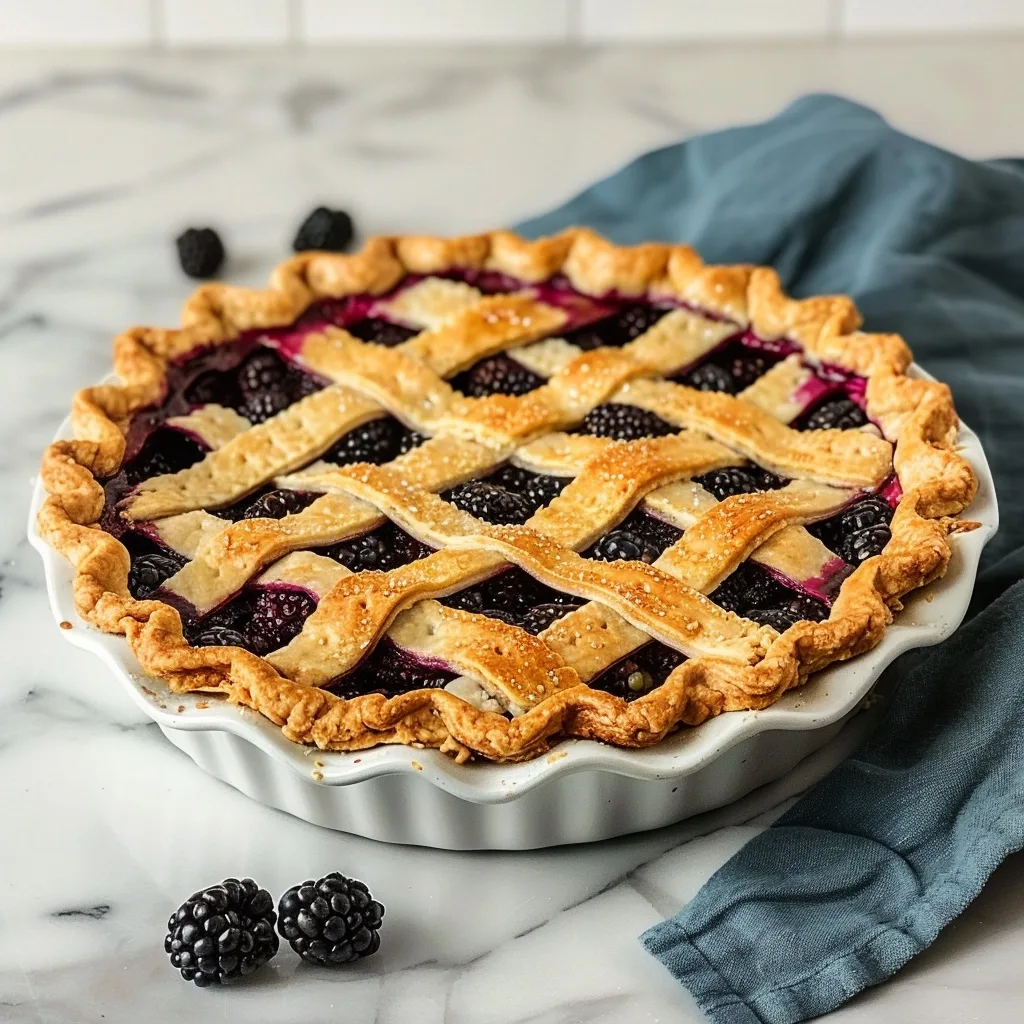
Juicy Blackberry Pie with Flaky, Buttery Crust
Juicy blackberry pie with flaky, buttery crust. There are few things in this world that speak to the heart quite like a perfectly baked pie, especially one bursting with the deep, sweet-tart flavor of fresh blackberries nestled within a crust that shatters just so with every bite. It’s more than just a dessert; it’s a warm hug, a story whispered from the kitchen, a tangible piece of comfort that fills a home with an irresistible aroma. This recipe, passed down through generations, is my way of sharing that enduring warmth, ensuring that every home can experience the simple magic of a truly spectacular blackberry pie.
My grandmother’s kitchen was always filled with the scent of baking, a constant reminder of love made manifest through simple ingredients transformed by patient hands. She believed that a pie crust, above all, needed a whisper of tenderness, a gentle touch that spoke of care before it even met the oven. This juicy blackberry pie with flaky, buttery crust captures that essence—a celebration of summer’s bounty and the timeless joy of creating something beautiful and delicious from scratch, meant to be savored with loved ones, creating memories with each forkful.
What is Juicy Blackberry Pie with Flaky, Buttery Crust?
At its heart, a juicy blackberry pie with flaky, buttery crust is a testament to the beauty of simple, fresh ingredients coming together in perfect harmony. It features plump, ripe blackberries, their deep purple juices infused with a touch of lemon and a balanced sweetness from sugars, all cradled within a homemade pie crust. This crust isn’t just a vessel; it’s a star in its own right, designed to be light, tender, and wonderfully flaky, with a rich, buttery flavor that complements the tartness of the berries. It’s a classic American dessert, evoking memories of summer picnics, family gatherings, and cozy evenings.
What truly sets this pie apart is the delicate balance between the vibrant, slightly tangy blackberry filling and the sublime texture of the crust. We aim for a filling that’s sumptuously juicy but not watery, with the berries retaining their shape and offering bursts of intense flavor. The crust, achieved through careful handling of cold butter and minimal mixing, offers layers of delicate pastry that melt in your mouth, providing a satisfying contrast to the soft fruit. It’s a dessert that feels both rustic and elegant, a true celebration of nature’s perfect sweet-tart combination.
Reasons to Try Juicy Blackberry Pie with Flaky, Buttery Crust
This juicy blackberry pie with flaky, buttery crust is an absolute joy to make and to share, and there are so many reasons why it deserves a spot on your baking list. Firstly, the sheer sensory experience is unparalleled – the moment you pull it from the oven, the air fills with a sweet, fruity perfume, and the sight of the golden-brown crust promises pure bliss. It’s a recipe that delivers on comfort and nostalgia, tapping into those warm, fuzzy feelings that only homemade pie can inspire. Imagine the smiles of your family and friends as they take their first blissful bite.
Beyond its incredible taste and aroma, this pie is wonderfully versatile. It’s perfect for a special occasion, a holiday dessert, or simply a treat to brighten an ordinary day. Even if you’re new to baking pies, this recipe is designed to be approachable, with clear steps that guide you toward a successful outcome. The joy of creating a beautiful, impressive pie from scratch is incredibly rewarding, and the resulting deliciousness is a testament to your culinary efforts. It’s a project that feeds the soul just as much as it feeds the body.
Ingredients Needed to Make Juicy Blackberry Pie with Flaky, Buttery Crust
Gathering your ingredients is the first gentle step in creating this beloved pie. Think of these as the building blocks of joy, each one playing its part in the final symphony of flavor and texture.
- 6 cups fresh blackberries (washed gently and patted dry with care)
- ½ cup granulated sugar
- ¼ cup packed light brown sugar (for a deeper, caramel note)
- 3 tablespoons cornstarch (to thicken the juices beautifully)
- 4 tablespoons all-purpose flour
- 2 tablespoons freshly squeezed lemon juice (to brighten the berry flavor)
- 1 double pie crust (one for the bottom, one for the top)
- 2 teaspoons heavy cream (for brushing the crust to a golden sheen)
- 1 tablespoon granulated sugar (for sprinkling on top, optional sparkle)
Instructions to Make Juicy Blackberry Pie with Flaky, Buttery Crust – Step by Step
Now, let’s begin the gentle process of transforming these simple ingredients into a masterpiece. Each step is a moment of connection, a quiet act of love that builds towards something truly special.
Step 1: Prepare Your Baking Environment
Begin by preheating your oven to 425°F (220°C). It’s important to get the oven nice and hot so the crust has a chance to puff up beautifully. Adjust the oven rack so it’s just below the center position; this helps ensure the bottom crust cooks through evenly and avoids a soggy bottom, a common worry for pie makers. While the oven heats, take a moment to lightly butter or spray your pie pan. This small step prevents the crust from sticking, making it a dream to slice and serve later.
Step 2: Craft the Perfect Filling Mix
In a small bowl, whisk together the granulated sugar, packed brown sugar, cornstarch, and all-purpose flour. This dry mixture is crucial; it will mingle with the blackberry juices as they cook, thickening them into a luscious, glossy filling that clings to the berries. A well-mixed dry blend ensures there are no lumps of cornstarch and that the sweetness is evenly distributed, contributing to that perfectly sweet, just-right taste we cherish in a classic pie.
Step 3: Combine Berries and Sweetness
In a larger bowl, gently toss the freshly washed and patted-dry blackberries with the freshly squeezed lemon juice. The lemon juice adds a wonderful brightness that cuts through the sweetness and enhances the natural tartness of the berries. Now, softly fold in the sugar and cornstarch mixture you prepared. It’s important to be gentle here, using a spatula to fold rather than stir vigorously, as we want to keep the berries as whole and beautiful as possible. This care ensures that when you slice the pie, you’ll see gorgeous, intact berries.
Step 4: Assemble the Pie Crusts
Pour the luscious blackberry filling into the prepared bottom pie crust, spreading it evenly. Now it’s time to think about the top crust. You have so many lovely options! You could create a classic lattice by cutting the top crust into strips and weaving them over the filling, a full top crust with decorative vent slits to allow steam to escape, or even fun cut-out shapes for a playful touch. If you opt for a lattice, start by placing the vertical strips, then weave the horizontal ones over and under them. A tiny dusting of flour on your lattice strips can prevent them from sticking together as you work.
Step 5: Seal and Adorn Your Pie
Once your top crust is in place (whether it’s a lattice, a full crust, or cut-outs), it’s time to seal the edges with the bottom crust. Trim away any excess dough from the edges, then pinch or crimp them together firmly to create a beautiful, finished look that also helps keep the filling contained. For that signature golden-brown sheen and a touch of sweetness, lightly brush the entire top crust—including the lattice or edges—with the heavy cream. If you like a little sparkle and extra crunch, sprinkle a tablespoon of granulated sugar over the cream-brushed surface.
Step 6: The Patient Baking Process
Carefully place your assembled pie onto the lower oven rack. Bake at the initial high temperature of 425°F (220°C) for about 15 minutes. This initial burst of heat helps to set the crust and give it a head start on browning. After 15 minutes, reduce the oven temperature to 375°F (190°C) and continue baking for another 50–60 minutes, or until the filling is bubbling robustly all over and the crust has achieved a beautiful, deep golden-brown color. Keep a watchful eye; if the edges of the crust start to brown too quickly, you can gently tent them with strips of aluminum foil to prevent over-browning while the center finishes cooking.
Step 7: The Essential Resting Period
Once your beautiful pie is out of the oven, shimmering with bubbling juices and a perfectly golden crust, the most important step follows: patience. Let the pie cool completely on a wire rack for at least 2–3 hours, or even longer. This resting time is absolutely crucial; it allows the juices to thicken and set properly. Rushing this step will result in a runny filling that spills out when sliced. The wait is truly worth it for those clean, perfect slices that hold their shape and showcase the juicy berries and flaky crust.
Chef’s Tips for a Perfect Result
- Berry Quality Matters: Always use fresh, ripe blackberries. If using frozen berries, do not thaw them completely; toss them with the filling ingredients while still slightly frozen to prevent them from becoming too mushy.
- Keep Everything Cold: For the flakiest crust, ensure your butter, water, and even your flour are cold. This is what creates those beautiful steam-filled layers in the pastry.
- Don’t Overwork the Dough: Mix the pie dough ingredients until just combined. Overworking will develop the gluten too much, resulting in a tough crust instead of a tender, flaky one.
- Prevent a Soggy Bottom: Baking the pie on the lower rack and preheating the oven thoroughly are essential. You can also blind-bake the bottom crust for 10-15 minutes before adding the filling, especially for very juicy pies.
- Visual Cues for Doneness: Look for a filling that’s visibly bubbling in the center of the pie, not just around the edges, and ensure the crust is a deep golden brown. The crust should sound hollow when tapped gently.
- Cooling is Key: Resist the urge to slice into a hot pie! The filling needs ample time to set. Cooling for at least 2-3 hours ensures clean slices and a beautifully presented dessert.
Variations and Substitutions
While this juicy blackberry pie with flaky, buttery crust is perfection as is, feel free to adapt it to your preferences or dietary needs. The heart of a home cook is to nourish, and that means making recipes your own.
- Mixed Berry Delight:
What to change: Reduce blackberries to 4 cups and add 2 cups of other fresh or frozen berries like blueberries, raspberries, or sliced strawberries.
Impact: This offers a more complex berry flavor profile and varied textures. - Hint of Spice:
What to change: Add ½ teaspoon of ground cinnamon or ¼ teaspoon of ground nutmeg to the dry filling ingredients.
Impact: This adds a warm, comforting depth to the filling, especially lovely in cooler weather. - Citrus Zest Boost:
What to change: Add the zest of one lemon or one orange to the fresh blackberries along with the lemon juice.
Impact: This intensifies the bright, fresh flavors and adds a lovely aromatic quality. - Gluten-Free Alternative:
What to change: Use your favorite gluten-free all-purpose flour blend for the crust and ensure cornstarch is verified gluten-free.
Impact: The texture of a gluten-free crust can vary, but it allows those with gluten sensitivities to enjoy the pie. Look for recipes specifically designed for flaky gluten-free pie crusts. - Vegan Option:
What to change: For the crust, use vegan butter or vegetable shortening and ice water. For the wash, use a bit of plant-based milk (like almond or oat) or a cornstarch slurry instead of heavy cream. Ensure your granulated and brown sugars are vegan-friendly.
Impact: This version is entirely dairy-free, offering a delicious pie for those following a vegan lifestyle.
How to Serve and Pair
Serving this beautiful juicy blackberry pie with flaky, buttery crust is an occasion in itself. The simplest way to present it is warm, allowing the rich aroma to fill the room. A dollop of freshly whipped cream, or a scoop of homemade vanilla bean ice cream, is a classic pairing that adds a creamy, cooling contrast to the warm, tart berries.
For a more elegant touch, consider a drizzle of crème anglaise or a sprinkle of toasted slivered almonds over the whipped cream. This pie is perfect for Sunday dinners, holiday celebrations, or any gathering where you want to share a moment of pure, comforting joy. It pairs wonderfully with a mild, fruity tea or even a sparkling cider for a refreshing non-alcoholic option. Remember, the presentation is part of the love you pour into the meal; a clean slice on a pretty plate is always a welcome sight.
Storage and Reheating
Proper storage ensures that the delightful flavors and textures of your juicy blackberry pie with flaky, buttery crust can be enjoyed over several days. My philosophy is to treat leftovers with the same care as the freshly baked pie.
Refrigerator
Once the pie has cooled completely, store any leftovers in the refrigerator. It’s best to cover the pie loosely with plastic wrap or place it in an airtight container. The pie will keep well for 3 to 4 days.
Freezer
For longer storage, you can freeze the completely cooled pie. Wrap it tightly in plastic wrap, then in aluminum foil, or place it in a freezer-safe container. It can be stored in the freezer for up to 2-3 months. For easier serving, you can freeze individual slices.
Room Temperature
While it’s tempting to leave a homemade pie on the counter, it’s generally safer to refrigerate it once it has completely cooled to prevent spoilage, especially with fruit fillings. However, if you plan to consume it within a day, leaving it covered at room temperature might be acceptable in cooler climates, but refrigeration is always the safest bet for fruit pies.
Reheating
To reheat a slice of pie, the oven is your best friend. Place a slice on a baking sheet and warm it in a preheated oven at 300–325°F (150–160°C) for about 10–15 minutes, or until warmed through. This method helps to crisp up the crust again. If reheating a whole pie, increase the time accordingly. Avoid using the microwave, as it can make the crust soggy and the filling rubbery.
Frequently Asked Questions (FAQ)
Q1: Can I substitute other fruits for the blackberries in this pie?
Yes, you can absolutely substitute other fruits like blueberries, raspberries, or even sliced apples. While the core recipe calls for juicy blackberries, other berries or fruits will yield a delicious pie, though the baking time might need slight adjustments based on the fruit’s moisture content and density.
Q2: How can I tell if my blackberry pie is fully baked and done?
Your pie is done when the crust is a deep golden brown and the filling is visibly bubbling all over, especially in the center. Gently nudging the crust should reveal a slightly firm structure, and if you prick the filling, it should be thickened, not watery.
Q3: What causes a soggy bottom crust and how can I prevent it?
A soggy bottom usually happens when the filling is too wet or the bottom crust doesn’t bake long enough. To prevent it, ensure your oven is fully preheated, bake on the lowest rack, and consider blind-baking the bottom crust beforehand.
Q4: Can I make the pie dough ahead of time?
Absolutely. Pie dough can be made up to 2 days in advance and stored in the refrigerator, or wrapped tightly and frozen for up to 3 months. This advanced prep is a wonderful way to simplify the pie-making process on baking day.
Q5: What are the best ways to customize or serve this pie?
You can customize your pie by adding a pinch of cinnamon or nutmeg to the filling, or by using a lattice top with decorative cutouts. Serving it warm with vanilla ice cream or fresh whipped cream enhances its comforting appeal.
CONCLUSION
This juicy blackberry pie with flaky, buttery crust is more than just a recipe; it’s an invitation to slow down and savor the moments that matter. It’s a tangible expression of love, baked into a tender, golden embrace. The irresistible sweetness of the berries, perfectly balanced by that oh-so-flaky crust, makes every single bite a delightful experience that will linger in your heart.
Print
Juicy Blackberry Pie with Flaky, Buttery Crust
- Prep Time: 30
- Cook Time: 55
- Total Time: 115
- Yield: 8 servings (9-inch pie) 1x
- Category: desserts
- Method: Baking
- Cuisine: American
- Diet: Vegetarian
Description
A flaky, buttery crust encases a rich blend of fresh blackberries, lemon, and balanced sweetness in this nostalgic American dessert. The golden-brown crust melts to tender layers while the filling offers bursts of ripe blackberry flavor, perfect for summer gatherings or cozy meals. This classic pie celebrates the harmony of rustic textures and fruity freshness.
Ingredients
2 1/2 cups all-purpose flour
3/4 cup cold unsalted butter, cubed
1/4 teaspoon salt
1/3 cup granulated sugar (crust)
2 tablespoons cold milk
4 cups fresh blackberries
1 cup granulated sugar (filling)
2 tablespoons cornstarch
1 tablespoon lemon juice
Zest of 1 lemon
1/4 teaspoon vanilla extract (optional)
Instructions
In a bowl, combine flour, salt, and 1/3 cup sugar for crust. Add cold butter cubes and toss until mixture resembles coarse crumbs.
Add cold milk 1 tablespoon at a time, mixing until dough forms a soft ball. Divide in half, flatten into discs, and refrigerate 30 minutes.
Roll one disc into a 9-inch circle. Place in a pie dish, trim edges, and refrigerate until firm.
In another bowl, combine blackberries, 1 cup sugar, cornstarch, lemon juice, zest, and vanilla. Set mixture to rest 10 minutes.
Fill the chilled crust with blackberry mixture, leaving 1/2 inch headspace. Roll and place top crust, crimp edges, and cut vents or use a lattice top.
Brush crust with leftover milk and bake at 400°F for 55 minutes, shielding edges after 30 minutes. Let cool 2 hours before serving.
Notes
Chill dough for firmness and precise shaping.
For added crispiness, bake pre-sharpened blackberries into the bottom crust.
Lattice design enhances aesthetics—create by cutting strips before assembling.
Store at room temperature up to 24 hours or refrigerate for longer freshness.
Nutrition
- Serving Size: One 9-inch slice (1/8 of pie)
- Calories: 240
- Sugar: 15g
- Sodium: 120mg
- Fat: 10g
- Saturated Fat: 6g
- Carbohydrates: 30g
- Fiber: 3g
- Protein: 2g
- Cholesterol: 20mg


