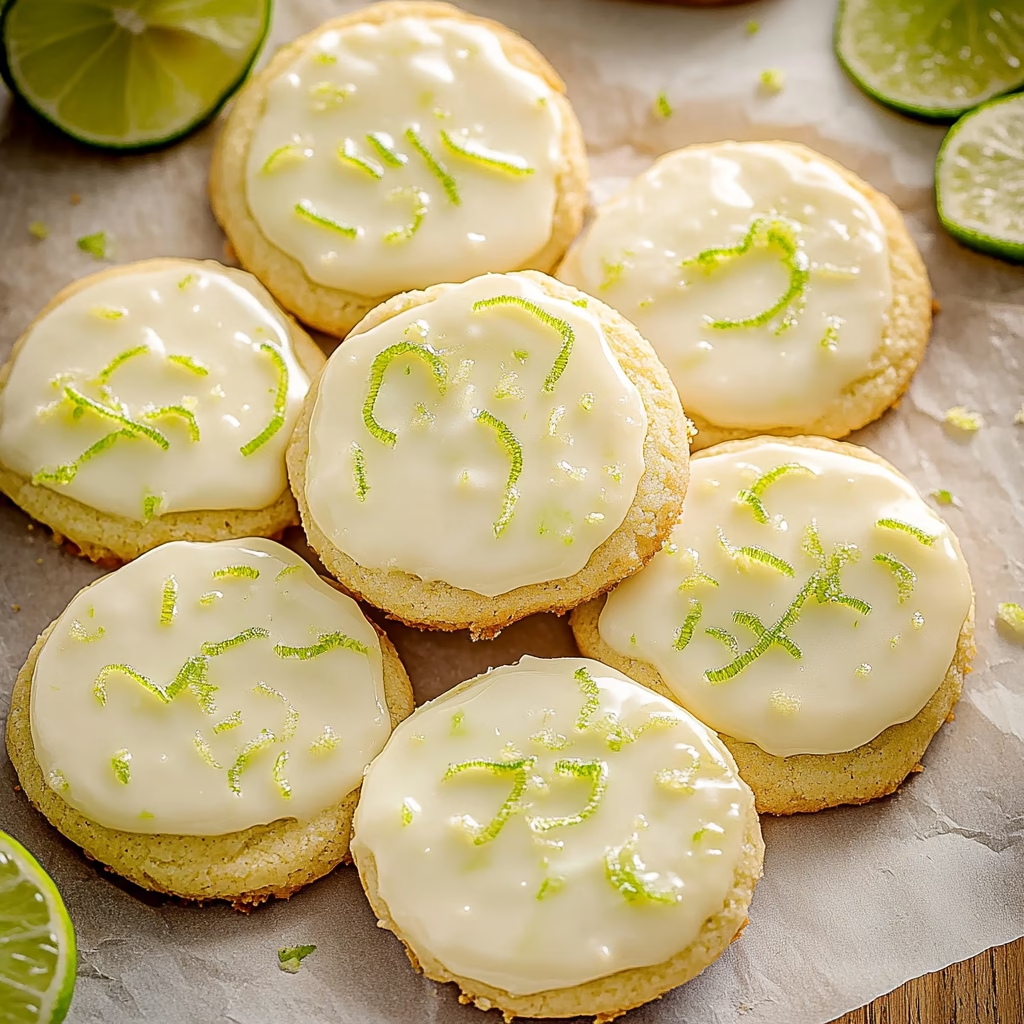
Key lime cookies are more than just a sweet treat; they are little pockets of sunshine, each one a whisper of warm breezes and coastal comfort. There’s a unique magic in baking, a way to bottle up feelings and shared moments, and these delightfully tangy cookies have always held a special place in my heart. They remind me of lazy afternoons spent with my grandmother, her kitchen filled with the comforting aroma of baking and the gentle hum of her sewing machine.
This recipe for key lime cookies is my way of recreating that feeling of simple joy and heartfelt connection. It’s designed to be accessible, so anyone can bake a batch and fill their home with the bright scent of lime and the promise of sweet, chewy goodness. I’ve refined it over the years, trying to capture the essence of that perfect bite – one that’s both zesty and comforting, a true embodiment of my culinary roots.
What is Key Lime Cookies?
Key lime cookies are a delightful twist on classic cookie recipes, infusing the beloved sweet dough with the unmistakable bright, tangy flavor of key limes. Unlike their more famous pie counterparts, these cookies offer a soft, chewy texture with a wonderfully tender crumb. The key lime zest and juice are the stars, imparting a vibrant citrus note that cuts through the sweetness, creating a perfectly balanced flavor profile that’s both refreshing and deeply satisfying.
Originating from the sunny shores of Florida, where key limes are abundant, these cookies have become a beloved way to enjoy the unique taste of this special fruit. They capture the spirit of their namesake pie but in a portable, shareable cookie form. The combination of buttery cookie dough kissed with lime is simply irresistible, making them a favorite for celebrations, afternoon treats, or whenever a little bit of zest is needed.
Reasons to Try Key Lime Cookies
There are so many reasons to fall in love with these key lime cookies. First and foremost, the flavor is simply divine – a perfect harmony of sweet and tart that awakens the palate. They offer a delightful chewiness that many cookie lovers adore, providing a satisfying texture with every bite. Plus, the preparation for the cookie dough itself is incredibly swift, taking only about 10 minutes, making them an ideal choice for those moments when you crave something delicious but are short on time.
These cookies are perfect for beginner bakers looking for a rewarding and easy recipe, as well as seasoned bakers wanting a reliable, crowd-pleasing treat. They are wonderful for family gatherings, bake sales, or simply as a comforting indulgence during a quiet afternoon with a cup of tea. The vibrant citrus notes also make them a fantastic dessert option for spring and summer events, bringing a touch of tropical brightness to any occasion.
Ingredients Needed to Make Key Lime Cookies
Here’s what you’ll need to bring this sunshine-filled recipe to life:
- ½ cup unsalted butter, softened to room temperature (113g)
- 1 large egg, at room temperature
- ¾ cup granulated sugar (150 g)
- ¼ cup light brown sugar, packed (50g)
- 1 tsp vanilla extract
- 2-3 tsp key lime zest (from about 2-3 key limes)
- 1 ¾ cup all-purpose flour (219g)
- ½ tsp baking soda
- ½ tsp salt
For the Key Lime Glaze:
- 1 cup powdered sugar
- 1 Tbsp key lime juice (freshly squeezed is best)
- 1-2 Tbsp milk (whole or 2% for richness)
- ¼ tsp vanilla extract
- ½ tsp key lime zest
- Pinch of salt (optional, to enhance flavors)
Instructions to Make Key Lime Cookies – Step by Step
Let’s embark on this baking journey together. Each step is a gentle invitation to create something wonderful, filled with love and care.
Step 1:
Begin by preparing your oven and your dry ingredients. Preheat your oven to a warm 350°F (175°C). In a small bowl, gently whisk together the flour, baking soda, and salt. This simple step ensures your leavening agents are evenly distributed, which is key for a beautifully risen cookie. Set this bowl aside, allowing the ingredients to mingle while you work on the wet components.
Step 2:
In a separate, larger mixing bowl, cream together the softened butter, granulated sugar, and light brown sugar. Using an electric mixer on high speed, beat these ingredients for about 1-2 minutes. You’re looking for a transformation here – a light, fluffy texture that’s pale in color. This process incorporates air, which is vital for achieving that perfect tender cookie crumb, mimicking the gentle fluff of a cloud.
Step 3:
Now, it’s time to bring in the binder and the essence of warmth. Add the room-temperature egg and the vanilla extract to the creamed butter and sugar mixture. Beat again until everything is thoroughly incorporated, creating a smooth, cohesive base. Next, gently fold in the finely grated key lime zest. Breathe in that bright, invigorating aroma; it’s the first hint of the sunshine that these cookies will bring.
Step 4:
Gradually introduce the dry ingredients to the wet mixture. Add about one-third of the flour mixture at a time, beating on a low speed only until it’s just combined. It’s important not to overmix here; we want to keep that delicate texture. Continue adding the flour mixture slowly until a soft dough begins to form. It should hold together beautifully when you gently press it.
Step 5:
Shape the wonderful dough into playful mounds. Roll the dough into roughly 1 ½-inch balls. Imagine creating little spheres of happiness, each one ready to be baked into a tender cookie. Arrange these dough balls on a baking sheet lined with parchment paper, leaving a little space between each one so they have room to spread their wings as they bake.
Step 6:
Let the magic of the oven work its wonder. Bake the cookies for approximately 8-10 minutes. You’re looking for edges that are set but not deeply browned; the centers might still appear a touch soft. This is precisely how you achieve that desirable chewy texture. Once out of the oven, let the cookies cool on the baking sheet for 2-3 minutes. This brief rest allows them to firm up slightly before you transfer them to a wire rack to cool completely.
Step 7:
While the cookies are cooling, prepare the luminous key lime glaze. In a medium bowl, whisk together the powdered sugar and key lime juice. Gradually add milk, one tablespoon at a time, until you reach your desired consistency. It should be thick enough to coat the cookies but still pourable. Stir in the vanilla, key lime zest, and a pinch of salt if you’re using it. Let the glaze rest for a few minutes to allow it to thicken slightly.
Step 8:
Once the cookies are completely cool to the touch, it’s time to adorn them. You can either dip the tops of each cookie into the glaze, allowing any excess to drip back into the bowl, or use a knife or small spatula to spread the glaze artistically over the top. Place the glazed cookies back on the wire rack (with parchment paper underneath to catch drips) and let the glaze set completely. And there you have it – a batch of pure, zesty joy!
Chef’s Tips for a Perfect Result
- Ensure your butter and egg are at true room temperature. This allows them to emulsify properly, creating a smoother dough and a more tender cookie.
- Zest your key limes gently. You only want the colorful outer layer, avoiding the bitter white pith underneath for the brightest citrus flavor.
- Do not overbake the cookies. Pull them from the oven when the edges are just set; they will continue to bake on the hot cookie sheet, ensuring a chewy center.
- For a smoother glaze, sift your powdered sugar before whisking it with the key lime juice and milk. This prevents any small lumps from interrupting the beautiful finish.
- Chill the dough for 15-30 minutes if you prefer a slightly thicker cookie or if your kitchen is very warm. This helps control spread.
- Taste your key lime juice before using it in the glaze. If it’s particularly tart, you might need a bit more powdered sugar; if it’s mild, you might want a touch more juice.
Variations and Substitutions
- Gluten-Free Alternative: Substitute a good quality 1:1 gluten-free baking flour blend for the all-purpose flour. The texture might vary slightly, but the lime flavor will shine through.
- Lemon’s Zesty Cousin: If key limes are unavailable, you can substitute regular lime juice and zest, or even lemon juice and zest for a different citrus profile. Adjust the amount to taste, as green limes and lemons can be more tart.
- White Chocolate Drizzle: Melt some white chocolate chips and drizzle them over the set key lime glaze for an extra layer of sweetness and visual appeal.
- Coconut Kiss: Add a tablespoon or two of finely shredded unsweetened coconut to the cookie dough for a subtle tropical flavor infusion.
- Extra Zing: For an even more intense lime flavor, consider adding a tiny drop of key lime extract (use sparingly, as extracts are potent) to both the cookie dough and the glaze.
How to Serve and Pair
These delightful key lime cookies are wonderful served simply on their own, perhaps arranged artfully on a platter for a casual get-together. Their bright, zesty flavor makes them an excellent accompaniment to a steaming cup of herbal tea, such as chamomile or peppermint, or a refreshing glass of iced tea on a warm afternoon. You might also consider pairing them with fresh fruit salad or a light, creamy dessert like panna cotta.
For a more festive presentation, sprinkle a little extra key lime zest or finely chopped candied key lime peel over the wet glaze just before it sets. These cookies are perfect for a summer garden party, a bridal shower, or any occasion that calls for a touch of cheerful, tropical elegance. They also make a lovely addition to a breakfast or brunch spread, offering a sweet, citrusy start to the day.
Storage and Reheating
Refrigerator
Store leftover key lime cookies in an airtight container in the refrigerator for up to 5-7 days. The cool environment helps maintain the integrity of the glaze and the cookie’s texture. Ensure the container is truly airtight to prevent them from drying out or absorbing unwanted odors.
Freezer
Fully baked and cooled cookies can be frozen for up to 2-3 months. For best results, place them in a single layer on a baking sheet until solid, then transfer them to a freezer-safe bag or container, separating layers with parchment paper to prevent sticking. Thaw them at room temperature.
Room Temperature
Un-glazed cookies can be stored at room temperature in an airtight container for 3-4 days. If they are already glazed, it’s best to store them in the refrigerator, as the glaze may become sticky or melt at warmer temperatures. Ensure they are kept out of direct sunlight and away from heat sources.
Reheating
These cookies are best enjoyed at room temperature or chilled, and generally do not require reheating. If you do wish to slightly warm them, place them on a baking sheet in a low oven (around 300°F or 150°C) for just 2-3 minutes, watching carefully to prevent drying out or melting the glaze. Avoid microwaving, as this can quickly alter their delicate texture.
Frequently Asked Questions (FAQ)
Can I substitute regular limes for key limes in this recipe?
Yes, you can substitute regular limes for key limes. Use the zest and juice of about 2-3 regular limes, tasting as you go, as they can be more tart. This will give you a delicious, albeit slightly different, lime flavor.
How do I know when my key lime cookies are perfectly baked?
Your key lime cookies are perfectly baked when the edges are set and lightly golden, but the centers still look slightly soft and puffy. They will continue to bake slightly on the hot baking sheet after removal from the oven, ensuring a chewy texture.
My cookies spread too much, what went wrong?
Excessive spreading is often due to overly soft or melted butter, or too much sugar. Ensure your butter is softened but not melted, and try chilling the dough for 15-30 minutes before baking to help control spread.
Can I make these key lime cookies ahead of time?
Absolutely! You can bake the cookies and store them un-glazed at room temperature for up to 4 days. Prepare the glaze just before you’re ready to decorate them for the freshest flavor and best texture.
What are the best ways to customize these key lime cookies?
Customize your key lime cookies by adding a drizzle of white chocolate, folding in shredded coconut into the dough, or topping the glaze with extra lime zest or finely chopped candied lime peel for an extra burst of flavor and visual appeal.
CONCLUSION
These key lime cookies are a delightful testament to the simple pleasures of baking, offering a bright, tangy zest that cuts beautifully through their soft, chewy texture. They are a loving invitation to create moments of sweetness and connection, filling your home with warmth and joy. Don’t hesitate to bake a batch and let that signature key lime flavor transport you to a place of pure, unadulterated happiness.
Print
Key Lime Cookies: A Taste of Sunshine and Sweet Memories
- Prep Time: 10 mins
- Cook Time: 9 mins
- Total Time: 30 mins
- Yield: 24 cookies 1x
- Category: Dessert
- Method: Baking
- Cuisine: American
- Diet: Vegetarian
Description
These soft and chewy Key Lime Cookies are bursting with refreshing citrus flavor and topped with a sweet key lime glaze for the ultimate lime lover’s treat.
Ingredients
For the Cookies:
- ½ cup unsalted butter (113g), softened to room temperature
- 1 large egg, room temperature
- ¾ cup sugar (150g)
- ¼ cup light brown sugar (50g)
- 1 tsp vanilla extract
- 2–3 tsp key lime zest
- 1 ¾ cups flour (219g)
- ½ tsp baking soda
- ½ tsp salt
For the Key Lime Glaze:
- 1 cup powdered sugar
- 1 Tbsp key lime juice
- 1–2 Tbsp milk
- ¼ tsp vanilla
- ½ tsp key lime zest
- Pinch of salt, optional
Instructions
1. Preheat oven to 350°F.
2. Whisk together the flour, salt, and baking soda in a small bowl and set aside.
3. In a separate mixing bowl, combine the butter, brown sugar, and granulated sugar and beat with an electric mixer on high for 1-2 minutes until light and fluffy.
4. Add in the egg and vanilla extract and beat until fully combined.
5. Mix in the key lime zest.
6. Add one-third of the flour mixture at a time, mixing only until incorporated, until the dough forms.
7. Roll the dough into 1 ½ inch balls and arrange on a parchment-lined baking sheet.
8. Bake for 8-10 minutes.
9. Allow the cookies to cool on the baking sheet for 2-3 minutes, then transfer to a cooling rack.
10. Once the cookies are completely cooled, whisk together the glaze ingredients, adjusting the liquid or powdered sugar to reach the desired consistency.
11. Allow the glaze to sit for several minutes, then dip the cookies or spread the glaze over the tops with a knife.
12. Allow the icing to set before serving.
13. Store remaining cookies in an airtight container for 4-5 days.
Notes
Make sure the butter is properly softened for the best cookie texture.
Do not overbake the cookies to keep them soft and chewy.
The cookies may still look slightly puffy when removed from the oven, and that is normal.
Rolling the dough into smooth balls creates a prettier finished cookie.
Nutrition information is automatically calculated and should be used as an approximation only.
Nutrition
- Serving Size: 1 cookie
- Calories: 123
- Sugar: 13g
- Sodium: 76mg
- Fat: 4g
- Saturated Fat: 3g
- Unsaturated Fat: 1g
- Trans Fat: 1g
- Carbohydrates: 21g
- Fiber: 1g
- Protein: 1g
- Cholesterol: 17mg