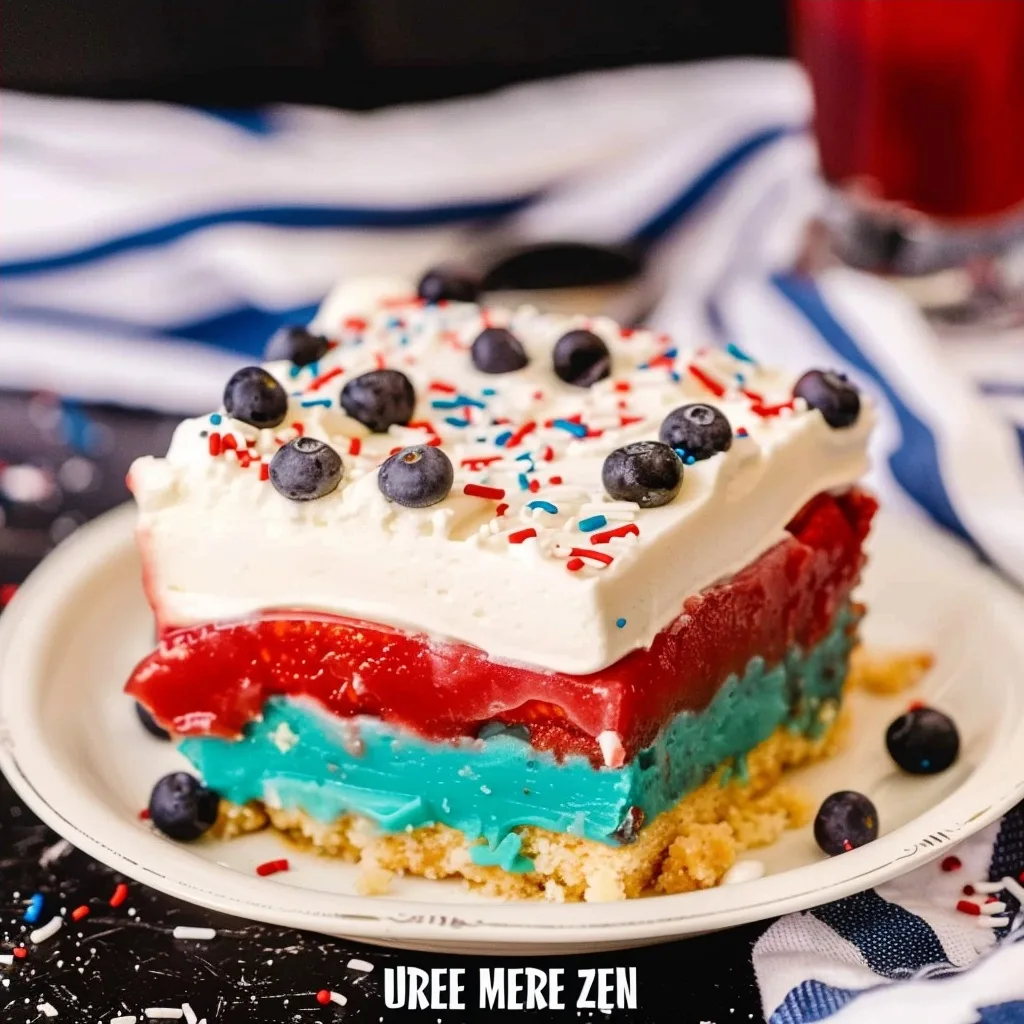
No Bake Berry Lush is the kind of dessert that reminds me of summer afternoons spent in my grandmother’s kitchen, where the hum of the refrigerator provided a soundtrack to our storytelling. This layered masterpiece brings together the crunch of vanilla cookies with the whimsical, vibrant hues of cherry and blue raspberry, all anchored by a cloud-like cream cheese filling. It is a dessert that requires nothing but a little patience while it sets, making it a perfect companion for those moments when you want to create something beautiful without turning on the oven.
There is something deeply grounding about preparing a treat like this No Bake Berry Lush. As you whisk the colors and smooth the layers, you are not just making food, but crafting a memory for the people you love. Whether it is a festive gathering or a quiet weekend treat, this recipe offers a sense of accomplishment that feels both simple and profound.
What is No Bake Berry Lush?
No Bake Berry Lush is a classic, chilled dessert constructed in distinct, delicious strata. It begins with a firm, buttery crust made from crushed vanilla cookies, providing a sweet foundation for the layers to follow. Above this lies a velvety mixture of cream cheese and powdered sugar, which balances the sweetness of the fruit-flavored gelatin layers that sit proudly on top.
This dessert is celebrated for its visual appeal, featuring bold stripes of red and blue that contrast beautifully with the creamy white center. By incorporating instant pudding into the gelatin, the texture becomes thick and spoonable, holding its shape perfectly when sliced. It is a nostalgic American treat that embodies the joy of no-bake cooking, highlighting how simple ingredients can transform into something truly spectacular.
Reasons to Try No Bake Berry Lush
This dessert is a savior for busy home cooks who refuse to compromise on flavor. Because it relies on refrigeration rather than baking, you can reclaim your kitchen space and keep your home cool, even during the height of the summer heat. It is a wonderful project for those who are just beginning their culinary journey, as it requires only basic mixing and layering techniques while delivering professional-looking results.
Beyond its ease, this dish is incredibly versatile and loved by children and adults alike. It is the perfect centerpiece for holiday celebrations, potlucks, or backyard barbecues where you need to feed a crowd. When you present this chilled delight, you are sharing more than just sugar and cream, you are offering a refreshing, vibrant experience that invites everyone to slow down and savor the moment.
Ingredients Needed to Make No Bake Berry Lush
- 36 vanilla Oreo cookies (finely crushed)
- 6 tablespoons unsalted butter (melted)
- 3 ounces cherry gelatin powder
- 3 ounces blue raspberry gelatin powder
- 0.6 cups boiling water (divided for both gelatins)
- 6.8 ounces vanilla instant pudding mix (two small boxes)
- 2.5 cups cold milk
- 8 ounces cream cheese (softened to room temperature)
- 1 cup powdered sugar
- 16 ounces whipped topping (divided, plus extra for garnish)
- Red, white, and blue sprinkles (for a festive finish)
Instructions to Make No Bake Berry Lush – Step by Step
Step 1: Begin by preparing your crust. Place the vanilla Oreo cookies into your food processor and pulse until they become fine, consistent crumbs. Transfer these crumbs into a large mixing bowl, pour in the melted butter, and stir until the mixture resembles wet sand that clumps together when pressed.
Step 2: Press the buttery crumb mixture firmly into the bottom of a 9×13 glass baking dish. Take your time here to ensure the base is even and compact, as this forms the structural integrity of your dessert. Once pressed, set the dish aside while you move on to the flavorful fillings.
Step 3: Prepare your fruit layers by placing the cherry gelatin in one small bowl and the blue raspberry gelatin in another. Add one-third cup of boiling water to each bowl, whisking thoroughly until the granules are completely dissolved. This foundation of color and flavor is what gives the dish its signature character.
Step 4: In a separate medium bowl, whisk together the dry vanilla instant pudding mix and the cold milk until smooth and thickened. Divide this pudding mixture evenly, stirring half into the cherry gelatin and the other half into the blue gelatin, creating two distinct, creamy fruit layers.
Step 5: In a large bowl, use an electric mixer to beat the cream cheese and powdered sugar together until the texture is light and silky smooth. Gently fold in half of the whipped topping to create an airy, decadent white layer that will act as the heart of the dessert.
Step 6: Assemble the lush by spreading the cream cheese mixture evenly over your prepared cookie crust. Carefully pour the red gelatin layer on top, smoothing it out with a spatula, then repeat the process with the blue gelatin layer, moving gently so the colors remain distinct.
Step 7: Finish by spreading the remaining whipped topping over the top of the blue layer. Garnish with your choice of red, white, and blue sprinkles, then cover the dish and refrigerate for at least four hours. Once set, the layers will slice beautifully, ready to be enjoyed by all.
Chef’s Tips for a Perfect Result
- Ensure your cream cheese is completely soft before mixing, as this prevents lumps and creates a perfectly smooth, velvety filling.
- Use a light touch when spreading the gelatin layers to keep the colors separate and vibrant without bleeding into one another.
- Let the pudding mixture sit for a few minutes before mixing it into the gelatin, as this helps the texture reach the ideal consistency.
- Chill the whisk and the bowl used for the whipped topping if you are making your own to ensure the structure holds up against the gelatin weight.
Variations and Substitutions
- Gluten-Free Alternative: Replace the vanilla Oreo cookies with a gluten-free sandwich cookie to keep the crust tradition alive for those with sensitivities.
- Lightened Version: Use reduced-fat cream cheese and sugar-free gelatin to decrease the overall calorie content without sacrificing the colorful appeal.
- Flavor Twist: Feel free to swap the cherry and blue raspberry for other fruit flavors like lime or strawberry to match your specific event theme.
How to Serve and Pair
Serve this dessert chilled, straight from the refrigerator to ensure the layers remain stable. A simple spatula works best to lift each portion cleanly from the 9×13 dish. Pair it with a cold glass of sparkling lemonade or a light herbal tea, which complements the fruity notes of the gelatin perfectly. It is a festive addition to any summer brunch or afternoon garden party.
Storage and Reheating
Refrigerator: Cover the dish tightly with plastic wrap or a lid. It will stay fresh for up to three days, though the crust may soften slightly over time. Freezer: This dish does not freeze well due to the gelatin and pudding consistency, which can become icy and lose texture when thawed. Room Temperature: Because of the dairy content in the cream cheese and whipped topping, this dessert should not be left out for more than two hours.
Frequently Asked Questions (FAQ)
Can I use a different cookie for the crust?
Yes, you can substitute vanilla wafers or even graham crackers if you prefer a different crunch. Ensure they are finely crushed and mixed well with the melted butter to maintain a sturdy base.
How do I know when the lush is fully set?
The dessert is ready when the top gelatin layer feels firm to the touch and does not jiggle excessively when the dish is gently moved. Four hours is usually sufficient, but overnight chilling yields the cleanest slices.
Why are my layers mixing together?
Layers often mix if the gelatin is added while still warm or if it is poured too quickly. Ensure each layer is thoroughly cooled and spread slowly with the back of a spoon to maintain distinct lines.
Can I make this the day before serving?
Making this dessert a day in advance is actually ideal, as it allows the flavors to meld and the structure to firm up perfectly. Keep it covered in the refrigerator until the very moment you are ready to serve.
How can I make the presentation more elegant?
To elevate the look, pipe decorative swirls of whipped topping on top before adding the sprinkles. You could also garnish each individual serving with a fresh berry for a pop of natural color.
Conclusion
No Bake Berry Lush is a testament to the joy of simple, heartfelt cooking that brings people together. Its vibrant layers and creamy, comforting texture make it a standout choice for any celebration that calls for a little extra sweetness. I encourage you to slow down, enjoy the process of creating these colorful layers, and share a slice with someone you love, savoring that signature burst of fruity delight in every bite.
Print
No Bake Berry Lush
- Prep Time: 20
- Total Time: 300
- Yield: 9 servings 1x
- Category: desserts
- Method: No-Bake
- Cuisine: American
- Diet: Vegetarian
Description
Indulge in a nostalgic, cooling treat with this No Bake Berry Lush. Featuring a buttery vanilla cookie crust topped with a velvety cream cheese layer and vibrant stripes of cherry and blue raspberry, this dessert is as visually stunning as it is delicious. Perfect for summer days, this easy-to-assemble masterpiece requires no oven time, allowing you to create a professional-looking, crowd-pleasing dessert with minimal effort and maximum flavor.
Ingredients
36 vanilla Oreo cookies, finely crushed
6 tablespoons unsalted butter, melted
8 ounces cream cheese, softened
1/2 cup powdered sugar
1 cup whipped topping
3 ounces cherry gelatin powder
3 ounces blue raspberry gelatin powder
0.6 cups boiling water, divided
0.6 cups cold water, divided
Instructions
In a medium bowl, combine the crushed vanilla cookies with melted butter until moistened.
Press the mixture firmly into the bottom of an 8×8 inch square baking dish and chill for 15 minutes.
In a separate bowl, whip the cream cheese and powdered sugar until smooth, then fold in the whipped topping.
Spread the cream cheese mixture evenly over the chilled crust and refrigerate for 30 minutes.
Dissolve the cherry gelatin in 0.3 cups of boiling water, then stir in 0.3 cups of cold water.
Pour the cherry gelatin gently over the cream cheese layer and refrigerate until set.
Repeat the same process with the blue raspberry gelatin and pour carefully over the cherry layer.
Refrigerate the entire dish for at least 4 hours, or until completely firm, before slicing and serving.
Notes
Ensure the cream cheese is fully softened to avoid lumps in the middle layer. For cleaner slices, wipe your knife with a warm, damp cloth between each cut. Keep the dessert refrigerated until the very moment of serving to maintain the structure of the gelatin layers.
Nutrition
- Serving Size: 1 square
- Calories: 310
- Sugar: 28g
- Sodium: 210mg
- Fat: 14g
- Saturated Fat: 7g
- Carbohydrates: 42g
- Fiber: 1g
- Protein: 3g
- Cholesterol: 35mg


