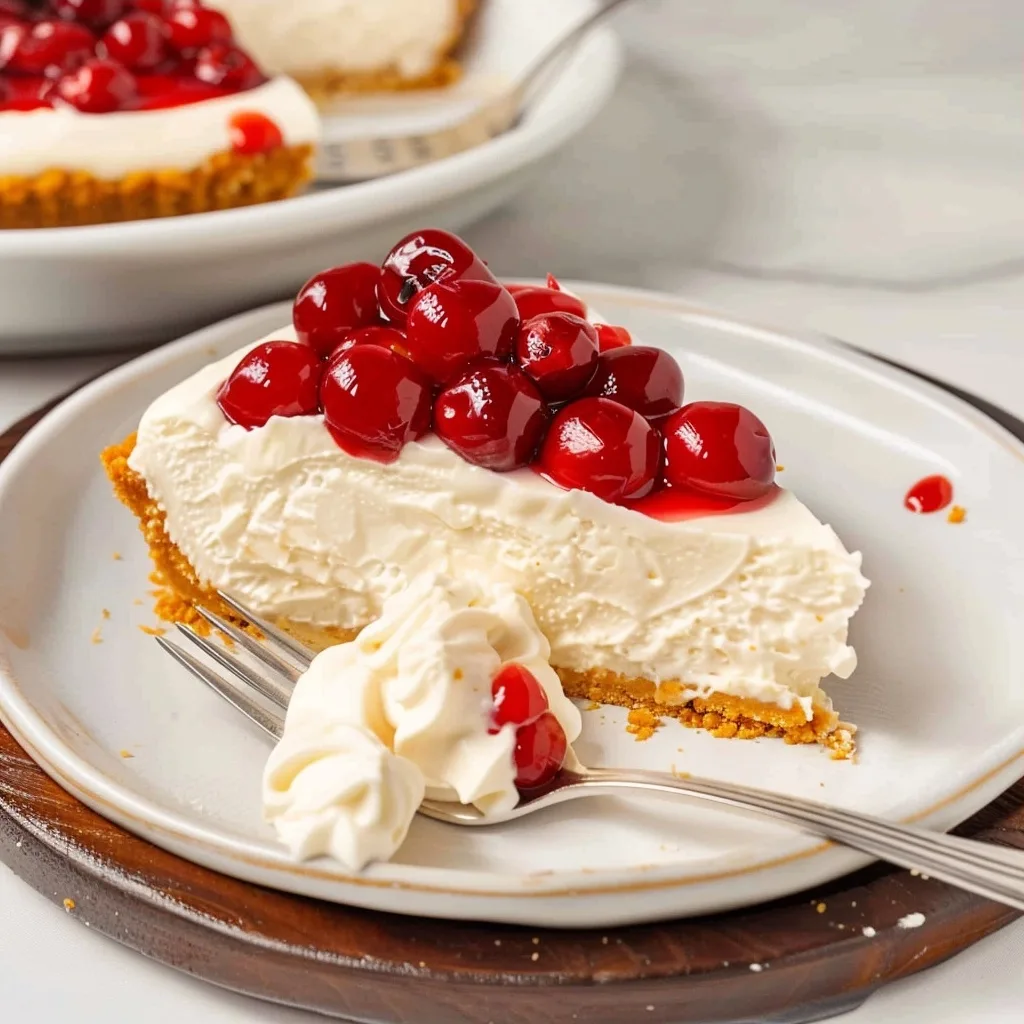
No bake cheesecake with Cool Whip has always been a gentle reminder that some of the most beautiful moments in life do not require intense labor. When I think of this dessert, I am transported back to my grandmother’s kitchen, where the hum of the refrigerator was the only sound and the scent of sweet vanilla hung in the air like a soothing embrace. Creating a decadent treat should feel like a moment of peace rather than a frantic race against the clock.
This recipe is my go-to when I want to offer something special without spending hours in the heat of the oven. The silky, cloud-like texture of a no bake cheesecake with Cool Whip brings comfort to any table, proving that simplicity is often the most sophisticated path to joy. Whether you are hosting a festive dinner or simply soothing your soul with a quiet slice on a Tuesday evening, this dessert is a reliable companion.
What is No Bake Cheesecake With Cool Whip?
A classic no bake cheesecake with Cool Whip is a chilled refrigerator pie that relies on the natural setting power of cream cheese and the airy lift of whipped topping. Unlike traditional versions that require a water bath and long baking times, this method yields a light, mousse-like consistency that feels remarkably luxurious. It is fundamentally a fusion of pantry staples, coming together to create a smooth, velvety experience that melts instantly on the tongue.
The beauty of this dessert lies in its structural integrity without the heat. By whipping cream cheese with a touch of sugar and folding in the whipped topping, you create a stable, airy filling that sets firmly as it chills. It is a traditional American favorite that celebrates convenience, allowing the natural tang of the cheese to play against the light, billowy sweetness of the topping.
Reasons to Try No Bake Cheesecake With Cool Whip
If you have ever felt overwhelmed by the precise science of baking, this recipe is a breath of fresh air. It is incredibly beginner-friendly, requiring no specialized equipment or mastery of temperamental ingredients. Because it does not require an oven, you can prepare it during the hottest summer months without heating up your home, making it a versatile choice for any season of the year.
Beyond ease, the texture is truly incomparable. There is a delightful contrast between the buttery, crumbly graham cracker crust and the whipped, cloud-like filling that makes every bite feel like a celebration. It is the perfect project to share with loved ones, teaching us that slowing down and savoring the process is just as meaningful as the final result.
Ingredients Needed to Make No Bake Cheesecake With Cool Whip
- 1 ½ cups graham cracker crumbs (finely crushed for a smooth base)
- ⅓ cup melted butter (unsalted works best to control the seasoning)
- 1 tablespoon granulated sugar (adds a hint of sweetness to the crust)
- 24 ounces cream cheese (ensure it is fully softened to room temperature for a lump-free texture)
- 1 cup powdered sugar (sifted to ensure a silky, smooth consistency)
- 1 teaspoon pure vanilla extract (the soulful anchor of the flavor)
- 8 ounces Cool Whip (thawed slightly so it folds in gently)
- 20 ounces cherry pie filling (the classic, vibrant finish)
Instructions to Make No Bake Cheesecake With Cool Whip – Step by Step
Step 1: Begin by grounding yourself in the process. In a medium bowl, combine your graham cracker crumbs, melted butter, and the tablespoon of granulated sugar. Stir them together until the mixture takes on the texture of damp ocean sand, ensuring every loose crumb is evenly coated in the butter.
Step 2: Press this mixture firmly and evenly into the bottom of a 9-inch springform pan. I like to use the flat bottom of a glass to really pack it down, as this creates a sturdy foundation for our delicate filling. Once pressed, tuck the pan into the refrigerator to chill while you prepare the next layers.
Step 3: In a large, deep bowl, beat the softened cream cheese and powdered sugar together. Take your time here, moving slowly to ensure there are absolutely no lumps. This is the stage where the heart of your cheesecake is built, so aim for a texture as smooth and airy as soft silk.
Step 4: Gently mix in your vanilla extract until fully incorporated. Finally, add the thawed whipped topping. Use a spatula to fold the mixture with wide, sweeping motions, keeping the airiness intact until you have a uniform, creamy blend.
Step 5: Carefully spread the cream cheese mixture over your chilled crust, smoothing the top with your spatula to create a beautiful, even surface. If the surface looks slightly rustic, embrace it, as home cooking is about personality rather than perfection.
Step 6: Place the pan in the refrigerator for at least 3 hours. This time is vital, allowing the cheesecake to set and the flavors to find harmony. Once firm, remove the springform sides gently and crown your work with a generous layer of cherry pie filling just before you serve.
Chef’s Tips for a Perfect Result
- Always use room temperature cream cheese, as cold cheese will create stubborn lumps that spoil the texture.
- Use an offset spatula to spread the filling, which helps you reach the corners without dragging the crust.
- Make sure to thaw your whipped topping in the refrigerator overnight rather than on the counter to maintain its stability.
- If you find your crust is crumbling, add an extra teaspoon of melted butter to ensure it binds perfectly.
Variations and Substitutions
- Gluten-Free Alternative: Substitute the graham crackers with gluten-free oat-based crumbs or crushed gluten-free ginger snaps for a slightly spiced, aromatic base.
- Low-Sugar Version: You can swap the powdered sugar for a powdered erythritol blend and use a sugar-free whipped topping to lower the carbohydrate impact.
- Fresh Fruit Variation: If cherries are not your preference, top the cake with fresh macerated strawberries or a swirl of blueberry compote to highlight the season’s best offerings.
How to Serve and Pair
This cheesecake is best served directly from the refrigerator, where it remains firm and refreshing. Pair it with a steaming cup of Earl Grey tea or a light floral herbal infusion to balance the richness of the cream. For a more festive presentation, garnish each slice with a fresh mint leaf or a dusting of toasted coconut threads.
Storage and Reheating
Refrigerator: Keep your cheesecake in an airtight container for up to 4 days. It is important to keep it covered tightly, as the cream cheese can absorb odors from other items in your fridge.
Freezer: For longer storage, you can freeze individual slices wrapped well in plastic wrap. Consume them within one month to ensure the texture remains creamy and avoids ice crystallization.
Reheating: This is a cold-served dessert, so please do not attempt to reheat it. Simply allow it to soften at room temperature for five minutes if you prefer a slightly softer, more mousse-like bite.
Frequently Asked Questions (FAQ)
Can I use Greek yogurt instead of cream cheese?
While you can substitute a portion of the cream cheese with thick Greek yogurt, it will change the structural set and tanginess of the final result. For the best traditional texture, stick to full-fat cream cheese.
How do I know when my cheesecake is set?
The cheesecake is done when the top feels firm to the touch and the edges have pulled away slightly from the sides of the pan. A gentle jiggle should show that the center is stable and no longer liquid.
Why is my filling clumpy?
Clumpy filling usually happens when the cream cheese was too cold when you started the initial mixing process. Always remember to let your ingredients come to room temperature before beginning to ensure a smooth, professional consistency.
Can I make this a day ahead?
This recipe is actually perfect for preparing a day in advance, as it benefits from extra time in the refrigerator. Just be sure to add the fruit topping right before serving to keep it looking fresh and vibrant.
What is the best way to slice the cheesecake?
For clean, beautiful slices, use a thin knife dipped in warm water and wiped dry between each cut. This prevents the blade from dragging through the creamy filling and ensures a sharp, clean finish on every portion.
Conclusion
Creating this no bake cheesecake with Cool Whip is a reminder that we can find beauty in the simplest of ingredients. It is my hope that this recipe brings a moment of calm and sweetness to your table, bridging the gap between busy days and precious moments of rest. Enjoy the creamy, dreamy texture that makes this dessert truly timeless.
Print
Creamy No Bake Cheesecake With Cool Whip
- Prep Time: 20
- Total Time: 380
- Yield: 12 servings 1x
- Category: desserts
- Method: No-Bake
- Cuisine: American
- Diet: Vegetarian
Description
Experience the effortless elegance of this classic No Bake Cheesecake. By combining softened cream cheese with light, airy whipped topping, you achieve a mousse-like, velvety texture that melts on the tongue. Sitting atop a buttery graham cracker crust, this dessert offers a perfect balance of tangy richness and billowy sweetness. It is the ultimate stress-free treat that requires no oven, making it perfect for year-round entertaining or quiet moments of indulgence, evoking the comforting nostalgia of a home kitchen.
Ingredients
1 1/2 cups graham cracker crumbs
1/3 cup unsalted butter, melted
1 tablespoon granulated sugar (for crust)
24 ounces cream cheese, softened to room temperature
1 cup granulated sugar
1 teaspoon vanilla extract
8 ounces whipped topping (Cool Whip), thawed
Instructions
In a medium bowl, combine the graham cracker crumbs, melted butter, and 1 tablespoon of sugar until the mixture resembles wet sand.
Press the crumb mixture firmly into the bottom and sides of a 9-inch pie dish or springform pan, then refrigerate for 20 minutes to set.
In a large mixing bowl, beat the softened cream cheese with 1 cup of sugar and vanilla extract until smooth and creamy.
Gently fold in the thawed whipped topping until the mixture is uniform and airy.
Pour the filling over the prepared crust and smooth the top with a spatula.
Cover and refrigerate for at least 4 to 6 hours, or until set firm, before serving.
Notes
Ensure the cream cheese is fully at room temperature before beating to avoid lumps.
For flavor variation, you can drizzle the top with fresh strawberry or berry sauce before serving.
Store in the refrigerator for up to 3 days.
This recipe is entirely alcohol-free and pork-free.
Nutrition
- Serving Size: 1 slice
- Calories: 310
- Sugar: 22g
- Sodium: 280mg
- Fat: 24g
- Saturated Fat: 14g
- Carbohydrates: 26g
- Fiber: 0g
- Protein: 4g
- Cholesterol: 65mg


