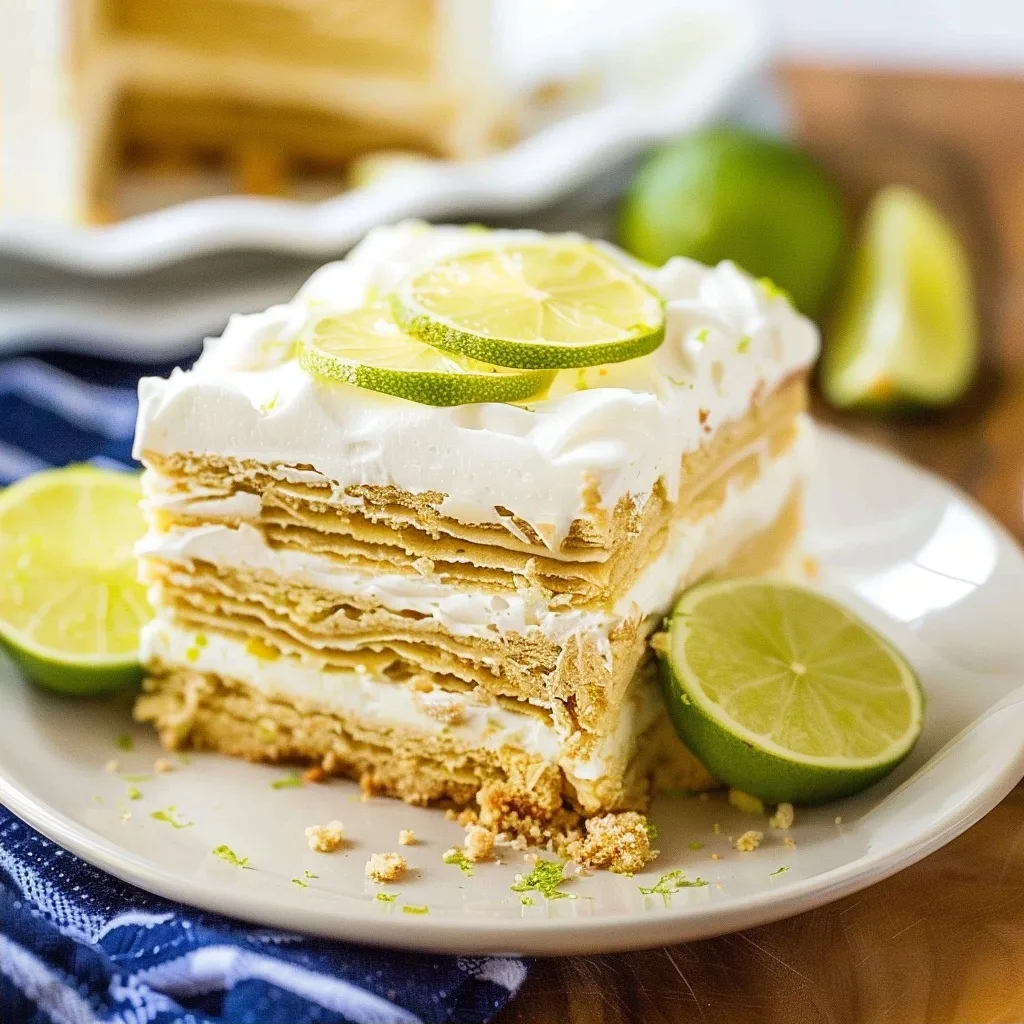
No-Bake Key Lime Icebox Cake
No-bake key lime icebox cake is a dessert that whispers of sunshine and simple joys. It’s the kind of treat that brings a sigh of contentment, a moment of pure bliss in every spoonful. Growing up, my grandmother would often make something similar after long summer days spent by the coast, the scent of salt and citrus filling the air. This icebox cake captures that same feeling – a cool, creamy embrace that’s both invigorating and deeply comforting. It’s a testament to how a few simple ingredients, layered with care and a touch of magic, can create something truly extraordinary.
This particular recipe, our no-bake key lime icebox cake, is a modern homage to those cherished memories. It bypasses the oven entirely, relying on the chill of the refrigerator to set into a delightful dessert that’s lighter than a traditional cake but no less satisfying. The tangy notes of key lime dance beautifully with the sweet, creamy layers, making it the perfect antidote to a warm afternoon or a celebratory end to any meal. It’s a recipe that feels like a hug, crafted to bring smiles and shared moments around your table.
What is No-Bake Key Lime Icebox Cake?
A no-bake key lime icebox cake is a chilled dessert masterpiece, composed of layers of crushed cookies or wafers, a creamy filling, and set in the refrigerator. Unlike baked cakes, it relies on the cold to firm up, creating a dense yet creamy texture that melts in your mouth. The star of this particular creation is the vibrant key lime flavor, a bright, zesty tang that cuts through the richness of the custard and whipped topping.
This dessert is a distant cousin to other icebox cakes made with ingredients like chocolate wafers or pudding. Its distinct character comes from the use of key lime juice and zest, which impart a unique tropical sweetness and a refreshing tartness. The magic truly happens as it chills, allowing the flavors to meld and the layers to soften, transforming simple components into a cohesive, delightful treat. It’s a dessert that feels both sophisticated and approachable, embodying the spirit of easy elegance.
Reasons to Try No-Bake Key Lime Icebox Cake
There are so many reasons to fall in love with this no-bake key lime icebox cake. First and foremost, its sheer simplicity is a dream for busy home cooks. It requires no oven time, meaning your kitchen stays cool and your energy is saved for more important things, like enjoying the company of loved ones. The preparation is straightforward, making it an ideal project for aspiring bakers or even younger helpers who want to contribute to a sweet creation.
Beyond the ease, the flavor profile is simply irresistible. The balance of sweet creaminess with the bright, zesty punch of key lime is utterly refreshing. It’s the perfect dessert for those who find traditional cakes a bit too heavy or sweet. Whether you’re hosting a summer barbecue, celebrating a special occasion, or simply craving a taste of sunshine, this icebox cake delivers pure delight. It’s a guaranteed crowd-pleaser that evokes a sense of joy and lightheartedness with every bite.
Ingredients Needed to Make No-Bake Key Lime Icebox Cake
To bring this delightful No-Bake Key Lime Icebox Cake to life, you’ll gather these simple treasures:
- 3/4 cup granulated sugar
- 1/4 cup cornstarch
- 4 large egg yolks (for richness and binding)
- 2 cups half-and-half (a creamy dairy blend)
- 3 tablespoons unsalted butter (for velvety smoothness)
- 2 tablespoons key lime zest (from about 3-4 key limes, for potent aroma)
- 1/2 cup key lime juice (freshly squeezed, for that signature tang)
- About 15 graham crackers (enough to line an 8×8 inch dish)
- 1 cup heavy whipping cream (chilled, for the cloud-like topping)
- 1/4 cup powdered sugar (to sweeten the whipped cream)
Instructions to Make No-Bake Key Lime Icebox Cake – Step by Step
Step 1:
Begin by preparing the luscious key lime custard. In a medium-sized heavy-bottomed saucepan, whisk together the granulated sugar and cornstarch until they are well combined and no lumps remain. This is a simple step, but one that ensures a silky smooth custard later on. Take a moment to appreciate the fine texture of these dry ingredients, the foundation of our creamy filling.
Step 2:
In a separate mixing bowl, gently whisk together the four large egg yolks with the half-and-half until the mixture is smooth and uniform. This liquid component will temper the dry ingredients gently. It’s like coaxing the flavors together, preparing them for the warmth that is to come. Imagine the rich yolks blending with the creamy half-and-half, creating a canvas for our vibrant lime flavor.
Step 3:
Now, it’s time to bring these two mixtures together. Turn your stovetop heat to medium. Whisk the egg yolk and half-and-half mixture gradually into the sugar and cornstarch mixture in the saucepan. Continuous whisking is key here to prevent any lumps from forming and to ensure even cooking.
Step 4:
Continue to cook this mixture over medium heat, whisking constantly. You’ll notice it begins to thicken. Bring it just to a gentle boil and let it bubble merrily for about one minute, giving it a final whisk. Once it has reached this point, carefully remove the saucepan from the heat. The custard should now be thick enough to coat the back of a spoon beautifully.
Step 5:
Remove the saucepan from the heat and whisk in the unsalted butter, the fragrant key lime zest, and the bright, zesty key lime juice. Stir until the butter is completely melted and incorporated, and the lime elements are distributed throughout the custard. The aroma that fills your kitchen at this stage is absolutely divine, a true preview of the deliciousness to come.
Step 6:
Allow the key lime custard to cool slightly. Set the saucepan aside on your counter and let it rest for about 10 minutes. This partial cooling helps to prevent the custard from being too hot when we use it to create our layers, and it begins the process of letting the flavors deepen.
Step 7:
While the custard is cooling, prepare your 8×8 inch square baking dish. Line it carefully with plastic wrap, making sure there’s a little overhang on the sides. This overhang will be helpful for lifting the cake out later. This creates a neat and tidy base for our icebox cake to set.
Step 8:
Now for the structure of our cake! Arrange your graham crackers on the bottom of the prepared dish. I find that placing about three crackers across and then breaking or trimming others to fill any gaps works wonderfully. You want to create a solid, even base layer for the custard, much like laying the foundation for a comforting home.
Step 9:
Spoon about 3/4 cup of the slightly cooled key lime custard over the layer of graham crackers. Use a spatula or the back of a spoon to gently spread it evenly, ensuring each cracker is covered. This is where the magic truly begins to build, layer by layer.
Step 10:
Repeat the layering process. Continue adding a layer of graham crackers, followed by another 3/4 cup of custard, and spreading it gently. You will repeat this process three times in total, finishing with a final top layer of graham crackers. The goal is a beautiful stack of alternating textures, kissed with tart lime.
Step 11:
Once all layers are in place, carefully cover the top of the cake with plastic wrap. Place the baking dish in the freezer and let it chill and set for at least 8 hours, or preferably overnight. Patience is key here, allowing the flavors to meld and the cake to become firm and sliceable.
Step 12:
When you are ready to serve, gently remove the icebox cake from the freezer. Use the plastic wrap overhang to carefully lift the entire cake out of the dish and place it onto your serving plate or platter. Let it thaw at room temperature for about 1 hour. This thawing time is crucial for achieving the perfect, creamy texture, transforming it from frozen solid to delightfully soft.
Step 13:
While the cake is thawing, prepare the fluffy whipped topping. In a chilled bowl, whip the cold heavy whipping cream and the powdered sugar together using an electric mixer. Beat until soft peaks form – these are peaks that gently curl over when the beaters are lifted. This takes the cake from wonderful to absolutely heavenly.
Step 14:
Gently spread the freshly made whipped topping over the top of the thawed icebox cake. If you like, garnish with a little extra key lime zest or thin slices of key lime for a beautiful presentation. This final touch makes the cake look as vibrant and delightful as it tastes.
Chef’s Tips for a Perfect Result
- Freshly squeezed key lime juice and zest are paramount for the most authentic and vibrant flavor; bottled juices can lack the same bright intensity.
- Ensure your half-and-half and egg yolks are at room temperature before combining them for the custard, which helps create a smoother, more stable base.
- Do not rush the chilling process; allowing the cake to freeze for at least 8 hours or overnight is essential for it to set properly and achieve the ideal texture.
- When making the whipped topping, ensure your heavy cream and bowl are very cold, as this helps the cream whip up to light and fluffy peaks more easily.
- For an extra festive touch, consider lightly toasting the graham crackers (about 300°F or 150°C for 5-7 minutes) before assembling the cake for a deeper flavor and slightly firmer base.
Variations and Substitutions
Exploring different takes on this delightful dessert can add even more joy and versatility:
Vegan Option
- What to change: Substitute dairy ingredients with plant-based alternatives.
- Suggested substitute: Use full-fat canned coconut milk (the thick cream from the top) instead of half-and-half, and vegan butter. For the whipped topping, use chilled full-fat coconut cream.
- How it impacts flavor or texture: The coconut might impart a subtle tropical note, and the texture may be slightly different, but equally delicious.
Gluten-Free Alternative
- What to change: Swap the graham crackers for a gluten-free option.
- Suggested substitute: Use gluten-free graham crackers, or a mix of crushed gluten-free shortbread cookies.
- How it impacts flavor or texture: Ensure the gluten-free cookies have a similar crumbly texture for the best results.
Using Regular Limes
- What to change: Replace key limes with regular Persian limes.
- Suggested substitute: Use the juice and zest of 2-3 regular limes.
- How it impacts flavor or texture: Regular limes are often less tart and have a slightly different, perhaps more familiar, citrus profile. You might need to adjust sugar slightly depending on your preference.
Budget-Friendly Swap
- What to change: Substitute butter with a good quality margarine or a touch more oil.
- Suggested substitute: Use a plant-based or dairy margarine for the custard if cost is a concern.
- How it impacts flavor or texture: This might slightly alter the richness, but the key lime flavor will still shine through beautifully.
How to Serve and Pair
This No-Bake Key Lime Icebox Cake is a celebration in itself, best served chilled directly from the refrigerator. Presentation is simple yet elegant: after letting it thaw for an hour, gently lift it onto a beautiful platter. A final dusting of lime zest or a few thin slices of lime on top adds a wonderful visual and aromatic flourish. It’s perfect for casual gatherings, summer picnics, or simply as a sweet ending to a family dinner.
Pair this vibrant dessert with a glass of cold water, sparkling water with a lime wedge, or a light herbal tea. For a slightly more indulgent experience, a mild, sweet white wine or a creamy Italian soda can also complement its flavors beautifully. Occasions range from a backyard barbecue to a birthday celebration, or even as a refreshing treat during a moment of quiet reflection on a warm afternoon.
Storage and Reheating
Refrigerator
Leftovers of your No-Bake Key Lime Icebox Cake can be stored in the refrigerator for up to 3 days. Keep it covered tightly with plastic wrap or transfer it to an airtight container. This method helps to prevent it from absorbing other odors in the fridge and maintains its creamy texture.
Freezer
While best enjoyed fresh, you can freeze the entire cake before the final thaw for longer storage. Wrap it very securely in plastic wrap and then a layer of aluminum foil. It can be kept in the freezer for up to 1 month. Thaw it in the refrigerator for several hours or at room temperature for about 2-3 hours before serving.
Room Temperature
Due to the dairy and custard components, it’s best not to leave this icebox cake at room temperature for more than 2 hours. For optimal freshness and safety, always keep it chilled or enjoy it shortly after its final thaw.
Reheating
Reheating is generally not necessary for this chilled dessert. The magic of an icebox cake lies in its cool, refreshing state. If it has become too firm after prolonged freezing, simply allow it to sit at room temperature for a bit longer to soften to your desired consistency.
Frequently Asked Questions (FAQ)
Can I substitute regular limes for key limes in this icebox cake recipe?
Yes, you can absolutely substitute regular limes for key limes. Use the juice and zest of about 2 to 3 regular Persian limes to achieve a similar, though slightly less tart, citrus flavor profile.
How do I know when the No-Bake Key Lime Icebox Cake is ready to serve?
The cake is ready when it has thawed for about an hour after being removed from the freezer. It should be firm but yielding to the touch, with a creamy, sliceable consistency, not hard or frozen solid, and not mushy.
My custard is lumpy, how can I fix it?
If your custard has lumps, you can try to strain it through a fine-mesh sieve before adding the butter and lime. For future batches, ensure you whisk the sugar and cornstarch thoroughly and temper the egg mixture slowly over medium heat, whisking constantly.
Can I make this No-Bake Key Lime Icebox Cake ahead of time?
Absolutely. The cake is designed to be made ahead. It needs to freeze for at least 8 hours or overnight. You can also freeze it for longer storage, up to a month, and thaw it before serving.
What are the best ways to serve or customize this icebox cake?
Serve it chilled, topped with whipped cream and a sprinkle of lime zest. You can also add a dollop of whipped cream on the side or a few fresh berries for extra color and flavor.
CONCLUSION
This No-Bake Key Lime Icebox Cake is a simply divine dessert, offering a delightful balance of creamy sweetness and refreshing tartness without ever needing to turn on the oven. It’s a loving embrace in dessert form, perfect for any occasion that calls for a touch of sunshine and comfort. The signature zesty key lime flavor, nestled between tender layers, promises a truly irresistible experience.
Print
No-Bake Key Lime Icebox Cake
- Prep Time: 20
- Total Time: 20
- Yield: 10 servings 1x
- Category: desserts
- Method: No-Bake
- Cuisine: American
- Diet: Vegetarian
Description
A refreshing, no-bake dessert with a tangy key lime filling layered over a graham cracker crust, chilled to perfection and topped with whipped cream. Light, creamy, and bursting with citrusy sweetness.
Ingredients
1 ½ cups graham cracker crumbs
¼ cup granulated sugar (for crust)
6 tbsp (¾ stick) unsalted butter, melted
16 oz cream cheese, softened
½ cup sour cream
1 cup key lime juice (about 6–8 limes)
½ cup freshly grated key lime zest
1 ½ cups powdered sugar
1 cup heavy whipping cream
¼ tsp salt (for whipped topping)
¼ cup confectioners’ sugar (for whipped topping)
Instructions
In a medium bowl, mix graham cracker crumbs, ¼ cup sugar, and melted butter. Press into the bottom of a 9×5-inch loaf pan. Refrigerate crust for 10 minutes.
In a large bowl, beat cream cheese and sour cream until smooth. Gradually add key lime juice, lime zest, and 1 ½ cups powdered sugar. Beat until fluffy and well combined.
In a separate bowl, whip heavy cream, ¼ tsp salt, and ¼ cup powdered sugar until stiff peaks form. Fold whipped cream into the key lime mixture.
Spread half the key lime mixture over the crust, then chill for 1 hour. Spread remaining mixture on top, smooth, and chill until fully set, at least 4 hours or overnight.
Unmold onto a serving plate and serve chilled, optionally garnished with additional lime zest.
Notes
Use key limes for authentic flavor. Chill at least 4 hours for best results. Store in an airtight container in the refrigerator up to 3 days. For a vegan version, substitute dairy-free cream cheese, plant-based whipping cream, and ensure sugar is vegan.
Nutrition
- Serving Size: 1 slice
- Calories: 350
- Sugar: 23g
- Sodium: 180mg
- Fat: 21g
- Saturated Fat: 10g
- Carbohydrates: 32g
- Fiber: 1g
- Protein: 4g
- Cholesterol: 55mg


