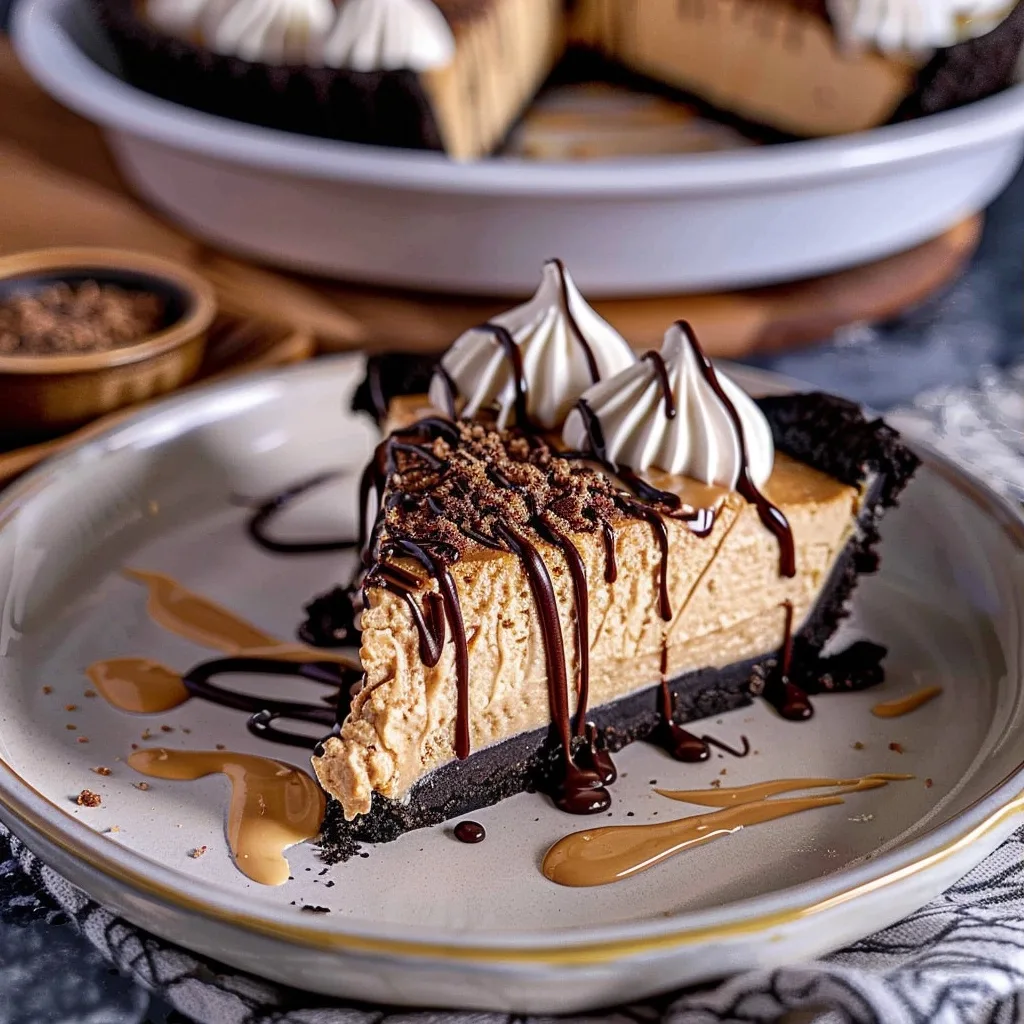
No Bake Peanut Butter Pie Recipe
No Bake Peanut Butter Pie Recipe is more than just a dessert; it’s a warm hug in edible form. It’s the kind of treat that calls to mind lazy afternoons, shared laughter, and the simple joy of a sweet moment. This recipe, inspired by the comforting traditions passed down through generations, is designed to bring that feeling right into your kitchen, with minimal fuss and maximum deliciousness. It’s a testament to how simple ingredients, when combined with a little love and care, can create something truly magical and deeply satisfying.
This No Bake Peanut Butter Pie Recipe comes together with such ease, it feels almost like a culinary secret whispered from one kitchen to another. It’s perfect for those moments when you crave something sweet but don’t have hours to spend baking. Think of it as a shortcut to pure bliss, a way to bring a smile to faces with very little effort. It’s a reminder that even the busiest lives can hold space for moments of simple, sweet indulgence and shared joy around the table.
What is No Bake Peanut Butter Pie?
At its heart, a No Bake Peanut Butter Pie is a wonderfully luscious dessert that requires no oven time at all. It’s a dream for anyone who loves the irresistible combination of peanut butter and creamy, sweet filling, all nestled within a crisp, crumbly crust. This specific variation offers a silky smooth texture that just melts in your mouth, enhanced by the rich, aromatic essence of peanut butter. It’s a classic comfort food, elevated with a touch of elegance that makes it suitable for any occasion, from a casual family gathering to a more festive celebration.
The beauty of this dessert lies in its simplicity and the familiar, beloved flavors it embodies. Imagine the delightful contrast between the slightly crunchy, chocolatey cookie crust and the impossibly smooth, rich peanut butter filling. It’s a culinary composition that feels both nostalgic and excitingly new with every bite. This pie is a testament to how humble ingredients can come together to create a truly show-stopping dessert, embodying the spirit of home cooking where comfort and flavor are paramount.
Reasons to Try No Bake Peanut Butter Pie
There are so many wonderful reasons to welcome this No Bake Peanut Butter Pie into your repertoire. First and foremost, its sheer deliciousness is undeniable. The perfect balance of rich peanut butter, sweet creaminess, and a satisfying cookie crust creates a flavor profile that is universally loved. It’s the kind of dessert that elicits happy sighs and requests for seconds, embodying pure culinary comfort and joy.
Beyond its delectable taste, the sheer ease of preparation is a major draw. With no oven required, it’s an ideal choice for hot summer days when you want to avoid heating up the kitchen, or for busy weeknights when time is short. This recipe is perfect for beginner bakers as it’s incredibly forgiving, and it’s also a lifesaver for seasoned cooks looking for a quick, crowd-pleasing option. Plus, its elegant presentation makes it feel special, even though it takes minutes to put together.
Ingredients Needed to Make No Bake Peanut Butter Pie
For the Crust:
- 24 chocolate sandwich cookies (like Oreos), finely crushed
- 4 tablespoons salted butter, melted
For the Filling:
- 1 cup heavy whipping cream, cold
- 8 ounces cream cheese, softened to room temperature
- ½ cup creamy peanut butter (ensure it’s smooth, not natural style unless well-stirred)
- 1 cup powdered sugar, sifted
- 1 ½ teaspoons vanilla extract
Instructions to Make No Bake Peanut Butter Pie – Step by Step
Step 1: Begin by creating the delightful base for your pie. Take your chocolate sandwich cookies and process them in a food processor until they turn into fine, soft crumbs. This ensures a wonderfully crumbly yet cohesive crust. Once you have your crumbs, slowly stream in the melted salted butter while the food processor is running or pulsing. Continue to mix until the crumbs are evenly moistened, resembling damp sand. This moisture is key to helping the crust hold its shape.
Step 2: Next, pour the crumb mixture into your 9-inch pie plate. Use the bottom of a flat measuring cup or a sturdy glass to firmly press the crumbs into an even layer across the bottom and up the sides of the plate. Pressing them down well is crucial for a crust that won’t crumble when you slice into your pie. Once pressed, place the pie plate into the freezer for at least 30 minutes. This chilling time will help the crust firm up beautifully, making it ready to hold the creamy filling.
Step 3: While the crust is chilling, let’s prepare the luscious filling. In a large, chilled bowl, pour in the cold heavy whipping cream. Using an electric hand mixer or a stand mixer with a whisk attachment, whip the cream until it forms stiff peaks. This means when you lift the whisk, the cream holds its shape without drooping. Be careful not to over-whip, or you’ll end up with butter. Set this whipped cream aside; it will soon add lightness to our filling.
Step 4: In a separate large bowl, combine the softened cream cheese with the peanut butter. Using your electric hand mixer, whip these two ingredients together until they are incredibly smooth and well combined. You want a texture completely free of lumps, creating a luxurious base for the filling. This step is where the rich peanut butter flavor truly begins to infuse into the pie.
Step 5: Now, gradually add the sifted powdered sugar to the cream cheese and peanut butter mixture, a little at a time, while continuing to blend with the mixer. Also, add the fragrant vanilla extract at this stage. Mix until everything is just combined and the filling is wonderfully smooth and sweet. Ensure all the powdered sugar is incorporated without making the mixture too thin.
Step 6: Gently fold the whipped cream into the peanut butter and cream cheese mixture using a spatula. Use a light hand and a folding motion, incorporating the airy whipped cream until there are no visible streaks of white or peanut butter. This step is crucial for achieving that signature silky-smooth, cloud-like texture that makes this no-bake pie so irresistible. The goal is to lighten the filling beautifully without deflating all the air from the whipped cream.
Step 7: Retrieve the chilled pie crust from the freezer. Carefully pour the prepared peanut butter filling into the crust. Use your spatula to gently spread the filling evenly across the crust, smoothing the top surface so it looks as beautiful as it tastes. Take a moment to appreciate the anticipation of the deliciousness to come.
Step 8: Finally, cover the pie loosely with plastic wrap. Place the pie in the refrigerator to chill and set for at least 4 hours. For the best texture and flavor, I often recommend chilling it overnight. This allows all the flavors to meld beautifully and the filling to become perfectly firm. Once set, slice your masterpiece and serve it chilled. It’s a simple yet profound joy to share.
Chef’s Tips for a Perfect Result
- Ensure your cream cheese is truly softened to room temperature; this is crucial for a smooth, lump-free filling. Cold cream cheese will result in a grainy texture.
- Chill your mixing bowl and whisk attachment before whipping the heavy cream. A colder environment helps the cream whip up faster and achieve stiffer peaks.
- Use a good quality, creamy peanut butter that is well-stirred. Natural peanut butters with oil separation can sometimes lead to a less stable filling texture.
- Don’t skip the chilling time for the crust; it makes a significant difference in how well the crust holds its shape when slicing.
- When folding the whipped cream, be gentle but thorough. You want to incorporate it fully to distribute the lightness without overmixing and losing volume.
- For an extra special finishing touch, consider adding a layer of whipped cream and a drizzle of chocolate syrup on top just before serving.
Variations and Substitutions
Chocolate Lover’s Dream
- What to change: Incorporate chocolate into the crust or filling.
- Suggested substitute: Use chocolate sandwich cookies for the crust. Add 2-3 tablespoons of unsweetened cocoa powder to the filling mixture. Drizzle melted chocolate over the top.
- How it impacts flavor or texture: This intensifies the rich, decadent flavor, creating a more pronounced chocolate-peanut butter synergy. The texture remains largely the same, with the added richness of chocolate.
Crunchy Peanut Butter Delight
- What to change: Add extra texture to the filling.
- Suggested substitute: Use crunchy peanut butter instead of creamy. You can also fold in about 1/4 cup of chopped peanuts.
- How it impacts flavor or texture: Introduces a delightful textural contrast to the smooth filling, offering a satisfying crunch with every bite. The peanut flavor might be slightly more pronounced due to the nuts.
Mini Pie Versions
- What to change: Alter the serving format.
- Suggested substitute: Prepare the crust and filling in mini tart pans or muffin tins lined with cupcake liners.
- How it impacts flavor or texture: These are perfect for individual servings and allow for easy portion control. Baking time for the crust formation might be slightly adjusted, but the chilling time remains essential.
Gluten-Conscious Twist
- What to change: Make the pie safe for those avoiding gluten.
- Suggested substitute: Use gluten-free chocolate sandwich cookies for the crust. Ensure all other ingredients are certified gluten-free.
- How it impacts flavor or texture: The flavor should remain very similar, though the texture of gluten-free cookies can vary, potentially making the crust slightly more crumbly.
Peanut Butter & Jelly Fulfillments
- What to change: Infuse a classic flavor pairing.
- Suggested substitute: Swirl a layer of good quality grape or strawberry jelly into the peanut butter filling just before pouring it into the crust.
- How it impacts flavor or texture: Adds a fruity, slightly tart counterpoint to the rich peanut butter, creating a flavor reminiscent of a peanut butter and jelly sandwich.
How to Serve and Pair
This No Bake Peanut Butter Pie is a celebration on a plate, perfect for almost any occasion. Serve it chilled, of course, allowing its silky texture to shine. For presentation, a sprinkle of chopped roasted peanuts, a generous drizzle of chocolate syrup, or a dollop of freshly whipped cream takes it to the next level. It’s wonderful sliced and served alongside a cold glass of milk, which beautifully complements its sweetness. A strong cup of coffee or a delicate cup of tea also makes a lovely pairing, offering a contrasting flavor that highlights the pie’s richness.
This pie is a star at potlucks, family dinners, backyard barbecues, or simply as a comforting treat after a long day. It’s casual enough for a weeknight dessert but elegant enough to impress guests at a dinner party. Consider personalizing it with a scattering of mini chocolate chips or even a few crushed peanut butter cups for an extra layer of indulgence. It’s a dessert that always brings people together, fostering warmth and connection with every spoonful.
Storage and Reheating
Refrigerator
Leftover No Bake Peanut Butter Pie will keep beautifully in the refrigerator for up to 3-4 days. Store it in an airtight container or tightly covered with plastic wrap to prevent it from absorbing odors from other foods. Maintaining it covered also helps keep its creamy texture from drying out. Just slice and enjoy directly from the fridge.
Freezer
This pie freezes surprisingly well, making it a fantastic make-ahead option. Once set, you can freeze the entire pie, loosely wrapped first in plastic wrap and then in a layer of aluminum foil, for up to 1 month. For individual servings, slice the pie and freeze the slices separately on a baking sheet until firm before transferring them to a freezer-safe bag or container. This prevents slices from sticking together.
Room Temperature
It’s best to serve this dessert chilled, so it is not recommended to store it at room temperature for more than a couple of hours. Prolonged exposure to room temperature can affect the texture of the filling, making it too soft or potentially compromising its stability.
Reheating
Reheating is generally not necessary as this pie is best served cold or slightly chilled. If you have frozen slices and want to serve them without a complete thaw, you can let them sit at room temperature for about 15-30 minutes before serving. If they are too warm, the filling will become overly soft. Avoid any conventional reheating methods like ovens or microwaves.
Frequently Asked Questions (FAQ)
Can I substitute the peanut butter?
Yes, you can substitute almond butter or cashew butter for a delicious nutty variation. While the peanut flavor will be different, these alternatives offer a similar creamy texture and rich taste that complements the pie beautifully.
How do I know when the pie is set?
The pie is set when the filling is firm to the touch and no longer appears wet or soft. When you gently press the center, it should feel solid and hold its shape without indenting deeply.
What if my filling is too runny?
If your filling is too runny, it’s likely due to insufficient chilling of the crust, or the cream cheese wasn’t fully softened. Ensure the pie is chilled for the full recommended time, and if it’s still too soft, you can try chilling it for a few more hours or overnight.
Can I make this pie a day in advance?
Absolutely! This no-bake peanut butter pie is ideal for making ahead. Chilling it overnight allows the flavors to meld perfectly and ensures a beautifully set texture, making it a stress-free dessert option for entertaining.
What are the best toppings for no bake peanut butter pie?
The best toppings are ones that enhance the rich peanut butter flavor, such as a drizzle of chocolate sauce, chopped roasted peanuts, crumbled chocolate cookies, a dollop of whipped cream, or even mini peanut butter cups. Get creative with your favorite sweet additions!
Conclusion
This No Bake Peanut Butter Pie Recipe is a testament to the comfort and joy that simple, honest ingredients can bring. It’s an effortless way to create a truly memorable dessert that will have everyone asking for seconds. The irresistible blend of creamy peanut butter and chocolatey crust is a classic combination that never fails to delight!
No Bake Peanut Butter Pie Recipe
- Prep Time: 15
- Total Time: 15
- Yield: 8 servings 1x
- Category: desserts
- Method: No-Bake
- Cuisine: American
- Diet: Vegetarian
Description
A no-oven dessert with a chocolatey cookie crust and creamy, rich peanut butter filling. Perfect for warm summers or quick comfort treats that melt in your mouth with a sweet-savory balance of peanut butter and sugar.
Ingredients
2 cups chocolate cookie crumbs (Oreos or graham crackers)
1/2 cup unsalted butter, melted
1/4 cup powdered sugar (for crust)
2 cups natural peanut butter
1 cup powdered sugar (for filling)
1 can (14 oz) evaporated milk
1 tsp pure vanilla extract
4 large egg whites (room temperature)
Whipped cream (for topping)
Crushed chocolate cookies (for garnish)
Instructions
Combine chocolate cookie crumbs, melted butter, and 1/4 cup powdered sugar in a bowl
Press the mixture firmly into the bottom of a 9-inch pie dish
Chill the crust in the refrigerator while preparing the filling
In a large bowl, beat egg whites with a wire whisk or electric mixer until stiff peaks form
Gradually add 1 cup powdered sugar and vanilla extract to the egg whites, continuing to beat until glossy
Fold in evaporated milk and half the peanut butter until just combined
Pour the filling into the chilled crust and smooth the top
Refrigerate for 2-4 hours until set
Garnish with whipped cream and crushed chocolate cookies before serving
Notes
For a halal crust, use store-bought halal-certified cookies or crush gluten-free chocolate-flavored cookies and melt vegan-friendly halal butter instead of regular butter
To make whipped cream, whip heavy cream with a splash of vanilla until stiff
Crush reserved chocolate cookie crumbs using a food processor or ziplock bag for easy garnish
Store leftovers in an airtight container in the refrigerator for up to 3 days
Nutrition
- Serving Size: 1 slice (1/8 of the pie)
- Calories: 420
- Sugar: 26g
- Sodium: 240mg
- Fat: 18g
- Saturated Fat: 10g
- Carbohydrates: 54g
- Fiber: 2g
- Protein: 9g
- Cholesterol: 35mg


