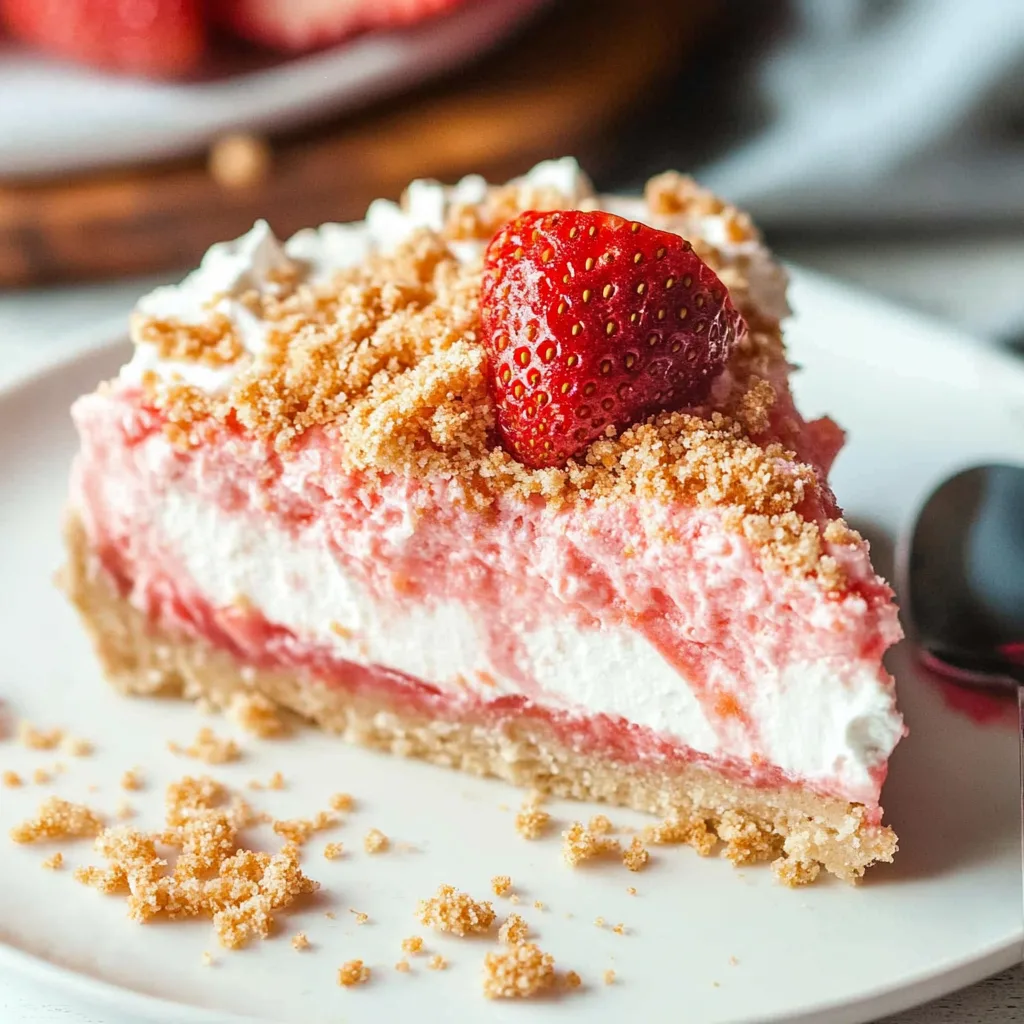
No-Bake Strawberry Crunch Cheesecake is more than just a dessert; it’s a whispered melody of comforting flavors and textures that instantly transports you to a place of pure joy. It’s the kind of treat that feels both special occasion-worthy and perfectly suited for a quiet afternoon, a gentle reminder that even the simplest moments can be filled with sweetness. Imagine the velvety smooth cheesecake filling, swirled with vibrant strawberry hues, resting atop a buttery, crisp cookie crust, all crowned with a delightful crunch that sings with every bite. This is a dessert that doesn’t demand hours in the kitchen but generously offers spoonfuls of happiness.
When the world feels a little too hurried, when life’s melody seems out of tune, I find my calm in the kitchen. It’s a sanctuary where I can slow down, connect with the ingredients, and pour a little bit of my heart into whatever I’m creating. This No-Bake Strawberry Crunch Cheesecake is one of those recipes that brings utter comfort and unadulterated delight, a testament to how simple ingredients, handled with care, can create something truly magical. It’s a recipe I love to share because it embodies the spirit of home, family, and the sweet memories we build around the table.
What is No-Bake Strawberry Crunch Cheesecake?
A No-Bake Strawberry Crunch Cheesecake is a delightful dessert that captures the essence of classic cheesecake without the need for an oven. It typically features a crumbly cookie crust, a rich and creamy cheesecake filling, and a luscious strawberry component, all finished with a tantalizingly crunchy topping. The magic lies in its simplicity and the beautiful balance of textures and flavors that come together in perfect harmony. It offers all the indulgence of a baked cheesecake but with an accessible, stress-free approach ideal for any home cook.
The allure of this dessert is its adaptability and the joyous combination of sweet strawberries and creamy cheesecake. The ‘crunch’ element often comes from a delightful crumble topping, adding an irresistible textural contrast to the smooth filling. It’s a modern take on a beloved classic, designed for ease and maximum deliciousness, making it a go-to for gatherings, celebrations, or simply when you crave a moment of pure, unadulterated dessert bliss. It’s the kind of dessert that makes you feel good from the inside out.
Reasons to Try No-Bake Strawberry Crunch Cheesecake
There are so many wonderful reasons to welcome this No-Bake Strawberry Crunch Cheesecake into your dessert repertoire. First and foremost, it’s incredibly easy to make! The absence of baking means less fuss, no risk of cracking, and crucially, more time to enjoy life’s simple pleasures. It’s a perfect recipe for beginners looking to impress or for anyone who wants a stunning dessert without the commitment of traditional baking. The ingredients come together beautifully, yielding a dessert that looks and tastes like it took hours of effort.
Beyond its ease, the taste is simply divine. The creamy tang of the cream cheese filling, elevated by the sweet, bright burst of fresh strawberries, is a classic combination that never fails to please. The buttery cookie crust provides a delightful base, and the strawberry crunch topping adds that irresistibly satisfying texture that makes each bite an adventure. This dessert is incredibly versatile, too; you can easily adapt it for different occasions or dietary needs, making it a true crowd-pleaser that’s perfect for family dinners, potlucks, summer picnics, or even just a special treat to brighten a regular Tuesday.
Ingredients Needed to Make No-Bake Strawberry Crunch Cheesecake
- 24 Golden Oreo cookies (about 2 sleeves)
- 4 tablespoons (59 ml) salted butter, melted
- 24 ounces (680 g) cream cheese, 3 packages, softened to room temperature
- 2 cups (240 g) powdered sugar, sifted
- 2 teaspoons (10 ml) fresh lemon juice
- 1 cup (144 g) fresh strawberries, puréed until smooth
- 2 teaspoons (10 ml) pure vanilla extract
- 1 ½ cups (355 ml) heavy whipping cream, cold
- 1 batch strawberry shortcake crumble (for topping)
Instructions to Make No-Bake Strawberry Crunch Cheesecake – Step by Step
Step 1: Begin by preparing the buttery cookie crust. In a food processor, crush the Golden Oreo cookies until they form fine crumbs. If you don’t have a food processor, you can achieve this by placing the cookies in a sturdy zip-top bag and using a rolling pin to crush them into fine pieces. Once they are finely crushed, transfer them to a mixing bowl and pour in the melted salted butter. Stir everything together until the cookie crumbs are thoroughly saturated and resemble wet sand. This is the foundation of our delightful cheesecake, so give it a good mix. Learn more about creating perfect pie crusts.
Step 2: Next, get your springform pan ready and press the crust mixture into it. Lightly spray a 9-inch springform pan with cooking spray. Take the buttered cookie crumb mixture and press it evenly into the bottom of the prepared pan, extending about one inch up the sides to create a lovely border. This forms the vessel for our creamy filling. Once pressed in, place the pan into the freezer while you whip up the luscious cheesecake filling. Chilling this crust will help it set firmly.
Step 3: Now for the heart of our dessert: the creamy cheesecake filling. In a large mixing bowl, combine the softened cream cheese, pure vanilla extract, fresh lemon juice, and sifted powdered sugar. Using an electric mixer (a hand mixer or stand mixer works wonderfully), beat these ingredients together until the mixture is completely smooth and free of lumps. You want a velvety texture, so take your time to ensure everything is well incorporated. This step is crucial for achieving that signature smooth, decadent cheesecake consistency.
Step 4: In a separate, clean bowl, whip the cold heavy whipping cream. Using the whisk attachment of your electric mixer, beat the heavy cream until stiff peaks form. This means when you lift the whisk, the cream holds its shape and the peaks stand straight up without drooping. Be careful not to overbeat, as it can turn into butter! The goal is a light and airy whipped cream that will gently lighten the cream cheese base.
Step 5: Gently fold the whipped cream into the cream cheese mixture. This is a delicate step. Using a rubber spatula, carefully fold the whipped cream into the cream cheese mixture in two or three additions. The key is to be gentle, preserving as much air from the whipped cream as possible. This technique ensures a light, fluffy cheesecake filling rather than a dense one. You want to see streaks disappear without overmixing.
Step 6: Prepare to infuse our filling with vibrant strawberry goodness. Divide the cheesecake mixture evenly into two separate bowls. To one of these bowls, add the puréed fresh strawberries. Gently fold in the puréed strawberries until they are just combined. You’re looking for a beautiful, uniform pink hue throughout this portion of the filling. This is where the magic of strawberry flavor truly comes alive.
Step 7: Assemble the stunning layers of your cheesecake. Take the first half of the cheesecake filling (the plain white portion) and pour it into the chilled cookie crust. Smooth the top evenly with your spatula. Then, carefully spoon or pour the strawberry-infused filling over the plain layer. Gently spread this pink layer to create a smooth, even surface. The contrast between the two colors will be lovely once sliced.
Step 8: Allow your masterpiece to chill and set. Once both layers are in place, cover the springform pan tightly with plastic wrap. Place the cheesecake in the freezer for at least 4 to 5 hours, or ideally, overnight. This extended chilling time is essential for the cheesecake to firm up properly, ensuring it holds its shape beautifully when sliced. Patience here is key to that perfect no-bake texture.
Step 9: The grand finale and presentation! When you’re ready to serve, carefully remove the cheesecake from the springform pan. This is often done by running a thin knife or offset spatula around the edge before unclipping the sides. Now, generously coat the top and sides of the chilled cheesecake with your prepared strawberry shortcake crumble. This adds a delightful crunch and visual appeal. If the cheesecake is very firm from the freezer, allow it to thaw for about 10-15 minutes at room temperature before slicing to make it easier to cut.
Chef’s Tips for a Perfect Result
- Ensure your cream cheese is truly at room temperature for the smoothest filling; cold cream cheese can lead to lumps that are hard to smooth out.
- Always sift your powdered sugar to prevent any tiny lumps from affecting the silky texture of the cheesecake filling.
- When whipping heavy cream, make sure the cream and your bowl are very cold. This is essential for achieving stiff peaks that hold their shape.
- Avoid overmixing when folding the whipped cream into the cream cheese mixture; gentle folding preserves the airy lightness of the filling.
- For the puréed strawberries, strain out excess seeds if you prefer a smoother texture, though leaving them in adds a lovely rustic charm.
- Chilling is your best friend for no-bake cheesecakes; don’t rush the freezing process, as adequate chilling ensures the cheesecake is firm enough to slice neatly.
Variations and Substitutions
- Gluten-Free Alternative: Swap the Golden Oreos for gluten-free sandwich cookies or even a mix of gluten-free graham crackers and butter for the crust. This will yield a similar buttery, crumbly base.
- Berry Twist: Experiment with other berries! Try puréeing raspberries or mixed berries and swirling them into the cheesecake filling for a different fruit flavor profile. The color might be slightly different, but the taste will be delicious.
- Lemon Zest Boost: For an extra zing, add the zest of one lemon to the cream cheese mixture along with the juice. This will enhance the citrus notes and add a brighter, more complex flavor.
- Cream Cheese Swap: If you prefer a lighter dessert, you can substitute half of the cream cheese with softened mascarpone cheese. This will give the filling a slightly richer, more decadent mouthfeel.
- Crunch Topping Choices: Beyond strawberry shortcake crumble, consider using crushed graham crackers, crushed pretzels for a sweet and salty contrast, or even toasted slivered almonds mixed with butter and sugar for a nutty crunch.
How to Serve and Pair
This No-Bake Strawberry Crunch Cheesecake is a showstopper on its own, but a few thoughtful touches can elevate it even further. Serve each slice slightly chilled, allowing it to soften just a touch from the freezer for the perfect creamy texture. A dollop of freshly whipped cream or a few fresh strawberry slices on top can add an extra layer of elegance and freshness. For a delightful pairing, consider a light, crisp white wine like a Moscato d’Asti, or a sparkling cider for a non-alcoholic option. This dessert is perfectly suited for celebrations, from birthdays and anniversaries to summer gatherings and holiday dessert tables. It also makes a wonderfully comforting treat for a cozy evening at home.
For presentation, consider dusting the edges with a little extra crumble, or perhaps arranging a few perfectly ripe strawberries artfully on top. Small touches make a big difference and show your guests the love and care you put into preparing this delightful treat. This no-bake wonder is especially fantastic for picnics or potlucks because it travels so well and always disappears quickly!
Storage and Reheating
Refrigerator
Store any leftover No-Bake Strawberry Crunch Cheesecake in an airtight container in the refrigerator for up to 3-4 days. While it’s best enjoyed within the first couple of days for optimal texture, refrigerating it helps maintain its creamy consistency. Covering it well is key to preventing it from absorbing odors from other foods.
Freezer
You can also freeze the cheesecake for longer storage, up to 1-2 months. It’s best to freeze individual slices wrapped tightly in plastic wrap, then placed in a freezer-safe bag or container. This prevents freezer burn and makes it easy to grab a single serving whenever a craving strikes.
Room Temperature
This no-bake cheesecake is best served chilled and is not recommended to be left at room temperature for extended periods, especially in warmer environments, as the dairy components could spoil or the texture could become too soft. A brief period (10-15 minutes) at room temperature before slicing is beneficial, but it should be returned to refrigeration afterwards.
Reheating
Reheating is generally not necessary or recommended for a no-bake cheesecake, as it is designed to be served cold. If you wish to serve it slightly softer than straight from the freezer, simply let it sit at room temperature for about 10-15 minutes before slicing. Avoid any form of traditional reheating like an oven or microwave, which would melt the filling and ruin the texture.
Frequently Asked Questions (FAQ)
Can I substitute the Golden Oreos for another cookie?
Yes, you can absolutely substitute the Golden Oreos with graham crackers, vanilla wafers, or even shortbread cookies for the crust. Simply adjust the amount of melted butter to achieve a crumbly, cohesive texture similar to wet sand; you might need slightly more or less butter depending on the cookie type.
How do I know when the cheesecake filling is perfectly smooth?
The cheesecake filling is perfectly smooth when you can no longer see any streaks of powdered sugar or feel any lumps of cream cheese. Thoroughly beating the softened cream cheese with the sugar and flavorings until it’s completely homogenous is the key step before folding in the whipped cream.
My cheesecake filling isn’t firm enough, what went wrong?
If your cheesecake filling isn’t firm enough, it’s likely due to insufficient chilling time or the cream cheese not being fully softened, which affects the ability of the fats to set. Ensure it has chilled for the full recommended time in the freezer and that your cream cheese was at true room temperature during preparation.
Can I prepare this No-Bake Strawberry Crunch Cheesecake ahead of time?
Absolutely! This no-bake cheesecake is ideal for making ahead. It needs to chill for at least 4-5 hours, but it’s even better when prepared the day before serving. This allows the flavors to meld beautifully and ensures the cheesecake is perfectly set.
What’s the best way to serve or customize this dessert?
Serve this cheesecake chilled, with a few fresh berries or a dollop of whipped cream. For customization, you can swirl in additional fruit purées, add mini chocolate chips to the filling, or experiment with different flavored crumbles for a unique touch. It’s also lovely served in individual jars for a charming presentation.
CONCLUSION
This No-Bake Strawberry Crunch Cheesecake is a testament to the simple joys of homemade desserts. It’s a creamy, dreamy, and incredibly satisfying treat that brings ease and elegance to any occasion. I encourage you to try this recipe; it’s a comforting hug in dessert form, perfect for sharing with loved ones or savoring by yourself. The irresistible combination of sweet strawberries, velvety cheesecake, and that delightful crunch makes it a truly unforgettable dessert experience.