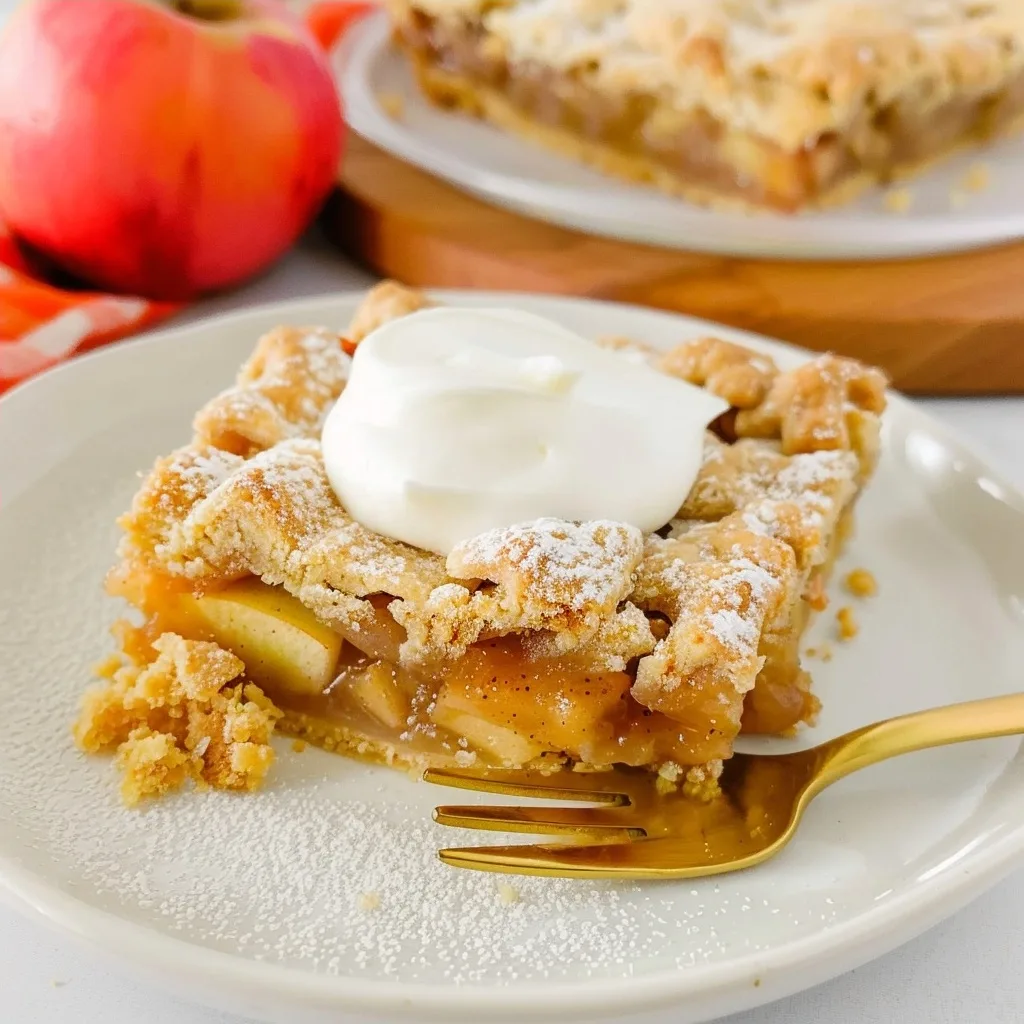
Old-Fashioned Apple Pie Bars are a comforting reminder that the most beautiful memories are often baked right at home in a simple pan. There is a sacred quiet that settles in the kitchen when the aroma of cinnamon and fresh apples begins to dance through the air, pulling us away from the rush of the day and grounding us in the present moment. These bars carry that specific warmth, offering a soft, buttery crust layered with tender fruit and a satisfyingly crisp topping that feels like a gentle hug in every single bite.
Creating these Old-Fashioned Apple Pie Bars allows us to slow down and honor the traditions passed down through generations of family cooks. Whether you are baking them on a crisp autumn afternoon or seeking a bit of sweetness in the middle of a busy week, this recipe serves as a reminder that cooking is an act of love. By choosing simple, quality ingredients, you can transform humble fruit and flour into a dessert that brings people together around your table with ease and grace.
What is Old-Fashioned Apple Pie Bars?
Old-Fashioned Apple Pie Bars are a portable, handheld interpretation of the classic American apple pie that eliminates the stress of rolling out delicate dough. They feature a buttery, shortbread-like base that perfectly cradles a tender layer of spiced apples and a golden, crumbly streusel topping. These bars preserve the nostalgic flavors of a traditional orchard treat while offering a less formal, more forgiving structure that is perfect for everyday sharing.
Unlike a traditional pie that requires careful slicing and plating, these bars are sturdy, hand-held delights that hold their shape beautifully. They rely on classic, wholesome ingredients like crisp apples, warm cinnamon, and real butter, resulting in a dessert that tastes like a secret family heirloom. They are a reflection of intentional, slow living, where the joy is found as much in the baking process as it is in the tasting afterward.
Reasons to Try Old-Fashioned Apple Pie Bars
These bars are the perfect solution for those moments when you yearn for a homemade dessert but lack the willpower to manage a complicated pie crust. They come together with minimal fuss, making them an ideal starting point for beginner bakers or a reliable go-to for busy parents who still want to provide a heartfelt, homemade treat for their family. The recipe is incredibly forgiving, yet the end result is sophisticated enough to impress at neighborhood gatherings or holiday events.
Beyond the ease of preparation, there is a deep sense of satisfaction in the texture of these bars. Each bite provides a beautiful contrast between the buttery base, the jammy, spiced fruit, and the crunchy crumb topping. Because they are baked in a square pan and chilled, they offer a consistent, professional-looking slice every time, ensuring that each guest gets an equal portion of that buttery, fruit-forward magic that defines a perfect baked good.
Ingredients Needed to Make Old-Fashioned Apple Pie Bars
For the Crust:
½ cup unsalted butter, softened
1 teaspoon vanilla extract
¼ teaspoon fine sea salt
1 cup all-purpose flour
For the Filling:
4–5 small to medium crisp apples (like Honeycrisp or Granny Smith)
2 tablespoons granulated sugar
2 tablespoons all-purpose flour
2 teaspoons fresh lemon juice
1 ½ teaspoons apple pie spice
For the Crumbly Topping:
¼ cup granulated sugar
½ cup packed light brown sugar
1 ¼ cup all-purpose flour
¼ teaspoon fine sea salt
1 ½ teaspoons ground cinnamon
½ cup unsalted butter, softened
Instructions to Make Old-Fashioned Apple Pie Bars – Step by Step
Step 1: Start by preheating your oven to 350°F and preparing an 8-inch square baking dish with a layer of parchment paper, leaving a slight overhang on the sides for easy removal later. This small act of preparation ensures that the bars lift out perfectly once cooled, sparing you any frustration during the serving process.
Step 2: In a medium mixing bowl, combine the softened butter, vanilla, salt, and flour for the base until you achieve a texture reminiscent of coarse sand. Press this mixture firmly into the bottom of your prepared pan to create an even foundation, then bake it for 10 minutes, just until it begins to set and smell fragrant, then remove it from the heat to cool slightly.
Step 3: As the crust rests, focus on your filling by peeling and thinly slicing your apples into uniform pieces. In a separate bowl, toss the apple slices with the granulated sugar, flour, lemon juice, and apple pie spice, ensuring every slice is coated in that warm, aromatic mixture before spreading it evenly over your partially baked crust.
Step 4: Prepare the crumbly topping by mixing the sugar, brown sugar, flour, salt, and cinnamon in a bowl. Cut in the butter using a fork or your fingers until the mixture forms a pea-sized crumb, then scatter this liberally over the apple layer, ensuring you cover them completely for that perfect golden crust.
Step 5: Place the pan back in the oven and bake for 30 to 35 minutes, watching for the top to turn a deep, inviting golden brown and the fruit juices to bubble around the edges. Allow the bars to cool completely in the pan before refrigerating for at least one to two hours, as this time in the cold helps the base firm up and ensures each slice holds its shape for serving.
Chef’s Tips for a Perfect Result
- Use room-temperature butter for both the crust and the topping to ensure it incorporates evenly without leaving dense pockets of fat.
- Choose apples that hold their structure well during cooking, such as Granny Smith or Honeycrisp, to avoid a mushy filling.
- Do not skip the chilling stage, as the cold sets the butter in the crust and produces the clean, sharp edges that make these bars look professional.
- Lightly toss the apples with lemon juice immediately after slicing to prevent browning and to provide a bright acid note that balances the sugars.
- Use a sharp, dry knife to slice your bars after chilling and wipe the blade clean between each cut for the cleanest appearance.
Variations and Substitutions
Gluten-Free Alternative
Swap the all-purpose flour in all three sections for a high-quality 1:1 gluten-free baking flour blend. This should maintain a texture very close to the original without drastically altering the flavor profile.
Nutty Crunch
Add half a cup of finely chopped pecans or walnuts to the crumbly topping before baking. This adds a toasted depth and a pleasant texture change that bridges the gap between a cake and a classic crumble.
Reduced Sugar
You can replace the sugar in the apple filling with a high-quality sugar-free sweetener, though note that the apples will release slightly more liquid, so ensure you drain any excess juice before adding the filling to the pan.
How to Serve and Pair
These bars are best served at room temperature or slightly chilled, often accompanied by a dollop of fresh, lightly sweetened whipped cream or a small scoop of vanilla bean ice cream. For a festive presentation, dust the tops with a light coating of powdered sugar before slicing. They pair beautifully with a warm mug of spiced chai tea or a robust black coffee, serving as a peaceful companion on a slow Sunday afternoon or as a highlight of an evening gathering with friends.
Storage and Reheating
Refrigerator
Store your bars in an airtight container for up to 4 days. Because of the fresh fruit, the refrigerator is the safest place to ensure they remain fresh and the crust stays crisp.
Freezer
You can freeze individual bars wrapped tightly in parchment paper and placed in a freezer-safe bag for up to two months. Thaw them overnight in the refrigerator before bringing them to room temperature for serving.
Reheating
If you prefer your bars warm, place a slice in a moderate oven at 300°F for about 10 minutes until heated through. Avoid the microwave if possible, as it tends to soften the buttery crust too much and may make the topping lose its satisfying crunch.
Frequently Asked Questions (FAQ)
Can I substitute a different fruit for the apples?
You can successfully swap the apples for firm pears, which have a similar texture and hold up well to the heat. Just ensure you adjust the spice blend if necessary, as pears pair beautifully with warming spices like cardamom or nutmeg.
How do I know when the bars are fully baked?
The bars are done when the top has turned a rich golden brown and you can see the apple juices bubbling through the spaces in the crumbly topping. You can also test the apples with a small knife to ensure they are fork-tender before removing the pan from the oven.
Why is my crust soggy instead of crisp?
A soggy crust is often the result of not baking the bottom layer long enough before adding the fruit or using apples that release too much liquid. Always ensure you bake the base for the full ten minutes initially and avoid adding excess liquid to the apple mixture.
Can I prepare these in advance for a party?
These bars are actually better when prepared a day in advance, as it allows the flavors to meld and the crust to firm up perfectly. Just bake them fully, let them cool, and keep them in the refrigerator until you are ready to serve.
What is the best way to customize the flavor profile?
You can customize these bars by adding a teaspoon of pure almond extract to the filling for a deeper flavor, or by adding a pinch of freshly ground ginger to the topping. These small additions add layers of complexity that highlight the natural sweetness of your chosen apples.
Conclusion
There is a special, quiet joy found in baking these Old-Fashioned Apple Pie Bars, knowing that each one holds the warmth of a homemade tradition. By taking the time to layer the crisp fruit and buttery crust, you create something far greater than the sum of its parts. I hope you enjoy the process of bringing this comforting treat into your kitchen, filling your home with the lovely, soul-soothing scent of cinnamon and caramelized apples.
Print
Old-Fashioned Apple Pie Bars
- Prep Time: 20
- Cook Time: 45
- Total Time: 65
- Yield: 16 bars 1x
- Category: desserts
- Method: Baking
- Cuisine: American
- Diet: Vegetarian
Description
These Old-Fashioned Apple Pie Bars are a comforting, handheld version of the classic American dessert. They feature a buttery, shortbread-style base topped with a layer of tender, spiced apples and a golden, crumbly streusel. Perfect for gatherings or a quiet afternoon treat, these bars offer all the warmth of a traditional apple pie without the need for delicate pastry work. Simple, wholesome, and deeply satisfying, they are a true celebration of homely baking tradition.
Ingredients
1 cup unsalted butter, softened
1/2 cup granulated sugar
1/4 cup light brown sugar, packed
2 1/2 cups all-purpose flour
1/4 teaspoon salt
4 large crisp apples, peeled and thinly sliced
1/3 cup granulated sugar
1 teaspoon ground cinnamon
1 tablespoon lemon juice
Instructions
Preheat your oven to 375°F (190°C) and line a 9×9 inch square baking pan with parchment paper.
In a large bowl, cream together the softened butter and sugars until smooth.
Stir in the flour and salt until the mixture resembles coarse crumbs.
Press two-thirds of the dough firmly into the bottom of the prepared pan to form the base.
In a separate bowl, toss the sliced apples with the sugar, cinnamon, and lemon juice.
Arrange the apple mixture evenly over the crust layer.
Crumble the remaining dough over the top of the apples to form the streusel topping.
Bake for 40 to 45 minutes until the topping is golden brown and the edges are bubbling.
Allow the bars to cool completely in the pan before slicing into squares.
Notes
For best results, use a variety of firm, crisp apples like Honeycrisp or Granny Smith. Let the bars cool fully before cutting to ensure clean, firm edges. Store leftovers in an airtight container in the refrigerator for up to 3 days.
Nutrition
- Serving Size: 1 bar
- Calories: 240
- Sugar: 18g
- Sodium: 65mg
- Fat: 11g
- Saturated Fat: 7g
- Carbohydrates: 35g
- Fiber: 2g
- Protein: 2g
- Cholesterol: 30mg


