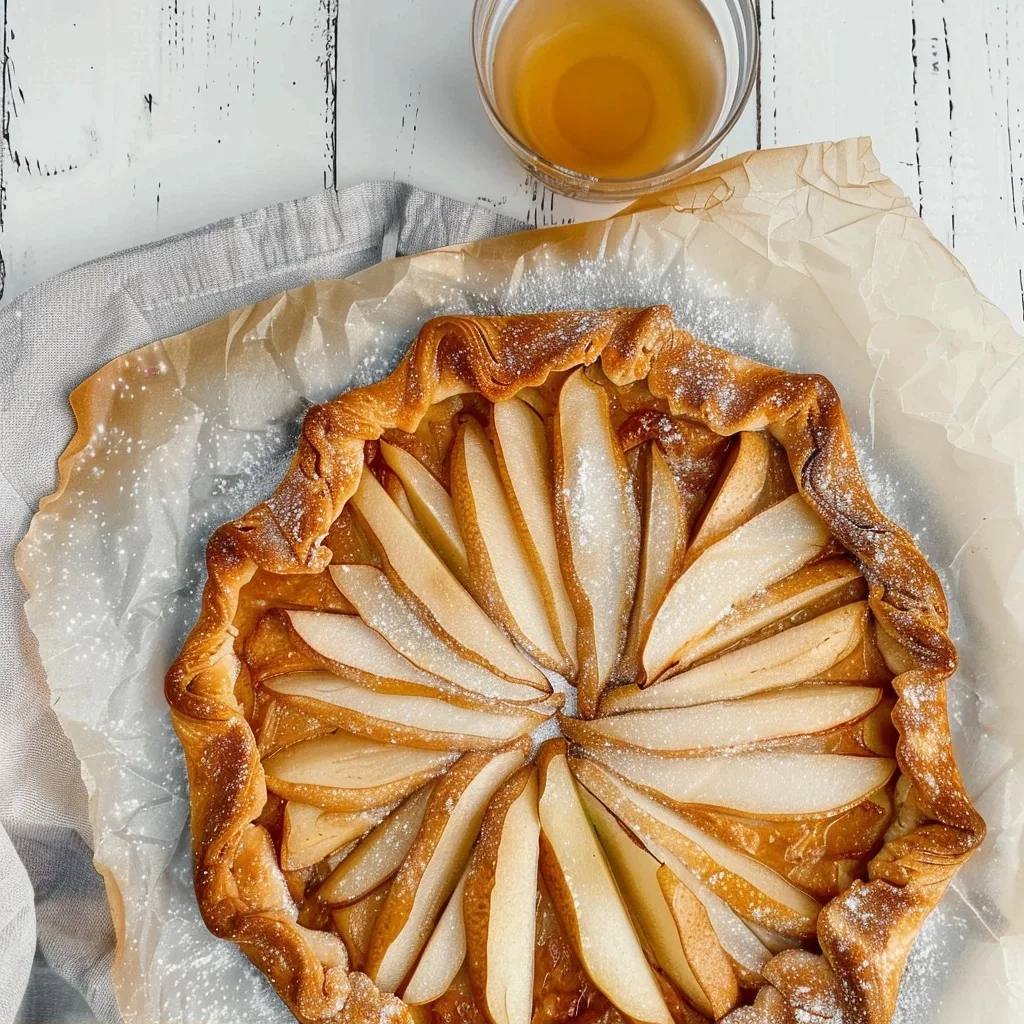
Pear Galette
A Pear Galette is more than just a dessert, it is an invitation to slow down and savor the simple beauty of seasonal fruit. When the air turns crisp, there is something deeply grounding about bringing a warm, golden pastry to the table. This rustic, free-form treat fills the kitchen with the intoxicating scent of cinnamon and caramelized fruit, reminding us that the most memorable moments are often the ones baked by hand in our own quiet kitchens.
Preparing a Pear Galette feels like a gentle reclamation of time. Unlike a traditional pie that demands precision and patience, this recipe embraces imperfection. The fruit is folded into a delicate pastry with a grace that feels both effortless and elegant, making it the perfect companion for a quiet afternoon cuppa or an intimate gathering of loved ones.
What is Pear Galette?
A Pear Galette is a classic French-style, free-form tart that foregoes the need for a formal pie dish. It celebrates the simplicity of orchard-fresh pears, tossed in aromatic spices and encased in a buttery, flakey crust that is folded casually over the edges of the fruit. This design allows the center of the tart to remain open, showcasing the beautiful, shimmering slices of pear once they have been baked to golden perfection.
Tracing its origins back to rural France, the term galette refers to a large variety of rustic, flat-crust cakes. It is deeply rooted in home culinary traditions, where ingredients were dictated by the season and simplicity was a virtue. By using high-quality refrigerated dough, we honor that tradition of accessibility while ensuring a consistent, melt-in-your-mouth pastry base every time.
Reasons to Try Pear Galette
You will love making a Pear Galette because it removes the intimidation factor often associated with pastry work. It is designed to be rustic, so those uneven folds and spontaneous arrangements are actually part of its charm. Whether you are a seasoned baker or someone who has never touched a rolling pin, you will find this process incredibly therapeutic and forgiving.
Furthermore, this recipe is a versatile hero in any home kitchen. It comes together quickly, making it a sophisticated choice for last-minute guests or a gentle weekend treat when you want something sweet without spending hours on cleanup. Because it relies on pantry staples and fresh, accessible fruit, it is a sustainable, heart-centered way to share joy without the stress of complex baking techniques.
Ingredients Needed to Make Pear Galette
- 1 refrigerated pie crust dough (let it reach room temperature for 15 minutes before rolling)
- 3-4 slightly firm but ripe Bartlett or Anjou pears (peeled, cored, and sliced into thin, uniform strips)
- 1/4 cup granulated sugar (for sweetness that caramelizes perfectly with the fruit)
- 2 tablespoons flour or cornstarch (to thicken the natural juices of the pears)
- 1 teaspoon ground cinnamon (the soul of the recipe)
- 1/4 teaspoon ground ginger (adds a subtle, warming kick)
- 1/4 teaspoon salt (to balance and brighten the sugar)
- 1 tablespoon fresh lemon juice (prevents browning and adds a necessary zing)
- 1/2 teaspoon lemon zest (enhances the aromatic profile)
- 1/2 tablespoon cold butter (diced into small pieces)
- 1 egg (beaten, to create a professional, golden-brown finish)
- Coarse turbinado sugar (to sprinkle on crust for a beautiful, crunchy texture)
Instructions to Make Pear Galette – Step by Step
Step 1: Begin by preparing your workspace. Line a large rimmed baking sheet with a piece of parchment paper or a silicone mat, then give it a light spritz of cooking spray to ensure nothing sticks during the bake.
Step 2: Roll out your room-temperature pie dough between two sheets of lightly floured waxed paper until you have a circle roughly 11 inches in diameter. Gently transfer the circle to your prepared baking sheet, cover it with plastic wrap, and let it rest in the refrigerator for about 15 to 30 minutes; this cooling step ensures the butter stays cold, leading to that coveted, flakey crust.
Step 3: While the dough rests, preheat your oven to 400 degrees F. In a large mixing bowl, combine your sliced pears, granulated sugar, flour, cinnamon, ground ginger, salt, lemon juice, and zest. Toss these components gently until every pear slice is evenly coated in those warm, aromatic spices.
Step 4: Once the dough is chilled, place your pear mixture in the center. Mound the fruit slightly, making sure to leave a clean two-inch border of dough around the edges. You can arrange the pears in a delicate spoke pattern, or simply pile them for a more rustic, home-spun look.
Step 5: Fold the border of the dough inward over the pears, overlapping the edges as you circle the tart. You do not need this to look perfect; the seams and slight wrinkles add to its artisanal quality. Gently press the folded sections so they stick together.
Step 6: Dot the cold butter pieces across the top of the fruit filling, which will melt down to create a rich, syrupy glaze. Brush the surface of the exposed dough with the beaten egg, then sprinkle your coarse turbinado sugar over both the fruit and the crust to encourage a beautiful, sparkling golden crunch.
Step 7: Slide the galette into the oven and bake at 400 degrees F for approximately 20 minutes, or until the pastry is deeply golden brown and the pears are tender. Let the tart sit on a wire rack for at least 20 minutes before slicing to allow the filling to set, keeping that signature texture intact.
Chef’s Tips for a Perfect Result
- Keep your ingredients cold: Cold butter and chilled dough are the secrets to a pastry that blossoms into delicate, buttery layers in the oven.
- Adjust the flour depending on fruit juiciness: If your pears are particularly ripe and juicy, use a full two tablespoons of flour or cornstarch to ensure the bottom crust stays crisp.
- Don’t skip the wash: Brushing the crust with beaten egg provides a rich, bakery-quality sheen that makes the final galette look as stunning as it tastes.
- Use a light hand: When folding, handle the dough gently to maintain its light structure, rather than kneading or pushing down too firmly.
Variations and Substitutions
- Gluten-Free Alternative: Use a high-quality, pre-made gluten-free pie crust dough, ensuring it is designed for rolling so it won’t crumble during the fold.
- Vegan Option: Use a vegan-friendly store-bought crust, skip the egg wash—use a little almond milk or maple syrup instead—and replace the butter with a high-quality vegan plant butter.
- Winter Spice Blend: For deeper warmth, replace the ginger with a pinch of ground cloves or cardamom, creating a profile that feels like a cozy winter morning.
How to Serve and Pair
Serve your warm Pear Galette alongside a generous dollop of softened vanilla bean whipped cream or a scoop of high-quality French vanilla ice cream. The temperature contrast between the warm, spiced fruit and the cold, creamy topping is absolutely divine. For an added touch of elegance, dust the edges with a light layer of powdered sugar just before serving.
Storage and Reheating
Refrigerator: Cover the cooled galette loosely with foil or store it in an airtight container for up to three days. It will remain delicious, though the crust will soften slightly over time.
Freezer: For longer storage, wrap the cooled tart tightly in plastic wrap and then tin foil. It will maintain its quality for up to two months.
Reheating: Reheat in a 350-degree F oven for about 10 minutes until warmed through and crisp. Using an oven is far superior to a microwave, as it prevents the crust from becoming soggy.
Frequently Asked Questions (FAQ)
Can I use apples instead of pears?
You can absolutely substitute firm apples like Granny Smith or Honeycrisp for the pears. Note that apples are denser, so you should slice them slightly thinner and bake them for 35 to 40 minutes to ensure they reach the perfect level of tenderness.
How do I know when the galette is fully baked?
The galette is finished when the pastry achieves a deep, golden-brown color and feels firm and crisp to the touch. The pear filling should be bubbling slightly around the edges, indicating that the juices have thickened into a rich syrup.
Why is my crust soggy after baking?
A soggy crust usually occurs when the filling is too wet or the oven temperature wasn’t hot enough to set the bottom quickly. Ensure you use the full amount of flour or cornstarch as a thickener, and place the galette on a preheated baking sheet if you want an extra crunch.
Can I make the dough or assembly ahead of time?
You can assemble the galette up to a few hours before you plan to bake, keeping it chilled in the refrigerator until the oven is ready. This is actually a great strategy for saving time while entertaining, and it helps the dough hold its shape beautifully.
How can I customize the flavor profile of the fruit?
You can customize the base by adding a handful of finely chopped walnuts or pecans to the fruit mixture for a delightful, nutty crunch. Alternatively, a teaspoon of vanilla extract or a drizzle of maple syrup can be added to the pear filling before folding the crust for a deeper, caramelized depth.
Conclusion
This Pear Galette is a testament to the joy of straightforward, honest baking that warms the heart as much as the kitchen. By choosing simple, high-quality ingredients and embracing the rustic nature of the finished dish, you create something far more meaningful than just a dessert. I encourage you to take that first slice, savor the buttery crunch against the soft, spiced pears, and enjoy the quiet sense of accomplishment that only a homemade treat can bring.
Print
Rustic Pear Galette
- Prep Time: 15
- Cook Time: 35
- Total Time: 50
- Yield: 6 servings 1x
- Category: desserts
- Method: Baking
- Cuisine: French
- Diet: Vegetarian
Description
A rustic, free-form tart that celebrates the simplicity of orchard-fresh pears folded into a buttery, flakey pastry. This classic French-style dessert is both effortless and elegant, perfectly spiced with warm cinnamon and caramelized fruit. Ideal for a quiet afternoon treat or an intimate gathering, the galette embraces imperfection, making it a forgiving and therapeutic baking project that showcases the natural beauty of seasonal fruit.
Ingredients
1 refrigerated pie crust dough
3–4 Bartlett or Anjou pears, peeled, cored, and thinly sliced
1/4 cup granulated sugar
2 tablespoons flour or cornstarch
1 teaspoon ground cinnamon
1 tablespoon butter, cubed
1 egg (for egg wash)
1 tablespoon coarse sugar (optional for dusting)
Instructions
Preheat your oven to 375°F (190°C) and line a baking sheet with parchment paper.
In a large bowl, toss the sliced pears with sugar, flour (or cornstarch), and cinnamon until well coated.
Roll out the pie crust on a lightly floured surface to roughly 12 inches in diameter.
Arrange the pear slices in the center of the dough, leaving a 2-inch border.
Fold the edges of the dough over the pears, pleating as you go, leaving the center open.
Dot the top of the fruit with the small cubes of butter.
Brush the edges of the crust with beaten egg and sprinkle with coarse sugar if desired.
Bake for 30-35 minutes until the crust is golden brown and the pears are tender.
Allow to cool for 10 minutes before slicing and serving.
Notes
Let the dough reach room temperature for 15 minutes before rolling to prevent cracking. Serve warm, perhaps with a dollop of whipped cream or a scoop of vanilla ice cream. Store any leftovers in an airtight container in the refrigerator for up to 2 days.
Nutrition
- Serving Size: 1 slice
- Calories: 280
- Sugar: 18g
- Sodium: 150mg
- Fat: 12g
- Saturated Fat: 6g
- Carbohydrates: 42g
- Fiber: 3g
- Protein: 3g
- Cholesterol: 35mg


