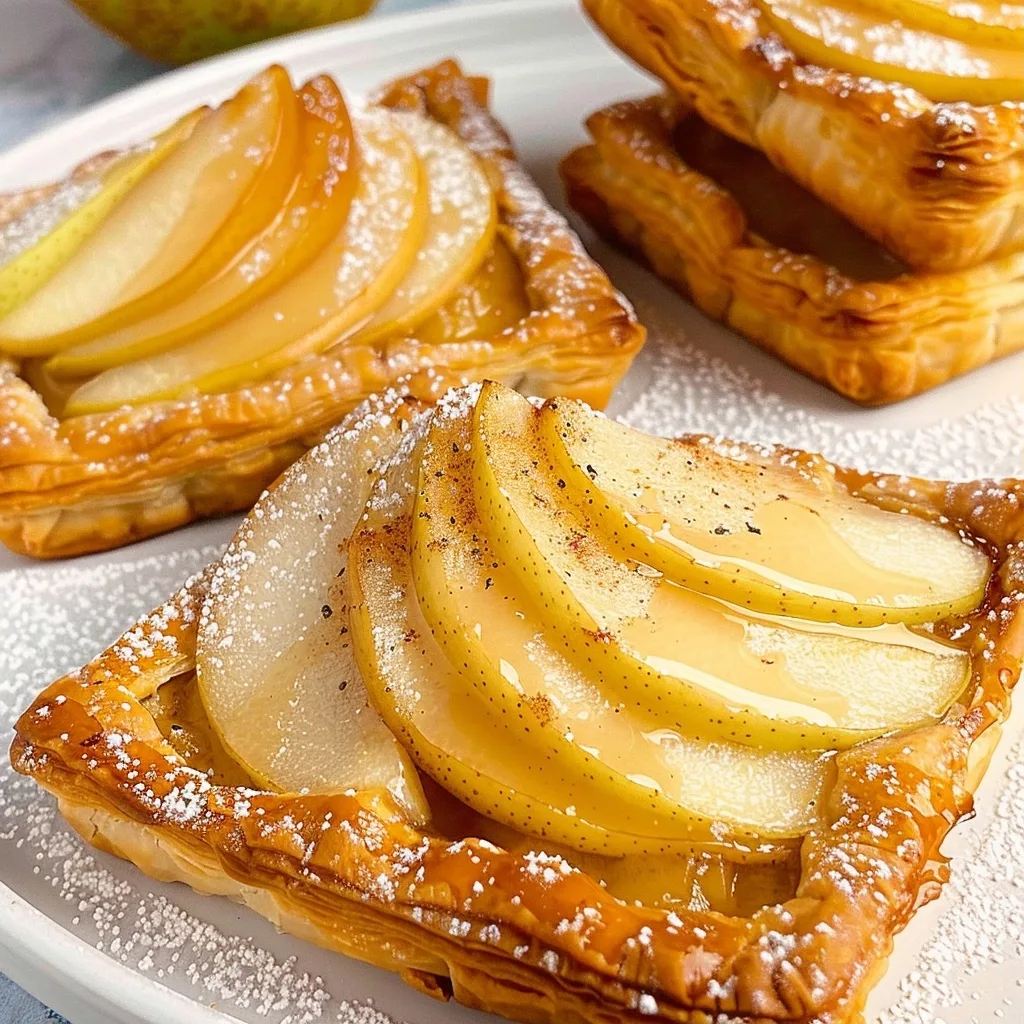
Pear Puff Pastry Tarts: A Simple Slice of Autumn Comfort
Pear puff pastry tarts are a delightful creation that brings the comforting flavors of autumn right to your kitchen. Imagine tender, sweet pears nestled in layers of impossibly flaky, golden puff pastry, their natural sweetness enhanced by a whisper of brown sugar. These little wonders are more than just a dessert; they’re a warm embrace, a moment of quiet joy on a busy day, reminiscent of simpler times spent in my grandmother’s kitchen. The gentle aroma that fills the house as they bake is pure magic, a promise of the simple elegance to come.
What I love most about these pear puff pastry tarts is their deceptive simplicity. They look and taste like something from a high-end bakery, yet they come together with an ease that belies their sophistication. They are a testament to how a few quality ingredients, treated with a little care and attention, can transform into something truly special. They are perfect for those moments when you need a little bit of sweetness to ground you, a reminder that beauty and comfort can be found in the most straightforward of preparations. Making them myself always feels like a gentle act of self-care, a way to pause and savor the simple pleasures.
What is Pear Puff Pastry Tarts?
Pear puff pastry tarts are individual-sized desserts featuring slices of fresh pear baked atop squares or rectangles of delicate, buttery puff pastry. The pastry bakes up into crisp, airy layers, providing a wonderful contrast to the soft, slightly yielding texture of the pears. Often, a touch of almond flour is used at the base of the pears to capture any juice, ensuring a beautifully crisp bottom crust. A light sprinkle of brown sugar caramelizes slightly during baking, adding a warm, sweet depth that complements the pear’s natural fruitiness.
While they evoke the essence of fall harvest, pear puff pastry tarts are delightful year-round, celebrating the pear’s subtle sweetness. They don’t have a single strict origin story like some more complex pastries, but they embody a spirit of rustic charm and elegant simplicity found in many European baking traditions, particularly in French and British patisseries. These tarts are about highlighting the natural beauty of the fruit and the incredible texture of puff pastry, creating a harmonious and utterly satisfying treat that feels both familiar and special.
Reasons to Try Pear Puff Pastry Tarts
There are so many reasons to invite these pear puff pastry tarts into your baking repertoire. Firstly, they are incredibly forgiving and remarkably easy to assemble, making them a perfect project for bakers of all levels, even those who might feel a little hesitant about working with pastry. The store-bought puff pastry is a wonderful shortcut, giving you that coveted flaky texture without the hours of folding and chilling traditionally required for homemade puff. They offer a sophisticated dessert that feels special enough for guests but is straightforward enough for a weeknight treat.
Beyond their ease, the taste and versatility of these tarts are outstanding. The combination of sweet, tender pears and crisp, golden pastry is irresistible, offering a delightful balance of textures and flavors. They are wonderfully adaptable; you can serve them warm with a dollop of cream or a scoop of vanilla ice cream, or enjoy them at room temperature. They are perfect for a quiet moment of reflection with a cup of tea, a charming addition to a brunch spread, or an elegant ending to a dinner party. They bring a touch of simple elegance and heartfelt comfort to any occasion.
Ingredients Needed to Make Pear Puff Pastry Tarts
- 2 packs Puff pastry, store-bought or homemade rough puff pastry portions (ensure they are cold but thawed if frozen)
- 6 ripe Pears, cut in half lengthwise
- 6 tablespoons Almond flour (about half a tablespoon per tart)
- 6 tablespoons Brown sugar
- 1 large Egg (for egg wash)
- A splash of Milk (for egg wash)
Instructions to Make Pear Puff Pastry Tarts – Step by Step
Step 1: Prepare the Baking Environment and Pastry
Begin by preheating your oven to 190°C (370°F) using the conventional setting, not fan-assisted. This ensures a gentle, even heat perfect for puff pastry. While the oven warms up, gently unfold your puff pastry sheets onto a lightly floured surface. It’s crucial that the pastry remains cold throughout this process; if it becomes warm and soft, it will be tricky to work with. Should it start to feel too pliable, don’t hesitate to pop it back into the refrigerator for a few minutes to firm up again. Immediately after unfolding, use a sharp knife or a pizza cutter to slice each sheet into 6 equal rectangles, aiming for consistency so your tarts bake evenly.
Step 2: Prepare the Pears and Almond Base
Now, turn your attention to the pears. Carefully cut each halved pear lengthwise, and then gently remove the core from the center of each half. The key to avoiding a soggy bottom lies in how you prepare the pears. Slice them very thinly, almost delicate, as this helps them bake through beautifully and release less excess moisture. Once sliced, gently press the pear slices onto a few layers of paper kitchen towels. This simple step absorbs excess juice and is a secret weapon for perfectly crisp pastry. For each pastry rectangle, place about half a tablespoon of almond flour right in the center. This acts as a delicious moisture barrier and adds a subtle nutty flavor.
Step 3: Assemble the Tarts
With your pastry rectangles ready and the pear slices prepared, it’s time to assemble these little beauties. Arrange one-half of a pear, with its perfectly fanned slices, right on top of the almond flour on each pastry rectangle. Try to keep the pears centered and neat, creating an appealing visual. Once each pear half is in place, take your brown sugar and sprinkle it evenly over the pears. The amount here is about a tablespoon per tart, enough to create a lovely caramelized sweetness without overpowering the pear’s delicate flavor. This step is where the magic truly begins to unfold, transforming simple ingredients into a tempting dessert.
Step 4: Apply the Egg Wash and Prepare for Baking
To achieve that coveted golden-brown, glossy finish, we’ll prepare a simple egg wash. In a small bowl, whisk together the egg with a tiny splash of milk. This mixture will give the pastry a beautiful sheen and a rich color as it bakes. Using a pastry brush, gently apply this egg wash all around the edges of the puff pastry, being careful to avoid brushing the pears themselves. This ensures that only the pastry gets that lovely color and crispness. You will continue this process with your second sheet of puff pastry, creating a total of 12 exquisite pear tarts ready for their transformation in the oven.
Step 5: Bake the Tarts to Perfection
Now, it’s time to bake! Carefully place your prepared tarts onto baking sheets, ensuring they have a little space between them so they can puff up beautifully. Bake the tarts at the preheated 190°C (370°F) for approximately 45 minutes. To gain deeper color and prevent the pears from browning too quickly, cover the tarts with aluminum foil after about 15 minutes of baking. This allows the pastry to cook through and the pears to become tender without the sugars burning. Keep an eye on them towards the end; the pastry should be deeply golden and puffed, and the pears should be tender. Trust your senses – the aroma will be divine.
Step 6: Cool and Serve
Once baked to golden perfection, carefully remove the baking sheets from the oven. Let the pear puff pastry tarts rest on the baking trays for a brief 3 minutes. This short resting period allows them to set slightly, making them easier to transfer. Then, gently move the tarts onto a wire cooling rack to cool further. While they are incredibly delicious when served warm, continuing to cool them will allow the flavors to meld and the pastry to achieve its ultimate crispness. These tarts are truly at their best enjoyed fresh, capturing the wonderful contrast between warm, tender fruit and crisp pastry.
Chef’s Tips for a Perfect Result
- Work with Cold Pastry: Always ensure your puff pastry is well-chilled. If it feels warm or sticky, refrigerate it for 10-15 minutes before proceeding to prevent it from stretching and tearing.
- Pat Pears Dry: Thoroughly patting the pear slices dry with paper towels is essential to minimize excess moisture and achieve a crisp pastry base.
- Even Slicing is Key: Slice your pears thinly and as uniformly as possible so they cook evenly and tenderize at the same rate.
- Don’t Skip the Almond Flour: The almond flour acts as a delicious barrier, absorbing excess pear juice and preventing a soggy bottom crust.
- Watch the Browning: If your tarts start to brown too quickly, especially the edges of the pastry or the pears’ sugar coating, tent them loosely with aluminum foil.
- Check for Doneness: Look for a deep golden-brown color across the puff pastry and check the underside for a golden, cooked appearance. The pears should be tender when gently pierced with a fork.
Variations and Substitutions
- Apple Puff Pastry Tarts: Easily substitute apples for pears. Use firm varieties like Honeycrisp or Fuji. The flavor profile will shift to a classic apple dessert, slightly tarter and with a different aromatic quality.
- Berry Puff Pastry Tarts: For a burst of vibrant flavor, use fresh or frozen berries (thawed and drained) instead of pears. You might reduce the brown sugar slightly, as berries can be sweeter. This will yield a more tart and juicy result.
- Spiced Pear Tarts: Add a pinch of cinnamon, nutmeg, or cardamom to the brown sugar. This enhances the warmth and aromatic complexity of the pear, making the tarts feel even more autumnal and cozy.
- Nutty Variations: Swap almond flour for finely chopped walnuts or pecans for added texture and a richer, deeper nutty flavor. Mix the nuts with the brown sugar before sprinkling.
- Citrus Zest Boost: Incorporate a teaspoon of lemon or orange zest into the brown sugar mixture for a bright, fragrant lift that complements the pear beautifully.
How to Serve and Pair
These delightful Pear Puff Pastry Tarts are wonderful served warm, straight from the oven, or at room temperature. For an extra touch of indulgence, a generous dollop of freshly whipped cream, a spoonful of crème fraîche, or a scoop of high-quality vanilla bean ice cream makes them truly spectacular. They are perfect for afternoon tea, a light dessert after a hearty meal, or even as a sweet treat alongside your morning coffee. Consider a simple dusting of powdered sugar for an elegant finish.
For pairings, a warm cup of chai tea or a delicate Earl Grey complements the warm spices and fruitiness beautifully. A light, slightly sweet dessert wine or a chilled glass of sparkling apple cider also makes for a sophisticated accompaniment. These tarts also shine as part of a dessert spread during holidays or family gatherings, bringing a homemade touch of comfort and warmth that everyone will appreciate. They are a versatile treat, adaptable to both casual moments and more special occasions.
Storage and Reheating
Refrigerator
Leftover pear puff pastry tarts can be stored in an airtight container in the refrigerator for up to 2-3 days. While they are best fresh, refrigeration will help maintain their quality for a short period. It’s advisable to place parchment paper between layers if stacking to prevent sticking, though they generally hold their shape well.
Freezer
For longer storage, you can freeze fully cooled baked tarts. Wrap each tart individually and tightly in plastic wrap, then place them in a freezer-safe container or bag. They should remain good for up to 1 month. Thaw them overnight in the refrigerator before reheating.
Room Temperature
Unbaked, assembled tarts are best baked the same day they are assembled. If you must prepare them slightly ahead, you can refrigerate the assembled, unbaked tarts for a few hours, ensuring the pastry stays cold. Baked tarts can be left at room temperature for a few hours for casual gatherings, but for best texture, refrigerate any leftovers.
Reheating
To restore the pastry’s crispness, gently reheat the tarts in a moderate oven (around 160°C / 320°F) for 5-10 minutes, or until warmed through and the pastry is crisp again. You can also reheat them briefly in a toaster oven. Avoid using a microwave for reheating, as it tends to make puff pastry soft and gummy.
Frequently Asked Questions (FAQ)
Can I substitute the pears with another fruit?
Yes, you can absolutely substitute pears with apples, a mix of apples and cranberries, or even firm peaches. Ensure the fruit is sliced thinly and patted dry, just like the pears, to maintain pastry crispness.
How can I tell if my pear puff pastry tarts are done baking?
Your tarts are done when the puff pastry is deeply golden brown and puffed up beautifully, and the pears are tender when pierced with a fork. The bottom pastry should also appear golden and cooked through.
What if my puff pastry tarts turn out soggy on the bottom?
A soggy bottom is often caused by too much moisture from the fruit or the pastry not being baked long enough. Ensure you pat the pears thoroughly dry and use the almond flour base. Baking on a preheated baking sheet can also help create a crispier base.
Can I prepare the pear puff pastry tarts ahead of time?
You can assemble the tarts (without egg wash) a few hours in advance and keep them chilled in the refrigerator. Bake them just before serving for the best texture. Baked tarts can be stored in the fridge for 2-3 days.
What are the best ways to customize or serve these tarts?
For serving, a sprinkle of powdered sugar, a drizzle of honey, or a dollop of mascarpone cheese are wonderful additions. You can also add a pinch of cinnamon or nutmeg to the pears before baking for an extra layer of flavor.
CONCLUSION
These pear puff pastry tarts are a comforting embrace in dessert form, blending the simple magic of flaky pastry with the sweet, gentle essence of pears. They are a gentle reminder that the most profound joys often come from the simplest preparations, made with love and a mindful touch. Baking these allows a moment of peaceful connection, a pause to savor the sweet, caramelized fruit and the satisfying crunch of golden pastry, a flavor that feels like home.
Print
Pear Puff Pastry Tarts: A Simple Slice of Autumn Comfort
- Prep Time: 15
- Cook Time: 15
- Total Time: 30
- Yield: 12 tarts 1x
- Category: desserts
- Method: Baking
- Cuisine: French
- Diet: Vegetarian
Description
Crispy puff pastry filled with sweet caramelized pears and a touch of brown sugar. A rustic, autumn-inspired dessert that’s easy to assemble and bursting with seasonal flavor.
Ingredients
1 (16 oz) sheet puff pastry, thawed
2 medium pears, thinly sliced
3 tbsp brown sugar
1 tbsp chopped almond flour (optional, to catch juices)
1/4 tsp ground cinnamon (optional)
1/2 cup confectioners’ sugar, sifted (for drizzling glaze)
Instructions
Preheat oven to 425°F (220°C)
Cut puff pastry into 12 equal squares or rectangles
Arrange pear slices in overlapping layers on each pastry piece
Sprinkle brown sugar, cinnamon, and almond flour over pear slices
Fold the pastry edges to form tartlets, leaving pear exposed
Bake 12-15 minutes until golden and crisp
Cool slightly, then drizzle with confectioners’ sugar mixed with 1 tsp water
Notes
Use pre-made puff pastry for convenience
Pears like Bartlett or Anjou work best
Brush pastry with egg wash for shiny finish
Serve warm or at room temperature
Store leftovers in an airtight container for 1-2 days
Nutrition
- Serving Size: 1 tart
- Calories: 210
- Sugar: 12g
- Sodium: 85mg
- Fat: 11g
- Saturated Fat: 6g
- Carbohydrates: 24g
- Fiber: 1g
- Protein: 2g
- Cholesterol: 10mg


