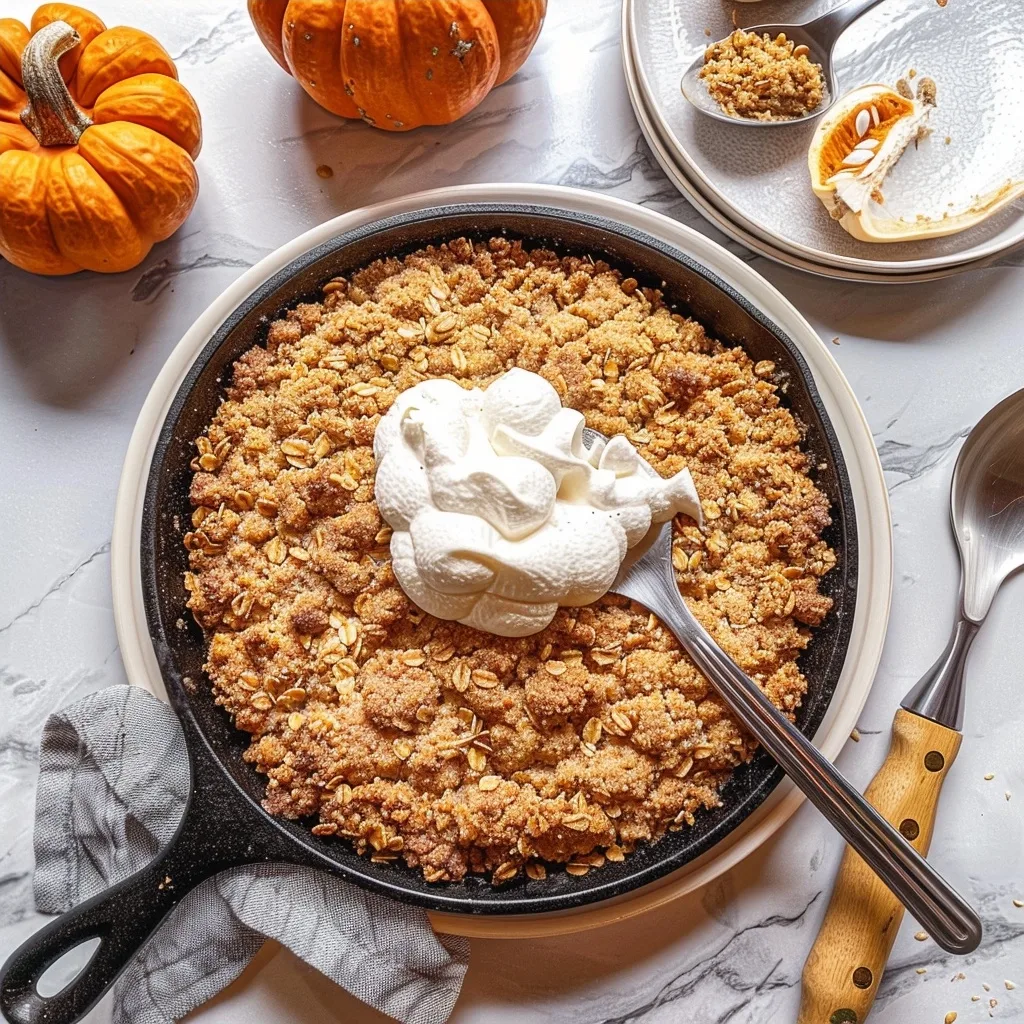
Pumpkin Crisp brings the soul-warming essence of autumn directly into your kitchen, filling your home with the intoxicating scent of cinnamon, cloves, and sweet roasted pumpkin. Preparing it feels like a quiet conversation with seasons past, where the hearth was the heart of the home and desserts were measured in love rather than minutes. This dish marries a velvety, spiced custard base with a golden, crunchy topping that turns every bite into a memory worth savoring.
When life feels hurried, slowing down to whisk together simple, honest ingredients like fresh pumpkin purée and warm spices offers a rare moment of peace. The beauty of this recipe lies in its simplicity, making it a perfect companion for cozy evenings. Whether you are gathering around the table with family or seeking a quiet moment of reflection, this treat warms the spirit as thoroughly as it warms the belly.
What is Pumpkin Crisp?
Pumpkin Crisp is a delightful hybrid dessert that captures the best parts of a classic pumpkin pie and a rustic fruit crumble. It features a rich, spiced pumpkin filling that sets into a creamy, smooth consistency, topped with a generous layer of buttery, crisp flour and sugar streusel. It is a dish that celebrates texture, contrasting the soft, silky depth of the pumpkin with the satisfying snap and crunch of the golden-brown crust.
Its roots are firmly planted in the tradition of home-style American baking, where fruit and vegetable crisps served as humble yet decadent crowd-pleasers. Unlike pies that require careful crust manipulation and chilling time, a crisp is forgiving and accessible. It is the kind of recipe my grandmother would pull from her wooden recipe box when the leaves began to turn, relying on pantry staples to transform a simple can of pumpkin into something truly celebratory.
Reasons to Try Pumpkin Crisp
This recipe is a masterpiece of efficiency, perfect for busy weeknights when you still crave the comfort of a homemade dessert. Because it comes together in a single cast iron skillet, you save time on cleanup while embracing the natural, rustic aesthetic that defines authentic home cooking. The deep, heat-retaining nature of the skillet also helps the filling set perfectly, ensuring consistent results every time you bake it.
Beyond its ease, the flavor profile is infinitely comforting. It is a versatile dish that welcomes both novice bakers and seasoned pros. If you are learning the rhythms of your own kitchen, this recipe offers a forgiving environment where the focus is on the warmth of the spices and the joy of creating something nourishing. It is equally perfect for a casual neighborhood potluck or as a quiet dessert after a long, reflective Sunday dinner.
Ingredients Needed to Make Pumpkin Crisp
For the Pumpkin Filling:
- 15 ounces canned pumpkin purée (ensure it is pure pumpkin, not pie filling)
- ¾ cup granulated sugar
- ¼ cup brown sugar, packed
- 3 large eggs (room temperature for better emulsification)
- 1 tablespoon pumpkin pie spice (homemade or high-quality store-bought)
- ½ teaspoon salt
- 1 teaspoon pure vanilla extract
- ½ cup heavy cream
For the Topping:
- 2 cups all-purpose flour
- 1 ¼ cups granulated sugar
- ¼ cup brown sugar, packed
- 2 teaspoons ground cinnamon
- ½ teaspoon salt
- ¾ cup butter (melted and slightly cooled)
Instructions to Make Pumpkin Crisp – Step by Step
Step 1: Start by preheating your oven to 375 degrees Fahrenheit. While the oven reaches temperature, generously butter your 12-inch cast iron skillet to ensure the edges of your dessert caramelize beautifully rather than sticking to the surface.
Step 2: In a large bowl, whisk together the canned pumpkin purée, granulated sugar, brown sugar, eggs, pumpkin pie spice, salt, and vanilla extract. Whisk until the mixture is uniform and the spices are well distributed, creating a deep, aromatic base that reflects the very soul of the autumn season.
Step 3: Gradually stream the heavy cream into the pumpkin mixture while continuing to whisk. Slow integration ensures the cream incorporates seamlessly, resulting in a silky, custard-like texture that feels luxurious on the palate.
Step 4: Once smooth, pour the filling carefully into your prepared cast iron skillet. Set it aside while you quickly prepare the topping, allowing the base to settle into the grooves of the metal.
Step 5: Prepare the topping by combining the flour, sugars, cinnamon, and salt in a medium mixing bowl. Drizzle the melted butter over the dry mix and stir with a fork until the mixture resembles coarse, buttery crumbs.
Step 6: Evenly sprinkle the crumb mixture over the pumpkin base, ensuring full coverage to create that iconic, golden crust. Place the skillet in the oven and bake for 35 to 45 minutes, or until the filling is set and the top has deepened to a warm, inviting golden brown.
Step 7: Finally, remove the skillet from the oven and allow it to cool for at least 10 minutes. This resting period is essential, as it allows the filling to firm up and the flavors to settle into a harmonious, comforting whole.
Chef’s Tips for a Perfect Result
- Use room-temperature eggs, as they blend more smoothly into the pumpkin mixture without creating lumps.
- Always use pure canned pumpkin rather than pre-sweetened pie mix to maintain total control over your sweetness levels.
- If your crust browns too quickly, tent the skillet loosely with aluminum foil for the final 10 minutes of baking.
- Allow the crisp to rest after baking; this mandatory cooling time ensures your first serving holds its shape perfectly.
- For an extra layer of texture, consider adding half a cup of chopped pecans or walnuts to your topping crumb mixture.
Variations and Substitutions
Gluten-Free Alternative: Swap the all-purpose flour for a high-quality 1-to-1 gluten-free baking blend. Use the same quantity, and your texture will remain remarkably similar to the original.
Lower Sugar Version: Replace granulated sugars with a preferred coconut sugar or a granulated erythritol sweetener. This will shift the flavor profile slightly toward a deeper molasses tone while keeping the sweetness balanced.
Nutty Crunch Variation: Add sliced almonds or toasted walnuts into the flour mixture before adding the butter. This creates a more robust, earthy crunch that pairs beautifully with the creamy pumpkin center.
How to Serve and Pair
Serve this crisp warm directly from the skillet to maintain that comforting, rustic vibe. It pairs exquisitely with a generous scoop of vanilla bean ice cream, which melts slightly into the warm pumpkin custard. For a morning-after treat, a small square can be gently reheated and served alongside a hot cup of spiced chai tea or freshly brewed black coffee.
Storage and Reheating
Refrigerator: Cover the skillet tightly or transfer leftovers to an airtight container. It will stay fresh for up to 4 days, though the topping will naturally lose some of its initial crunch the longer it sits.
Freezer: Allow the crisp to cool completely, then wrap tightly in plastic wrap and a layer of foil. It can be stored for up to 2 months; simply thaw in the refrigerator overnight before heating.
Reheating: For the best texture, reheat individual portions in a 350-degree oven for 10 minutes or in a toaster oven. Avoid the microwave if possible, as it tends to soften the crunchy topping too much.
Frequently Asked Questions (FAQ)
Can I use fresh pumpkin instead of canned purée?
Yes, you can use homemade pumpkin purée, provided you roast and strain it thoroughly to remove excess moisture. If the puree is too watery, your crisp will not set properly, so ensure it is thick and concentrated.
How do I know when the Pumpkin Crisp is fully cooked?
The crisp is ready when the edges of the pumpkin filling are just beginning to firm up and the topping is deeply golden brown. A gentle shake of the skillet should reveal only the very center quivering slightly, much like a traditional pumpkin pie.
Why did my topping turn out soggy instead of crisp?
A soggy topping usually indicates too much butter or the fat failing to incorporate with the flour properly. Ensure you are using cold-melted butter and mixing until the flour is fully moistened but still creates distinct, loose crumbs before baking.
Can I assemble this ahead of time?
Yes, you can prep the filling and the topping in separate bowls, but wait to combine them until you are ready to bake. Assembling too early can cause the dry ingredients to absorb moisture from the pumpkin, compromising the crunch.
What is the best way to customize the flavor?
The best way to customize this dish is by adjusting the spice profile to include fresh ginger or a pinch of ground cardamom. These additions elevate the pumpkin base and provide a nuanced, aromatic finish that feels deeply sophisticated.
Conclusion
Pumpkin Crisp is more than just a seasonal dessert; it is a warm, edible reminder to slow down and cherish the simplicity of the harvest. By inviting this recipe into your home, you are creating a centerpiece for connection, conversation, and quiet moments of joy. Let the rich, spiced aromas and the contrast of textures serve as a reminder that the sweetest memories are often the ones baked with love in your own kitchen.
Print
Pumpkin Crisp: The Ultimate Fall Comfort Dessert
- Prep Time: 15
- Cook Time: 45
- Total Time: 60
- Yield: 8 servings 1x
- Category: desserts
- Method: Baking
- Cuisine: American
- Diet: Vegetarian
Description
Experience the soul-warming essence of autumn with1 this Pumpkin Crisp. By marrying a velvety, spiced pumpkin custard base with a golden, buttery streusel topping, this dessert delivers a delightful contrast between soft, silky flavors and a satisfying crunch. It is the perfect, rustic comfort food, inspired by traditional home-style American baking, and designed to bring warmth to your home using simple pantry staples. Whether for a quiet evening or a family gathering, this treat is as easy to make as it is memorable.
Ingredients
15 ounces canned pumpkin purée (pure pumpkin)
3/4 cup granulated sugar
2 large eggs
1/2 cup evaporated milk
1 teaspoon vanilla extract
1 teaspoon ground cinnamon
1/2 teaspoon ground ginger
1/4 teaspoon ground cloves
1/4 teaspoon salt
1 cup all-purpose flour
1 cup rolled oats
1 cup light brown sugar, packed
1/2 cup unsalted butter, cold and cubed
Instructions
Preheat your oven to 350°F (175°C).
In a large bowl, whisk together the pumpkin purée, granulated sugar, eggs, evaporated milk, vanilla, cinnamon, ginger, cloves, and salt until smooth.
Pour the pumpkin mixture into a greased 10-inch cast iron skillet or a 9-inch square baking dish.
In a separate medium bowl, combine the flour, rolled oats, and brown sugar.
Use a pastry cutter or your fingers to work the cold, cubed butter into the dry ingredients until the mixture resembles coarse crumbs.
Sprinkle the topping evenly over the pumpkin filling.
Bake for 40 to 45 minutes, or until the topping is golden brown and the filling is set.
Allow to cool for at least 15 minutes before serving to let the custard firm up.
Notes
Serve warm, ideally with a scoop of vanilla bean ice cream or a dollop of whipped cream. Store leftovers covered in the refrigerator for up to 3 days and reheat in the oven or microwave before serving.
Nutrition
- Serving Size: 1 slice (approx. 1/8th of dish)
- Calories: 320
- Sugar: 38g
- Sodium: 180mg
- Fat: 11g
- Saturated Fat: 6g
- Carbohydrates: 52g
- Fiber: 3g
- Protein: 5g
- Cholesterol: 65mg


