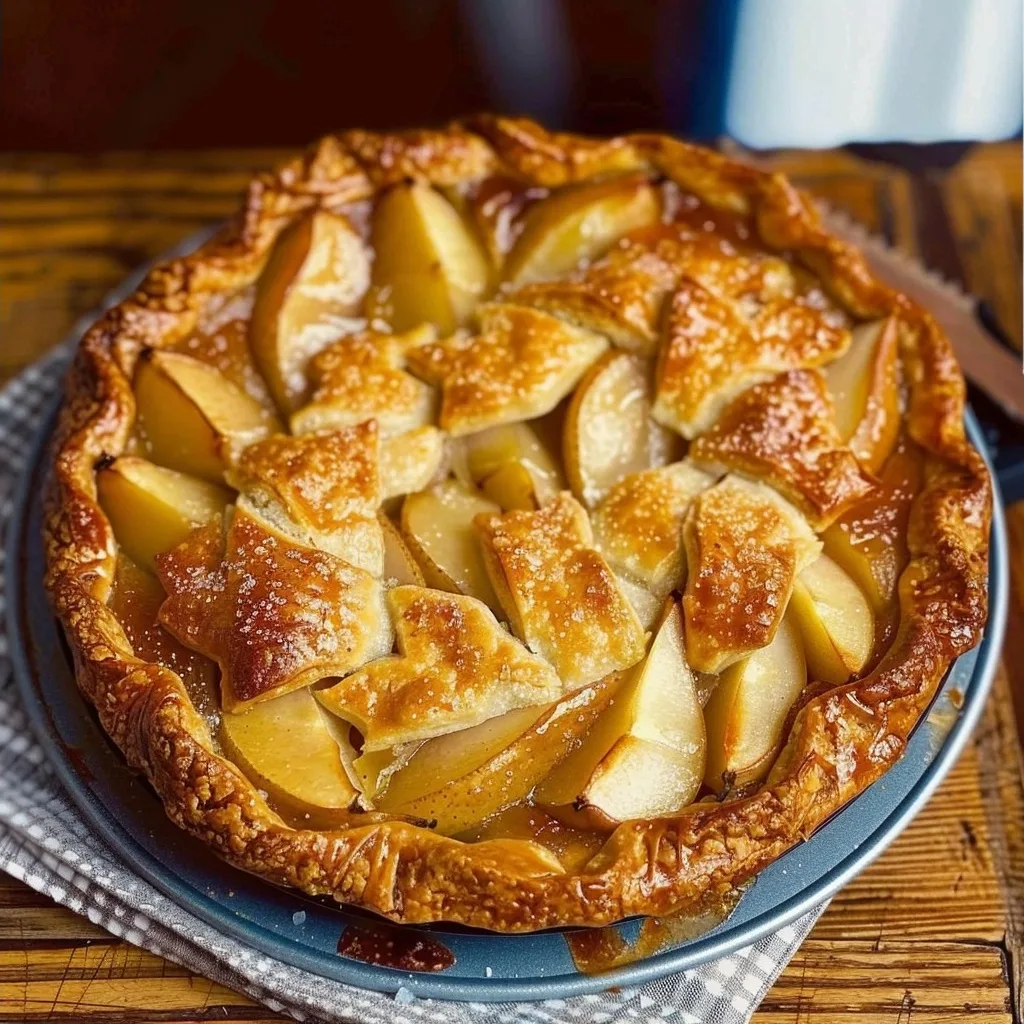
Rustic pear pie captures the essence of a quiet afternoon spent in the kitchen, where the simple act of rolling dough becomes a form of meditation. There is something profoundly healing about the way the scent of cinnamon and warm fruit fills the home, grounding us in the present moment. This recipe celebrates the imperfect beauty of homemade baking, inviting you to slow down and create something nourishing for those you love.
Bringing together the soft, floral notes of ripe pears with a golden, buttery crust, this dessert is a reminder that the best things in life are often the most uncomplicated. Making this rustic pear pie at home feels like a warm embrace, bridging the gap between old-world tradition and our modern, busy lives.
What is Rustic Pear Pie?
Rustic pear pie, often called a galette, is a free-form pastry that eschews the formality of traditional pie pans. Instead of crimping edges or worrying about precise lattice work, you simply roll your dough into a loose circle, pile fresh fruit in the center, and fold the edges over to hold everything in place. It is a dish born from the necessity of simple, country-style cooking, where the focus is entirely on the quality of the ingredients rather than decorative perfection.
The beauty of this dessert lies in its honesty. It relies on a flaky, buttery pastry crust that cradles succulent, spiced pear slices, which caramelize slightly as they bake. Because there is no top crust, the pears become tender and fragrant, creating a beautiful contrast between the crisp, golden pastry and the soft, melting center.
Reasons to Try Rustic Pear Pie
If you have ever felt intimidated by the idea of making a traditional pie, this recipe is your perfect introduction to the craft. It eliminates the stress of blind-baking crusts or worrying about whether your pie will slide out of a dish cleanly, allowing you to focus on the joy of creating something beautiful with your own hands. The process is incredibly forgiving, making it a wonderful choice for beginners or for those moments when you want a homemade treat without spending hours in the kitchen.
Beyond its ease, this pie is remarkably versatile. It is a dish that suits any occasion, from a cozy Sunday morning breakfast to a quiet dessert after a shared evening meal. It brings a sense of peace to the table, inviting friends and family to linger, talk, and enjoy the simple pleasure of a warm, fruit-filled pastry. Every slice tells a story of comfort, connection, and the quiet beauty of home.
Ingredients Needed to Make Rustic Pear Pie
For the pastry:
- 225g plain flour, plus extra for dusting (a high-quality all-purpose flour works best)
- 3 tbsp caster sugar (adds a delicate sweetness to the dough)
- ½ tsp fine salt (balances the rich butter)
- 140g unsalted butter, chilled and cut into small cubes (keep it cold for the flakiest crust)
- 1 large free-range egg (helps bind the dough)
For the filling:
- 4-5 pears, peeled, cored and thinly sliced (look for pears that are ripe but firm)
- 1 tbsp soft light brown sugar (adds a hint of molasses depth)
- ½ tbsp ground cinnamon (the soul of the filling)
- 1 tbsp plain flour (to thicken the fruit juices while baking)
- 1 free-range egg, beaten (for a beautiful golden glaze)
- Icing sugar to dust (for a final, snowy finish)
- Double cream, whipped to soft peaks (to serve on the side)
Instructions to Make Rustic Pear Pie – Step by Step
Step 1: Begin by preparing your pastry base. Place the flour, caster sugar, salt, and cold butter cubes into a large mixing bowl. Using your fingertips, gently rub the butter into the flour until the mixture resembles coarse, golden breadcrumbs. This process is tactile and grounding, a quiet moment to focus on the texture of the ingredients.
Step 2: Add the egg to the mixture and bring everything together with your hands to form a cohesive dough. If the dough feels a bit too dry, a tiny splash of cold water will help it come together. If it feels too sticky, a light dusting of flour is all you need. Wrap the ball of dough in cling film and let it rest in the fridge for 30 to 40 minutes, which allows the gluten to relax and the butter to firm up.
Step 3: While the dough rests, preheat your oven to 180°C (160°C fan/gas 4) and line a large baking sheet with parchment paper. In your cleaned mixing bowl, toss the prepared pear slices with the brown sugar, cinnamon, and flour until they are evenly coated. The fragrance of the cinnamon warming against the fresh pears is one of the most soothing scents you will experience in the kitchen.
Step 4: Once the dough has chilled, roll it out on a lightly floured surface into a rough circle about 5mm thick and 35cm in diameter. Carefully transfer the pastry to your prepared baking sheet. Arrange the spiced pears in the center of the circle, leaving an 8 to 9cm border of plain dough all around the edges.
Step 5: Use the sides of the baking paper to help you gently lift and fold the pastry border up and over the outer edge of the pears. It does not need to be perfect; the slight, organic folds are part of what makes this dish so charming. Brush the exposed pastry with the beaten egg to ensure a beautiful sheen once baked.
Step 6: Bake the pie for 40 minutes or until the crust is a deep, golden brown and the pears are tender. Let the pie cool slightly before dusting it with icing sugar and serving it warm, accompanied by a generous dollop of freshly whipped double cream.
Chef’s Tips for a Perfect Result
- Keep your butter as cold as possible until the very moment you mix it in, as small pockets of cold butter create the layers that make the crust flaky.
- Do not overwork the dough; handle it gently and quickly to ensure the pastry remains tender rather than tough.
- Choose pears that are just ripe; if they are too soft, they will turn into mush, but if they are too hard, they will not soften enough during baking.
- Always brush the crust edges evenly with egg, as this gives the pie that professional, high-gloss shine that makes it look so inviting.
Variations and Substitutions
- Vegan Option: Replace the butter with a high-quality plant-based butter block and use a splash of oat milk or a flax egg for the wash instead of chicken eggs.
- Gluten-Free Alternative: Swap the plain flour for a reliable 1-to-1 gluten-free baking blend that includes xanthan gum to help hold the structure of the crust.
- Budget Swap: Use seasonal apples if pears are expensive, simply adjusting the cinnamon to taste, as the technique remains identical.
How to Serve and Pair
This pie is best served warm, allowing the contrast between the hot, spiced pears and the cool, soft whipped cream to shine. It pairs beautifully with a pot of aromatic Earl Grey tea or a simple coffee. For a special occasion, you might serve it at the end of an intimate dinner, perhaps with a touch of nutmeg grated over the cream.
Storage and Reheating
Refrigerator: Store leftovers in an airtight container for up to two days. The pastry may lose some of its crispness, so it is best to refresh it before serving.
Freezer: You can freeze the unbaked pastry disc wrapped tightly for up to a month. Thaw in the fridge overnight before rolling out and filling.
Room Temperature: Keep in a cool spot covered with a clean cloth for up to one day, though the refrigerator is safer for longer storage.
Reheating: Warm the pie in a 160°C oven for about 10 minutes. This helps restore the crispness of the pastry that you might lose in a microwave.
Frequently Asked Questions (FAQ)
Can I use different fruits in this rustic pie?
You can substitute the pears with sliced apples, peaches, or plums depending on the season. Simply maintain the same sugar and flour ratios to ensure the filling sets correctly.
How do I know when the pear pie is finished baking?
The pie is done when the pastry crust turns a deep, golden brown and the pear juices are bubbling and thickened. If the pears are still firm to the touch, give it a few extra minutes in the oven.
My crust is cracking when I fold it, what should I do?
If the dough cracks, simply use a damp finger to patch the seam or press the dough back together. This is the beauty of a rustic pie, as small imperfections add to its homemade charm.
Can I prepare the components in advance?
You can make the dough up to two days in advance and keep it chilled in the refrigerator. We recommend tossing the pears with the sugar and spices just before assembly to ensure they do not release too much juice.
What is the best way to serve this to a crowd?
For a beautiful presentation, place the pie in the center of the table on a wooden board. Encourage guests to help themselves to generous slices, topping each portion with fresh whipped cream as you serve.
Conclusion
Rustic pear pie is a testament to the idea that simple ingredients, when treated with love, create the most memorable experiences. I hope you take the time to enjoy the quiet, grounding process of baking this in your own home. Let the warmth of the cinnamon and the tenderness of the pears remind you of the beauty in slow, deliberate living, and may every bite bring a sense of peace to your table.
Print
Rustic Pear Pie (Galette)
- Prep Time: 20
- Cook Time: 35
- Total Time: 55
- Yield: 8 servings 1x
- Category: desserts
- Method: Baking
- Cuisine: Rustic Country
- Diet: Vegetarian
Description
A beautiful, free-form pastry that celebrates the simple joy of rustic baking. This galette features a buttery, golden-brown crust filled with tender, spiced pear slices. With no need for a pie dish or intricate lattice work, it offers an honest and delicious dessert experience. It is the perfect uncomplicated treat to share with loved ones, highlighting the floral sweetness of ripe pears paired with a delicate, flaky crust.
Ingredients
225g plain flour, plus extra for dusting
3 tbsp caster sugar
1/2 tsp fine salt
140g unsalted butter, chilled and cubed
4 large ripe pears, thinly sliced
1 tbsp lemon juice
1/4 cup granulated sugar
1 tsp ground cinnamon
1 tbsp cornstarch
1 egg beaten (for egg wash)
Instructions
In a large bowl, whisk together the flour, 3 tbsp sugar, and salt.
Add the chilled butter cubes and rub into the flour using your fingertips until the mixture resembles coarse crumbs.
Add 3-4 tablespoons of ice water, mixing until the dough just comes together into a disk; wrap and chill for 30 minutes.
Preheat oven to 200°C (400°F).
In a bowl, toss sliced pears with lemon juice, granulated sugar, cinnamon, and cornstarch.
Roll out the dough on a floured surface into a large, rough circle about 12 inches across.
Place pears in the center, leaving a 2-inch border; fold the edges of the dough over the pears, pleating as needed.
Brush the crust with the beaten egg.
Bake for 30-35 minutes until the crust is golden brown and the pears are tender.
Notes
Keep the butter very cold to ensure a flaky crust. You can serve this warm with a scoop of vanilla ice cream. Store in an airtight container for up to 2 days.
Nutrition
- Serving Size: 1 slice
- Calories: 285
- Sugar: 18g
- Sodium: 145mg
- Fat: 12g
- Saturated Fat: 7g
- Carbohydrates: 42g
- Fiber: 3g
- Protein: 3g
- Cholesterol: 45mg


