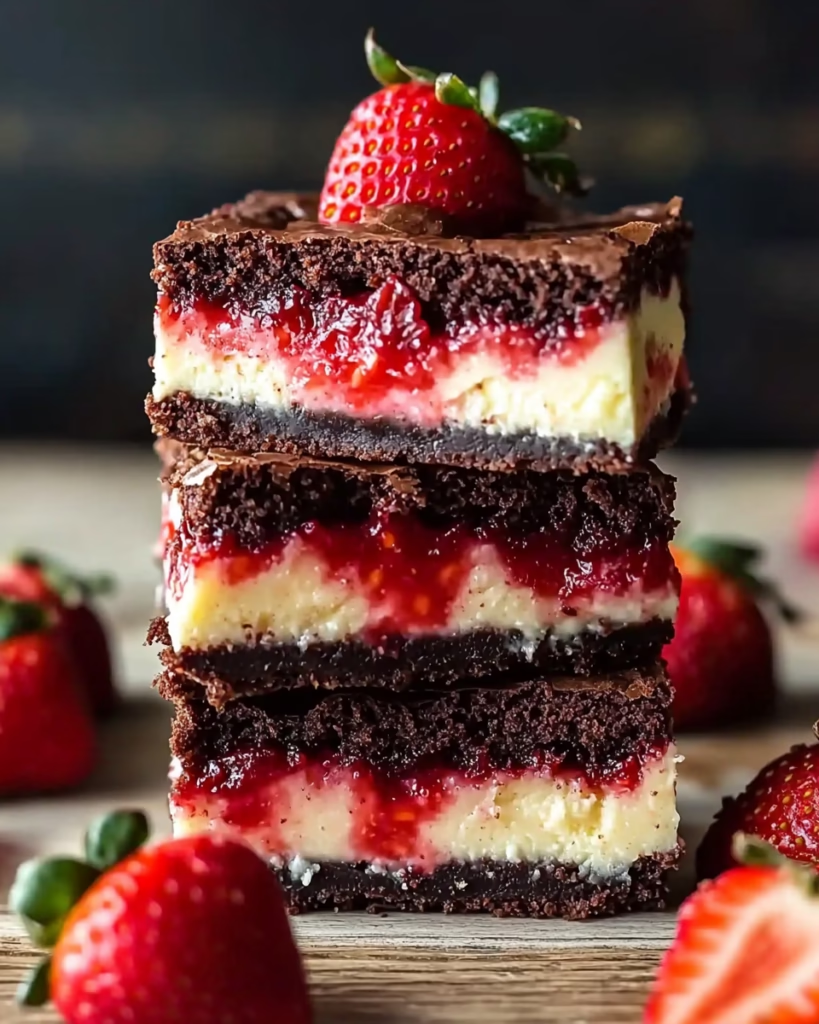
Strawberry Cheesecake Brownies are the kind of dessert that instantly transforms a simple afternoon snack into a celebration of rich, multicultural flavor. This American-inspired layered treat intertwines the deep, fudgy charm of chocolate brownies with the smooth silkiness of a vanilla cheesecake layer, all swirled with bursts of bright, ruby-red strawberry filling. Each bite is a journey through textures and temperatures, fusing comforting warmth with tangy brightness. Whether you’re reviving a nostalgic family recipe or crafting a show-stopping dessert for a gathering, these three-layered brownies radiate a sweetness that lingers long after the last piece is gone.
What makes these brownies truly special is their ability to balance indulgence with approachability. While they wear the trappings of a bakery masterpiece, they’re surprisingly simple to make, requiring just a few staples you might already have on hand. The secret lies in the harmony of layers: a crackly-topped chocolate foundation, a velvety cheesecake that melts into the brownie’s darkness, and a strawberry swirl that adds a playful twist. This isn’t just dessert—it’s a love letter to the kitchen as a space where memory, comfort, and creativity collide.
Because of their versatility, these brownies can be easily customized. Substitute ingredients to suit dietary preferences, swap strawberries for seasonal fruit, or simplify the steps for a no-bake version. But at their core, they remain a testament to how a single recipe can unite generations of bakers, each layer carrying the warmth of family traditions passed down like heirlooms.
What Are Strawberry Cheesecake Brownies?
At their essence, Strawberry Cheesecake Brownies are a modern reinvention of classic dessert foundations. The concept marries two icons: the dense, fudgy brownie first popularized in the United States in the 1920s, and the New York-style cheesecake, which emerged as a distinct category in the 1950s with the rise of Philadelphia-style cream cheese. By layering these elements with a fruity twist, the recipe creates a three-dimensional flavor profile that feels both inventive and familiar.
What sets these brownies apart is their thoughtful structural balance. The chocolate brownie base is baked at 350°F to develop a crisp outer crust while maintaining a molten center. This is followed by a cheesecake layer that incorporates room-temperature cream cheese folded gently to avoid air bubbles. The strawberry swirl is often crafted with either fresh berries pureed with sugar and lemon, or pre-made pie filling for convenience. This triple-layer construction ensures each aspect—bitter chocolate, tangy fruit, and creamy fill—plays its part in a symphony of taste and texture.
Originating from home baking communities, this layered technique gained popularity in bakery culture as a way to repurpose excess cake mix or expired cream cheese. Today, it’s a standard at holidays, potlucks, and dessert bars where visual appeal is as important as flavor. The key to success? Letting the layers cool completely before slicing, which preserves the elegant, slightly squishy peaks of the strawberry swirl.
Reasons to Try Strawberry Cheesecake Brownies
These brownies appeal to every type of home baker, from novices to seasoned enthusiasts. For beginners, they require no advanced techniques—just mixing and spreading. Exasperated 15-minute preppers will admire how the combination of failures (like a slightly overbaked cheesecake layer) can still yield a crowd-pleaser with a crispy base and gooey center. Parents love their adaptability, knowing they can substitute ingredients for alergies or swap the strawberry topping for blueberries if needed to suit family tastes.
What makes this recipe truly rewarding is the way it transforms simple pantry staples into a showpiece. A box of brownie mix or a basic slice of cheesecake becomes something newer, brighter, and more personal when reimagined with fresh swirls and textures. The wait time for chilling instead of baking also gives you freedom to focus on other responsibilities while the dessert sets in the refrigerator. Best of all, the brownies work as both a daily treat and a special occasion dessert, able to scale up or down based on need.
For aspiring home bakers, this recipe serves as a gateway to understanding layering techniques and how flavors interact. The science of temperature plays a role in achieving that perfect cheesecake-to-brownie ratio. It’s also a cooking poem—a canvas for your creativity – making it ideal for those who cook not just out of necessity, but from a place of joy and experimentation in the kitchen.
Ingredients Needed to Make Strawberry Cheesecake Brownies
- 1 cup granulated sugar (assist in creating a crackled crust on the brownie base while caramelizing the strawberries)
- ½ cup all-purpose flour (creates structure while allowing the batter to remain fudgy)
- ⅓ cup Dutch-process cocoa powder (for deep, mellow chocolate flavor without bitterness)
- ¼ teaspoon kosher salt (to balance sweetness and enhance other flavors)
- ¼ teaspoon baking powder (provides slight lift in the brownie base)
- 2 large eggs, room temperature (for maximum volume and emulsification of fats and sugars)
- 1 teaspoon vanilla extract (for aromatic warmth and to tie together all layers)
- ½ cup unsalted butter, melted and cooled (adds richness to the brownie foundation)
- 16 ounces cream cheese, room temperature (the key to a creamy, smooth texture in the cheesecake layer)
- 2 large eggs (to bind and stabilize the cream cheese mixture)
- ⅓ cup granulated sugar (to sweeten the cheesecake layer and balance tangy cream cheese)
- 1 teaspoon vanilla extract (to complement the brownie layer’s depth)
- ¼ teaspoon kosher salt (to cut through the cheesecake’s richness)
- 1 ½ cups strawberry pie filling** (*can be substituted with fresh strawberries pureed with lemon juice and sugar)
- Grease and parchment-lined 9×9-inch baking pan (essential for clean slicing and layer separation)
Instructions to Make Strawberry Cheesecake Brownies – Step by Step
Step 1:
Begin by preheating your oven to 350°F (175°C). Line a 9×9-inch baking pan with parchment paper, leaving overhang on both sides to easily lift the brownies from the pan later—this simple step prevents layers from sticking and ensures each slice comes out cleanly. Soften the butter in the microwave for 15 seconds if it’s taking too long to melt on its own; you want it fully incorporated but not hot enough to activate the leaveners in the dry ingredients.
Step 2:
In a large mixing bowl, combine the brownie ingredients: sugar, flour, cocoa powder, salt, and baking powder. Whisk them together with a fork until well blended. This combination forms the backbone of the fudgy base, so it’s important to leave no dry flour streaks. In a separate bowl, mix the wet ingredients: room-temperature eggs, vanilla extract, and cooled melted butter. Use a spatula to gently fold this into the dry mixture, working in a figure-8 pattern to maintain as much moisture as possible. The result should be a thick, ribbon-like batter that flows slowly off the spoon. Scrape the sides of the bowl to ensure full incorporation.
Step 3:
Spread the brownie batter evenly into the prepared pan using the back of a spoon or offset spatula. You want a uniform base to support the cheesecake layer. Tap the pan gently on the counter to release air bubbles and ensure the batter settles just right. Let it rest for 2-3 minutes before moving to the next step—this helps the brownie base firm up slightly, creating a stable foundation for the next layer.
Step 4:
Now beat the cream cheese in a separate bowl until it becomes smooth and silky. Most home cooks make the mistake of using cold cream cheese, which leads to tiny lumps even after beating. Keep the cream cheese at room temperature (35°F to 85°F works well) for at least an hour before starting. Add the eggs one at a time, beating each just until the yolk appears fully yellow and the whites disappear into the mixture. Add the sugar and vanilla, followed by the salt, and mix on medium speed for one minute. This prevents overcreaming, which can lead to a dense texture in the final layer.
Step 5:
Use a spatula to spread the cheesecake mixture evenly over the brownie base. Work quickly but deliberately, as the cheesecake layer sets relatively fast, especially in the oven. This isn’t a 72-hour layered cake that ripens—this is a one-step transformation. Check the consistency: if it’s too thin, add a splash of flour before adding it to the pan to prevent sinking into the brownie layer. The cheesecake should be thick enough to hold its shape but just loose enough to blend with the brownie below.
Step 6:
Spoon the strawberry pie filling in 6-8 dollops across the top of the cheesecake layer. Pick up a long, thin knife and gently swirl the filling into the cheesecake using a zig-zag motion. Avoid over-swirling, which dissolves the swirl completely, or under-swirling, which results in a completely separate layer. The goal is flashes of red through the white rather than a pinkish mess. This visual appeal isn’t just for show—the fiber in the strawberries helps prevent the cheesecake from becoming too dense while adding bursts of fresh flavor in each bite.
Step 7:
Bake for 35 to 40 minutes, keeping an eye on the center to avoid overbaking. The best way to check for doneness is the gentle jiggling test: after turning off the oven, press lightly on the top with a finger and release. The center should gently bounce back, leaving no significant indentation. Overbaking causes the complex emulsion of butter, sugar, and egg to set too rigidly, defeating the purpose of the ‘melt-in-the-mouth’ experience these brownies offer. If the edges begin browning too quickly, simply cover the pan with a piece of aluminum foil halfway through to regulate heat.
Step 8:
Once done, remove from the oven and let the pan sit at room temperature for 1 hour. Avoid jumping straight to the refrigerator, as rapid cooling causes condensation—tiny pools of water form on the cold surface, diluting the flavor and texture of the layers. Once slightly cooled, chill in the refrigerator for at least 4 hours to allow all layers to set properly for clean slicing. Leaving your mold on the counter for a few hours will still give you a sliceable treat, but the best results come with patience.
Step 9:
After chilling, use the parchment overhang to gently lift the brownies from the pan. Transfer to a cutting board and slice into 9 elegant squares with a sharp knife. For the best eating experience, serve at room temperature—when you cut into it, the layers should fall apart slightly in a graceful, edible stack. Lemon wedges make a nice condiment for those craving a touch more acidity to cut through the richness.
Chef’s Tips for a Perfect Result
- Use a kitchen scale for brownie batter: Volume measurements are notoriously inconsistent in baking. Use a digital scale to weigh your cocoa powder and flour for maximum accuracy, especially if you bake them regularly.
- Chill the batter before spreading: Refrigerating the brownie mixture for 30 minutes after mixing prevents the butter from melting prematurely during layering. This ensures a stable base for the cheesecake layer.
- Don’t skip the resting time after baking: The hour at room temperature is essential to maintain the layers’ integrity. Skipping this forces them to contract unevenly in the cold, leading to a messy final product.
- Use a comb spatula for swirling: Instead of a knife, these toothed tools create more defined, professional-looking swirls in the strawberry topping. It’s a small upgrade that transforms the presentation dramatically.
- Store in an airtight container** (*the longest fresh-baked flavor comes from storing at room temperature with the lid sealed. The starch in the brownie base begins recrystallizing when cold, so the ideal taste and texture only last 3 days under these conditions).
Variations and Substitutions
These brownies invite creative reinvention without losing their essential joy. Here are some thoughtful twists:
- Vegan Option: Substitute the cream cheese with coconut cream (chilled overnight in a can), brownie eggs with flaxseed “eggs,” and use maple sugar instead of granulated sugar. The richness is shifted toward tropical notes but maintains the same creamy experience.
- Low-Carb Alternative: Replace the brownie flour with almond flour (to cut carbs), use erythritol for sweetness, and crush the strawberries more finely to distribute sweetness evenly. The texture is denser but no less satisfying.
- Gluten-Free Choice: Use sorghum flour or a 1:1 gluten-free blend in place of all-purpose flour for the brownie base. The result is a slightly nutty undertone that complements the chocolate well.
- Budget Swap: Use store-brand brownie mix instead of homemade batter for a quicker, lower-cost option. Still layer in the cheesecake at home for a hybrid approach that saves time without sacrificing flavor.
- Fruit Swap: Puree blackberries or raspberries as a substitute for strawberries. The tartness of blackberries pairs especially well with the sweetness of the brownies, while raspberries add floral acidity.
- Dairy-Free Variation: Use cashew cheese for the cream cheese layer and substitute butter with sunflower oil. The brownie stays fudgy, and the cheese takes on a light, tangy profile.
How to Serve and Pair
These brownies are at their best when presented with care and intention. For an elegant serving, cut into small 1-inch squares and arrange on a slate with a scattering of hibiscus flowers. If you prefer large, shareable slices, cut them into four sections and serve on a stick with decorative paper labels for backyard events. For a quieter, family-friendly style, serve on parchment-lined platters with fork rests and lemon wedges alongside for freshness.
Pairs beautifully with chilled glasses of strawberry shortcake iced tea or a sparkly pink fizz like strawberry basil mimosas. For non-alcoholic pairings, match with a tall tea of hibiscus or Earl Grey—both of which highlight the chocolate undertones in the brownies. A single scoop of vanilla ice cream melted over a warm brownie elevates the richness into a near-sacred experience.
Storage and Reheating
Refrigerator: Store covered in an airtight container for 3–4 days. The texture remains slightly moist, while the flavors intensify. For longer storage, wrap tightly in plastic and freeze slices individually on a baking sheet before transferring to a larger bag.
Freezer: Freeze pre-cut slices for up to 2 months. Label with kitchen twine and dates for easy rotation. Thaw in the fridge for a soft, consolidate texture, or reheat straight from frozen in a toaster oven for 1 ½ minutes to mince.
Room Temperature: Best consumed within 3 hours if kept uncovered. The top layer dries slightly but still tastes of moist, fudgy chocolate in the center.
Reheating: Use the oven over the microwave for optimal results. Place slices on a baking sheet and reheat at 300°F for 1-2 minutes. Alternatively, wrap in a paper towel and use a damp cloth for the microwave to add moisture. Avoid stacking slices preheating, as condensation causes the brownie top to harden.
Nutritional Values
- Calories: 494 kcal
- Protein: 7 g
- Carbohydrates: 57 g
- Sugar: 38 g
- Fat: 28 g
- Saturated Fat: 14 g
- Fiber: 1 g
- Vitamin C: 6%
- Calcium: 3%
*Values may vary by ingredient brand and preparation method.
Frequently Asked Questions
Q1: Can I substitute the store-bought cream cheese with neufchâtel cream cheese?
Yes, neufchâtel has a higher water content and will require an additional 2 tablespoons of flour in the cream cheese layer to prevent over-liquidity. Let the brownies cool completely before slicing, as the layer sets faster when refrigerated.
Q2: How do I know when the cheesecake layer is fully set?
Shake the pan gently while it’s still on the cooling rack. If you notice slight jiggling near the center, it’s ready to chill. Air pockets in the layer may cause uneven jiggling—don’t return the pan to the oven, as overcooking can lead to a grainy texture.
Q3: My strawberry swirl turned into a runny syrup. Why?
Store-bought pie fillings often contain citric acid, which may react poorly with the cheese if the pH is off. For better control, use fresh strawberries pureed with lemon juice and sugar in a ¾:¼ ratio to manually balance sweetness and acidity.
Q4: Can I prepare these brownies the night before a party?
Yes— them together the night before and store in the refrigerator. The layers will consolidate in 4 hours. Avoid adding the strawberry topping until the day of consumption to maintain color and texture contrast.
Q5: What’s the best way to customize the presentation for a tea party menu?
Cut into small squares and serve with edible gold dust for a celebration theme. For elegant street-style service, skewer the brownies with bamboo sticks and wrap plastic disposable fortune cookies for take-home sweetness.
Conclusion
Strawberry Cheesecake Brownies are more than just a layered dessert—they’re a celebration of the comfort found in chocolate, the joy of creamy textures, and the brightness of ripe strawberries. Whether you’re sharing a slice with loved ones after a long day or crafting them for a weekend gathering, these brownies offer a perfect balance of flavor, simplicity, and elegance. With just a few ingredients and a touch of patience, you can create a dessert that feels both indulgent and deeply personal. How will your version of this recipe begin its own journey of flavor and memory?
Print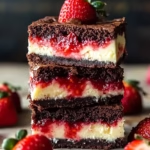
Strawberry Cheesecake Brownies: A Layered Delight Fusing Chocolate, Creamy Cheesecake, and Sweet Strawberries
- Prep Time: 15
- Cook Time: 45
- Total Time: 60
- Yield: 24 brownies 1x
- Category: desserts
- Method: Baking
- Cuisine: American
- Diet: Vegetarian
Description
Indulge in rich chocolate brownies paired with a creamy vanilla cheesecake layer and a tangy strawberry swirl. These three-layered treats balance fudginess, silkiness, and fruitiness with a celebration of American dessert tradition.
Ingredients
2 cups all-purpose flour
1 cup unsalted butter, softened
1 cup granulated sugar
1/2 cup cocoa powder (unsweetened)
3 large eggs
1 teaspoon vanilla extract
2/3 cup semi-sweet chocolate chips
1 package (8 oz) cream cheese, softened
1/4 cup granulated sugar
1 egg yolk
1/2 teaspoon vanilla extract
16 fresh strawberries or 1 cup strawberry pie filling (no added alcohol)
Instructions
Preheat oven to 350°F (180°C)
In a bowl, cream 1 cup butter until fluffy
Gradually add 1 cup sugar, mixing until light and airy
Beat in eggs one at a time, then stir in vanilla
In another bowl, sift together flour, cocoa powder, baking powder (1 tsp), and salt (1/4 tsp)
Gently fold dry ingredients into the batter
Press crust into the pan
Drop heaped spoonfuls of brownie batter into crust, spacing evenly
Bake for 18-20 minutes until slightly firm
Prepare strawberry swirl: mash fresh strawberries with 2 tbsp sugar and 1 tsp lemon juice, or use pie filling
Layer strawberries over warm brownies
Prepare cheesecake: beat cream cheese until smooth
Add 1/4 cup sugar, egg yolk, and vanilla, mixing until fluffy
Spread cheesecake mixture over strawberries
Return to oven and bake for 25 minutes until set
Cool completely before chilling in fridge for at least 3 hours
Cut into 24 brownies using a sharp knife
Notes
For a gluten-free version, substitute flour with gluten-free blend
Use vegan butter and dairy-free cream cheese for vegetarian adaptations
Store in an airtight container in refrigeration up to 3 days
Freeze unbaked layers for up to 2 weeks
Nutrition
- Serving Size: 1 brownie
- Calories: 220
- Sugar: 18g
- Sodium: 150mg
- Fat: 12g
- Saturated Fat: 6g
- Carbohydrates: 27g
- Fiber: 1g
- Protein: 4g
- Cholesterol: 35mg