The BEST Oreo Dessert brings together nostalgia and indulgence in a single, creamy bite. It’s a dessert my mother used to make on rainy afternoons, a way to fill the kitchen with warmth and the comforting scent of chocolate. Today, I want to share how this layered masterpiece combines the chewy goodness of Oreos with the silky smoothness of cream cheese and chocolate pudding. Whether you’re craving a quick treat after work or a showstopping dessert for a gathering, this recipe feels timeless yet refreshingly modern. The BEST Oreo Dessert reminds me of the joy that comes from turning simple ingredients into moments worth remembering.
There’s something magical about the way each layer complements the next, creating a harmonious balance of textures. The crushed Oreo crust provides a sturdy base, the cream cheese mixture adds a rich tang, the pudding lends velvety depth, and Cool Whip gives it a light, dreamy finish. It’s no coincidence this dessert has become a family favorite—it’s designed to feel like comfort in a slice, with just enough crunch and creaminess to satisfy every craving. For those who love the familiar taste of Oreos, this version takes the beloved cookie to a new crescendo of flavor.
This dessert is a love letter to American classics with a twist of soulful simplicity. Like a lullaby for the senses, it’s a celebration of how a few pantry staples can transform into joy on a plate. I remember my grandmother saying, “Good dessert is good memory,” and this Oreo wonder never fails to bring back childhood afternoons at her table. Let’s dive into the layers of love and technique that make this recipe extraordinary.
What is The BEST Oreo Dessert?
The BEST Oreo Dessert is a no-bake masterpiece that layers crushed cookies, cream cheese, pudding, and Cool Whip into a silky symphony. It’s a contemporary take on classic desserts that doesn’t skimp on the comfort food magic we all cherish. No oven needed, no time limits—just a few simple ingredients and a dash of patience to let the layers settle. It’s the kind of dessert that feels like a warm hug after a long day.
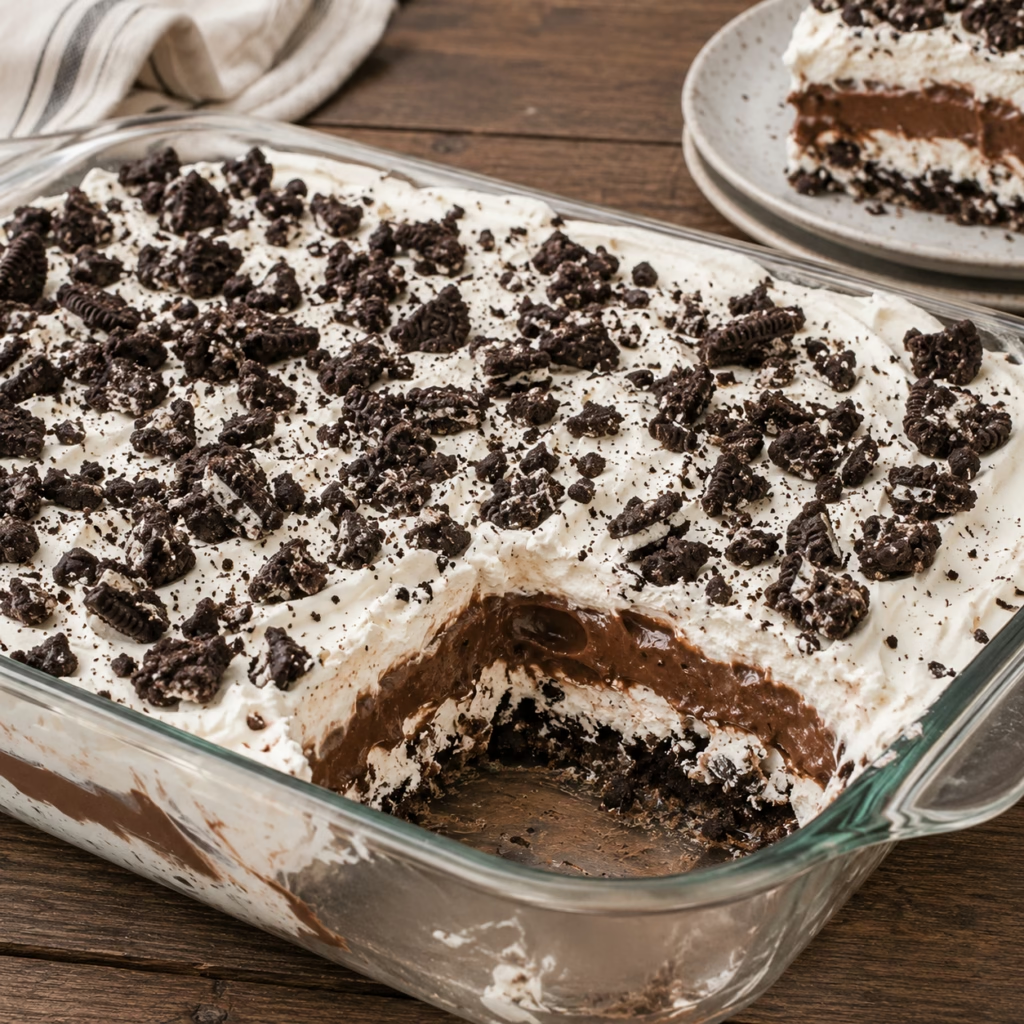
At its core, this recipe is about contrasts. The buttery, crumbly Oreo crust supports a creamy chocolate pudding middle, a cloudlike Cool Whip layer, and a final garnish of crushed double stuff Oreos. The recipe’s soul lies in how each component reflects a memory or tradition I grew up with. A spoonful of this dessert isn’t just a taste—it’s a story of how food has always been my family’s compass for love and togetherness.
The layers are intentionally designed for balance. Crushed Oreos bring earthy texture, while the pudding and Cool Whip offer smooth sweetness. It’s an accessible dessert with enough depth to intrigue those who think they might be tired of cookie-based treats. No matter the occasion, this dessert feels like a classic in reinvention.
Reasons to Try The BEST Oreo Dessert
The BEST Oreo Dessert is perfect for those who crave simplicity paired with bold, chocolate-driven flavor. As someone who’s often juggling life’s demands, I love the way this recipe fits seamlessly into the pace of a home cook. No preheating or chopping required—just crush, mix, and layer. The results? A dessert so tender it could bring tears to someone’s eyes on a stressful day.
What makes this recipe unforgettable is its nostalgic flavor profile, amplified by the beloved Oreo. The chocolate pudding adds a richness that harks back to old-fashioned layered bars, while the Cool Whip keeps it light enough to feel indulgent without being heavy. My kids always ask for a second helping because the layers melt together so beautifully. It’s a versatile dish—adjustable for dietary needs, easy to customize for parties, and even repackageable into bite-sized truffles.
This dish is a keeper for any kitchen arsenal. It’s ideal for beginners who want to impress and for experienced cooks craving a no-fuss recipe. I especially cherish making it during family gatherings because it evokes shared memories of baking. There’s something healing about assembling these layers while sipping coffee and listening to the stories people share over them.
Ingredients Needed to Make The BEST Oreo Dessert
- 1 package of Double Stuf Oreos (any size)
- ½ cup of melted unsalted butter (for a buttery depth that binds the crust)
- 2 packages of instant chocolate pudding mix (original or vanilla bean blend for versatility)
- 3 ¼ cups of milk (whole or 2%—for the pudding’s silky consistency)
- 2 containers of thawed Cool Whip (chilled for a stable, airy layer)
- 8 ounces of cream cheese (softened at room temperature for smooth blending)
- ¾ cup of powdered sugar (for balance and a hint of elegance)
- Sprinkles or chocolate drizzle (optional, for presentation flair)
Instructions to Make The BEST Oreo Dessert – Step by Step
Step 1:
Open a large Ziploc bag and add two rows of Double Stuf Oreos. I find this method easier than using a food processor because the cookies stay slightly chunked, preserving their essence. Seal the bag tightly and crush the cookies with the palm of your hand. If your wrist aches, switch to a rolling pin on a flat surface. Keep it gentle but thorough—aim for fine crumbs with a few larger, uneven pieces for subtle crunch. This isn’t just about texture, but about respecting the cookie’s soul.
Step 2:
Pour half of the crushed Oreos into a 9 x 13-inch baking pan. Add the melted butter and stir with a spoon until the mixture comes together like damp sand. Press the crumbs into the bottom of the pan using clean hands or the flat end of a glass. Don’t rush this—patience here ensures a sturdy base that won’t sink during layering. Let the crust rest in the refrigerator while you prepare the rest of the ingredients.
Step 3:
In a large bowl, pour the milk and add the chocolate pudding. Use a whisk attachment on a stand mixer for even blending. Start on low speed to avoid clumping, then gradually increase to medium. As the pudding thickens, it will start pulling away from the sides, almost as if saying, “I’m ready.” Set the bowl in the fridge and let it cool as you process the next layer.
Step 4:
With clean mixer bowls, beat the softened cream cheese until it’s smooth and velvety. Gradually add the powdered sugar while mixing on medium speed. Once combined, add one container of thawed Cool Whip and gently fold it in with a spatula. The goal is a creamy, luscious texture that feels like a warm hug for your palate.
Step 5:
When the crust is set, spread the first layer of cream cheese mixture evenly over the crust. Chill for 15 minutes to firm up, then add the pudding, another layer of Cool Whip, and a topping of remaining crushed Oreos. Cover the pan and refrigerate for a minimum of 2 hours. Letting it sit overnight enhances the depth, allowing every layer to sink into a seamless blend of flavor.
Step 6:
To serve, loosen the first corner by warming a damp dishcloth for a minute and placing it over the edge. This little trick helps avoid crumbling when you make those initial slices. Use a sharp knife dipped in hot water for clean cuts. Serve chilled, with a drizzle of melted chocolate if you want to elevate the visual. Each bite tells a story, and you’ll want to savor every one.
Chef’s Tips for a Perfect Result
- Bring ingredients to room temperature before mixing: This helps the cream cheese blend smoothly, avoiding air bubbles.
- Thaw Cool Whip in the fridge overnight: It becomes silky rather than runny, ensuring perfect layer cohesion.
- Press the crust firmly but evenly into the pan: This prevents crumbling and creates clean slices.
- Let each layer chill for 15–20 minutes before adding the next: The dessert holds its shape better with gradual setting.
- Use a clean work surface: Grease can cause layers to slip, so always wipe bowls and tools before mixing.
- Invest in a quality cookie press: It ensures consistent crushing and saves wrist effort for large batches.
Variations and Substitutions
Vegan Option
Replace cream cheese with cashew-based vegan cream cheese, substitute milk with almond or oat milk, and use dairy-free Cool Whip. This version keeps the lush texture but swaps butter for vegetable shortening. The result is a tender, tangy vegan treat with a slightly nutty backdrop.
Gluten-Free Alternative
Use certified gluten-free Oreos (check packaging for cross-contamination notices). A few trusted brands on Amazon or in grocery stores work perfectly. The flavor remains untouched by compromise and the structure holds firm for gluten-free friends.
Nut-Free Version
For families with allergies, swap Cool Whip for a whipped coconut cream alternative. It adds a subtle hint of tropical sweetness without masking the Oreo’s dominant flavor. This twist keeps textures creamy yet light.
Budget Swap
Use regular Oreos instead of Double Stuf. While the layers lack the same punch of chocolate, they remain comforting and satisfying. Adjust the pudding quantity slightly to balance the sweetness.
Chocolate Lover’s Twist
Add a layer of melted chocolate ganache between the cream cheese and pudding. It deepens the chocolate experience and adds a glossy, indulgent touch. Simply heat and stir ½ cup of heavy cream with 8 ounces of chopped dark or semi-sweet chocolate.
How to Serve and Pair
This dessert shines when paired with black coffee or chai-infused hot cocoa. The bitterness of the coffee or the spiced warmth of the cocoa enhances the milk-heavy dessert without overpowering it. For parties, present it on a marble slab with fresh raspberries and mint leaves for contrast. Leftovers can be repurposed into individual truffles—just roll the mixture into balls and refrigerate until firm.
The presentation should feel as special as the taste. Light drizzle over the top with chocolate sauce and dust with cocoa for a polished look. Serve it family-style on a large platter, encouraging everyone to share a slice and a story. For holiday gatherings, pair it with spiced apple cider or a citrus-infused dessert wine.
Storage and Reheating
Refrigerator
Store in an airtight container for up to 3 days. The layers may absorb some moisture over time, so cover with plastic wrap before sealing to preserve crispness. For maximum flavor, consume within 48 hours.
Freezer
Slice the dessert first, then freeze each portion on a silicone tray for 1 hour before wrapping in plastic wrap. It keeps for 2 months in the freezer but may lose some creaminess upon thawing. For optimal texture, thaw in the fridge overnight before serving.
Room Temperature
Leave out for up to 2 hours. Beyond that, it becomes too soft for clean slicing. Use it within this window at potlucks or casual gatherings where refrigeration isn’t an option.
Reheating
This dessert is best served chilled, but gently warm a fork in hot water and press into the slice to release it cleanly. Avoid using ovens or microwaves, which can separate the layers. For a warm take, assemble the dessert and refrigerate it before briefly dipping the knife in hot water for perfect slices.
Frequently Asked Questions (FAQ)
Can I substitute Oreos with another cookie?
Yes—sandwich cookies filled with caramel or vanilla work similarly, though texture will vary slightly. Gingersnaps add warmth or shortbread offers a richer base, but the key is using cookies with a sturdier crumb to support the layers.
How do I know when the layers have set properly?
Each layer should feel firm to the touch yet slightly yielding at the center—like pressing on a marshmallow. If the knife wobbles through the middle, give it another 20–30 minutes in the fridge for a perfect cut every time.
What if my crust sticks together before pressing it into the pan?
This usually means there’s not enough butter. Gradually add more until the mixture holds shape when pinched between fingers. My grandmother always said, “Cookies need their butter to behave,” and this is her golden rule.
Can I prep this dessert in advance?
Absolutely. Prepare the crust and layers the day before and assemble just before refrigerating. I often make it the night prior to a party, adding toppings in the morning for a refreshed look. Just ensure each component is stored separately in airtight containers.
How can I customize the flavor?
Swap pudding mix for vanilla or caramel. A swirl of raspberry sauce or a sprinkle of cinnamon makes this dessert unique. I once added orange zest for a citrus twist that had everyone guessing—creativity in desserts opens doors to new memories.
Conclusion
The BEST Oreo Dessert is a harmonious blend of layers, textures, and cherished memories. Whether you gift it to a friend or serve it at your next meal, this dessert transcends the ordinary by weaving simplicity with soul. What makes it irresistible is the way chocolate sings through every bite, a taste of comfort that lingers long after you’ve taken that last, velvety forkful.
Print
The BEST Oreo Dessert: A No-Bake Comforting Layered Indulgence for Home Cooks
- Prep Time: 20 minutes
- Cook Time: 0 minutes
- Total Time: 2 hours 20 minutes
- Yield: 12 servings 1x
- Category: Dessert
- Method: No-Bake
- Cuisine: American
- Diet: Vegetarian
Description
The BEST Oreo Dessert is an easy no-bake layered dessert made with Oreo cookies, butter, chocolate pudding, cream cheese, powdered sugar, and Cool Whip. It’s creamy, chocolatey, and perfect for parties or potlucks.
Ingredients
- 1 package Double Stuf Oreos, regular or family size
- 1/2 cup melted butter
- 2 packages instant chocolate pudding mix, 3.9 oz each
- 3 1/4 cups milk
- 2 containers Cool Whip, 8 oz each, thawed
- 8 oz cream cheese, softened to room temperature
- 3/4 cup powdered sugar
Instructions
1. Place 2 rows of Double Stuf Oreos in a large zip-top bag, seal, and crush into small chunks.
2. Pour the crushed Oreos into a 9×13-inch baking pan.
3. Crush the remaining row of Oreos and set aside for the topping.
4. Pour melted butter over the Oreo chunks in the baking pan and mix with a spoon.
5. Pat the Oreo crust down evenly and refrigerate to chill and set.
6. In a large bowl, whisk milk and chocolate pudding mix on low speed until incorporated, then increase speed and mix until thick.
7. Transfer pudding to a bowl and refrigerate to chill.
8. In a clean mixing bowl, beat softened cream cheese until fluffy.
9. Slowly add powdered sugar and beat until smooth.
10. Fold one container of Cool Whip into the cream cheese mixture.
11. Remove the Oreo crust from the refrigerator.
12. Layer the cream cheese and Cool Whip mixture over the Oreo crust.
13. Spread the chocolate pudding over the cream cheese layer.
14. Spread the second container of Cool Whip over the pudding.
15. Sprinkle the reserved Oreo cookie crumbs over the top.
16. Cover with plastic wrap and refrigerate for at least 2 hours before slicing.
Notes
Thaw Cool Whip in the refrigerator overnight so it is easier to spread.
For easier first-slice removal, place a hot wrung-out dishcloth under one corner of the pan for about 1 minute before cutting.
Store covered in the refrigerator until ready to serve.
Nutrition
- Serving Size: 1 slice
- Calories: 410
- Sugar: 28g
- Sodium: 359mg
- Fat: 26g
- Saturated Fat: 13g
- Unsaturated Fat: 11g
- Trans Fat: 1g
- Carbohydrates: 40g
- Fiber: 1g
- Protein: 5g
- Cholesterol: 48mg