What is the Best Raspberry Bread?
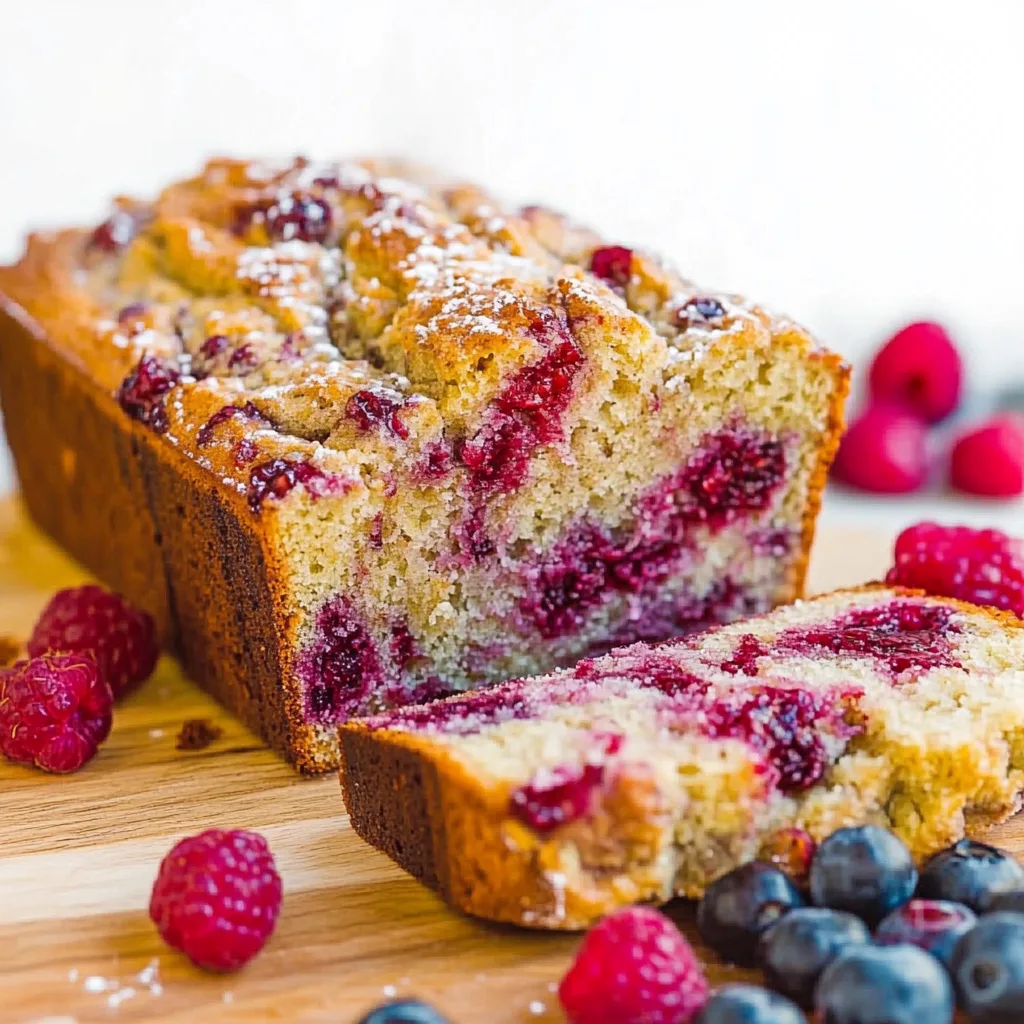
At its heart, the Best Raspberry Bread is a moist, tender quick bread generously studded with vibrant, juicy raspberries. Unlike a cake, it’s designed to be hearty enough for a satisfying breakfast or snack, yet exceptionally tender and almost cake-like in its texture. This recipe takes inspiration from home-style baking traditions, focusing on creating a loaf that’s more fruit than batter, a delightful surprise in every slice. It’s the kind of recipe that feels both familiar and remarkably special, bringing a burst of summer freshness to any time of year.
The magic of this bread lies in its simplicity and the quality of its star ingredient: raspberries. We use just enough of a tender, slightly sweet batter to bind those beautiful berries, ensuring each bite is a perfect balance of soft crumb and tart-sweet fruit. It’s a celebration of natural flavors and textures, a comforting classic that’s elevated by the sheer abundance of berries. This recipe is born from a desire to capture that feeling of pure, unadulterated joy that only a perfectly baked loaf, overflowing with flavor, can bring.
Reasons to Try the Best Raspberry Bread
Making this Best Raspberry Bread is an invitation to slow down and savor the process, filling your home with a comforting aroma that promises a delightful treat. It’s surprisingly easy to whip up, making it perfect even for novice bakers looking for a show-stopping result without the fuss. The intense raspberry flavor and incredibly moist texture make it a guaranteed crowd-pleaser, ideal for sharing with family, friends, or simply enjoying yourself with a cup of tea.
This bread is incredibly versatile, perfect for a special brunch, a comforting afternoon pick-me-up, or even a sweet addition to a simple dinner. It’s the kind of bake that feels rustic yet elegant, embodying the warmth and love that home baking is all about. Whether you’re looking for a way to use up fresh berries or simply craving something truly delicious, this recipe delivers pure comfort and joy in every single bite.
Ingredients Needed to Make the Best Raspberry Bread
2 cups + 4 tablespoons all-purpose flour, divided
¾ cup light brown sugar, packed
¼ cup granulated sugar
1 teaspoon baking soda
pinch salt, optional and to taste
¼ cup unsalted butter, melted
1 large egg
¾ cup buttermilk
¼ cup canola or vegetable oil
2 teaspoons vanilla extract
10 to 12 ounces raspberries, about 2 cups* (fresh highly recommended)
Instructions to Make the Best Raspberry Bread – Step by Step
Step 1: Begin by preparing your loaf pan and preheating your oven. Take a moment to embrace the anticipation of what’s to come. Lightly spray a 9×5-inch loaf pan with cooking spray or grease and flour it thoroughly; set it aside to await the beautiful batter. Set your oven to 350°F (175°C). This gentle warmth is the perfect environment for our bread to rise and bake to perfection.
Step 2: In a generous mixing bowl, combine the dry ingredients: whisk together 2 cups of the all-purpose flour, the packed light brown sugar, granulated sugar, baking soda, and that tiny pinch of salt if you’re using it. Imagine this mixture as the foundation of our comforting bread, ready to be enlivened by the wet ingredients. Set this aside for a moment; the simplicity of this step belies the deliciousness it will create.
Step 3: In a separate, medium microwave-safe bowl or a glass measuring cup, gently melt the unsalted butter. A quick 45 seconds on high power should do the trick. It’s important to let the melted butter cool just slightly; we want it warm and inviting, not so hot that it would cook the egg when we add it. This small pause allows the ingredients to be in perfect harmony.
Step 4: To the slightly cooled melted butter, add the large egg, the tangy buttermilk, the neutral canola or vegetable oil, and the fragrant vanilla extract. Whisk these wet ingredients together until they are beautifully combined, creating a smooth, fragrant liquid ready to mingle with the dry ingredients.
Step 5: Now, it’s time for the wet ingredients to meet the dry. Pour the wet mixture into the bowl with the dry ingredients. Stir everything together gently until *just* combined. It’s a crucial step to resist the urge to overmix; a few lumps in the batter are perfectly fine and actually desirable. Overmixing will develop the gluten too much, leading to a tough bread instead of the tender crumb we’re dreaming of.
Step 6: Prepare your precious raspberries with love. In a medium bowl, add your raspberries. Sprinkle the remaining 2 tablespoons of flour over them and toss them very lightly. This delicate coating of flour is a little trick that helps prevent the berries from sinking to the bottom of the loaf during baking, ensuring they’re beautifully distributed throughout.
Step 7: Gently fold the floured raspberries into the prepared batter. Use a light hand here; we want to incorporate them without crushing them too much. The goal is to distribute those jewel-like berries throughout the batter, creating pockets of fruity delight within the tender crumb.
Step 8: Carefully pour the batter, now brimming with raspberries, into your prepared loaf pan. Use a spatula to gently smooth the top and encourage the batter to fill the corners and sides of the pan. Think of it as tucking in the batter, making sure it’s ready to bake evenly into a beautiful loaf.
Step 9: Place the pan in your preheated oven and begin the baking process, which typically takes between 45 minutes to an hour. Keep an eye on it; baking times can vary, especially depending on whether you use fresh or frozen berries. The bread is ready when the top is set and slightly domed, feels springy to the touch, and a toothpick inserted into the center (avoiding a raspberry!) comes out clean or with a few moist crumbs clinging to it, but no wet batter.
Step 10: Once baked to perfection, remove the loaf pan from the oven. Let the bread cool in the pan for about 15 minutes. This brief rest allows it to set further before you turn it out. Then, gently invert it onto a wire rack to cool completely. Taking the time for it to cool fully before slicing ensures the best texture and makes for clean, beautiful slices.
Chef’s Tips for a Perfect Result
- Use room-temperature ingredients, especially eggs and buttermilk, as they incorporate more easily into the batter for a smoother texture.
- Don’t overmix the batter after adding the wet to the dry ingredients; a few lumps are perfectly fine and lead to a tender crumb.
- Toss raspberries with flour before adding them to the batter to help prevent them from sinking to the bottom during baking.
- If using frozen raspberries, do not thaw them completely; a slight frost helps them maintain their shape and reduces excess moisture.
- Tent the loaf with foil if the top starts to brown too quickly before the center is fully baked, ensuring even cooking.
- Allow the bread to cool completely in the pan for about 15 minutes before inverting onto a wire rack; this prevents it from breaking when you unmold it.
Variations and Substitutions
- Vegan Option: Substitute the egg with a flax egg (1 tablespoon flaxseed meal mixed with 3 tablespoons water, let sit for 5 minutes) and use a dairy-free buttermilk (1 cup non-dairy milk + 1 tablespoon lemon juice or vinegar, let sit for 5 minutes). A plant-based butter or additional oil can be used. The texture might be slightly denser but still delicious.
- Gluten-Free Alternative: Use a good quality 1:1 gluten-free all-purpose baking flour blend. Ensure it contains xanthan gum. You may need to adjust the liquid slightly if the batter seems too dry or too wet, as gluten-free flours absorb moisture differently.
- Citrus Zest Boost: Add the zest of one lemon or orange to the dry ingredients. This brightens the flavor and complements the tartness of the raspberries beautifully, adding a fragrant lift.
- Chocolate Chip Addition: Fold in ½ cup of your favorite chocolate chips along with the raspberries. The combination of berries and chocolate is a classic for a reason, adding a delightful richness and sweetness.
- Different Berries: While raspberries are key, you can certainly experiment with other berries! Blueberries, blackberries, or even a mix of red berries would be wonderful. Adjust flour coating accordingly if berries have different moisture levels.
How to Serve and Pair
The Best Raspberry Bread is wonderful served slightly warm or at room temperature, allowing its full aroma and flavor to develop. A simple dusting of powdered sugar can add a touch of elegance, or a light glaze made from powdered sugar and a little milk or lemon juice. For a truly decadent experience, a dollop of freshly whipped cream or a spoonful of tangy Greek yogurt is divine.
This bread pairs beautifully with a hot cup of herbal tea, a light roast coffee, or a glass of cold milk. It’s perfect for a leisurely weekend brunch alongside fresh fruit, a simple yogurt parfait, or scrambled eggs. For an afternoon treat, it stands alone beautifully, or perhaps with a small side of almond butter. Consider it for Mother’s Day, a baby shower, or simply as a comforting gesture to show someone you care.
Storage and Reheating
Refrigerator
Store the cooled raspberry bread in an airtight container in the refrigerator for up to 5-7 days. This helps to keep it fresh and prevents it from drying out. It’s best to slice only what you plan to eat as you go, as pre-sliced bread can dry out more quickly.
Freezer
For longer storage, wrap the completely cooled loaf tightly in plastic wrap, then in aluminum foil, or place it in a freezer-safe airtight container. It will keep well in the freezer for up to 3 months. This makes it convenient to have a slice of homemade goodness anytime you crave it.
Room Temperature
A completely cooled loaf of raspberry bread can be kept at room temperature in an airtight container for 2-3 days. Ensure it’s not in direct sunlight or a warm spot, as this can affect its freshness and texture. Beyond this, refrigeration or freezing is recommended.
Reheating
To reheat a slice, a few seconds in the microwave can bring back its soft texture. For a slightly crisper crust with a warm, gooey interior, warm it gently in a toaster oven or a conventional oven set at a low temperature (around 300°F/150°C) for a few minutes. Be careful not to overheat, which can dry it out, especially if it was already baked for a long time.
Frequently Asked Questions (FAQ)
Can I use other berries instead of raspberries in this bread?
Yes, you absolutely can swap raspberries for other berries like blueberries, blackberries, or even a mix. Be aware that different berries might release varying amounts of moisture, so you may want to adjust their flour coating slightly if they seem particularly juicy.
How do I know when my Best Raspberry Bread is perfectly baked?
The bread is done when the top is set, springs back gently when lightly touched, and a toothpick inserted into the center (away from berries) comes out clean or with just a few moist crumbs attached. The edges should also be pulling away slightly from the sides of the pan.
My raspberry bread sank in the middle and is gummy, what went wrong?
This often happens if the batter was overmixed, the oven temperature was too low, or if the center wasn’t fully baked. Overmixing develops gluten, causing it to rise and then fall, while an underbaked center will remain gummy. Ensure you’re gentle with the batter and follow the doneness tests carefully.
Can I prepare the batter for this raspberry bread the night before?
Quick breads like this are best baked fresh, as the leavening agents often start reacting once paired with liquid. While you can prepare your dry ingredients and wet ingredients separately the night before, it’s best to combine them and add the berries just before baking for optimal results.
What are some creative ways to customize this raspberry bread?
You can add lemon or orange zest to the batter for a bright citrus note, stir in white chocolate chips for a sweet contrast, or swirl in a bit of cream cheese batter for a richer, cheesecake-like variation. A streusel topping also adds a delightful crunch.
CONCLUSION
The Best Raspberry Bread is a comforting masterpiece, offering a tender, moist crumb that’s bursting with the sweet-tart essence of fresh raspberries. It’s a joy to bake and even more of a pleasure to share, bringing warmth and a touch of simple elegance to any occasion. Embrace the experience of creating this truly irresistible loaf, where every bite is a testament to the beautiful simplicity and profound comfort found in homemade baking.
Print
The Best Raspberry Bread
- Prep Time: 10 minutes
- Cook Time: 45 minutes
- Total Time: 55 minutes
- Yield: 1 loaf 1x
- Category: Bread
- Method: Baking
- Cuisine: American
- Diet: Vegetarian
Description
This raspberry bread is soft, tender, and packed with juicy berries in every slice for a sweet quick bread that is perfect for breakfast, brunch, or dessert.
Ingredients
- 2 cups + 4 tablespoons all-purpose flour, divided
- 3/4 cup light brown sugar, packed
- 1/4 cup granulated sugar
- 1 teaspoon baking soda
- Pinch of salt, optional
- 1/4 cup unsalted butter, melted
- 1 large egg
- 3/4 cup buttermilk
- 1/4 cup canola oil or vegetable oil
- 2 teaspoons vanilla extract
- 10–12 ounces raspberries, about 2 cups
Instructions
1. Preheat oven to 350°F. Spray one 9×5-inch loaf pan with floured cooking spray, or grease and flour the pan.
2. In a large bowl, whisk together 2 cups plus 2 tablespoons flour, brown sugar, granulated sugar, baking soda, and salt.
3. In a medium microwave-safe bowl, melt the butter, then let it cool slightly.
4. Add the egg, buttermilk, oil, and vanilla to the melted butter and whisk to combine.
5. Pour the wet ingredients over the dry ingredients and stir just until combined. Do not overmix; the batter should be slightly lumpy.
6. In a medium bowl, toss the raspberries with the remaining 2 tablespoons flour.
7. Gently fold the raspberries into the batter.
8. Transfer the batter to the prepared loaf pan and smooth the top lightly with a spatula.
9. Bake for 45–60 minutes, or until the top is set, slightly domed, springy to the touch, and a toothpick inserted in the center comes out clean or with a few moist crumbs.
10. Cool in the pan for about 15 minutes, then turn out onto a wire rack to cool completely before slicing.
Notes
Fresh raspberries are highly recommended, though frozen raspberries can be used.
If using frozen raspberries, baking time may be longer.
Tent the pan loosely with foil about 30 minutes into baking if the top is browning too quickly.
Store airtight at room temperature for up to 1 week or freeze for up to 6 months.
Nutrition
- Serving Size: 1 slice
- Calories: 326
- Sugar: 23g
- Sodium: 169mg
- Fat: 14g
- Saturated Fat: 5g
- Unsaturated Fat: 8g
- Trans Fat: 0g
- Carbohydrates: 45g
- Fiber: 3g
- Protein: 7g
- Cholesterol: 105mg