Easy Strawberry Earthquake Cake
Easy Strawberry Earthquake Cake is more than just a dessert; it’s an invitation to gather, to share, and to savor those precious moments that food so beautifully encapsulates. It’s the kind of treat that makes your heart sing, a delightful surprise in every bite, and a testament to how simple ingredients can create something truly spectacular. Imagine the comforting aroma filling your kitchen as it bakes, a promise of the joy to come, a feeling that settles deep in your soul. This cake, with its signature marbled swirls and pockets of dreamy cheesecake, is designed to be as comforting as a cherished memory.
When life feels a little too rushed, finding solace in the kitchen becomes a necessity, a gentle reminder to slow down and reconnect. An easy strawberry earthquake cake recipe offers just that: a path to creating something wonderful without the fuss. It’s a way to nurture yourself and the ones you love, transforming ordinary ingredients into an extraordinary experience. The beauty of this cake lies in its delightful unpredictability, a sweet surprise that mirrors the unexpected joys life offers.
What is Easy Strawberry Earthquake Cake?
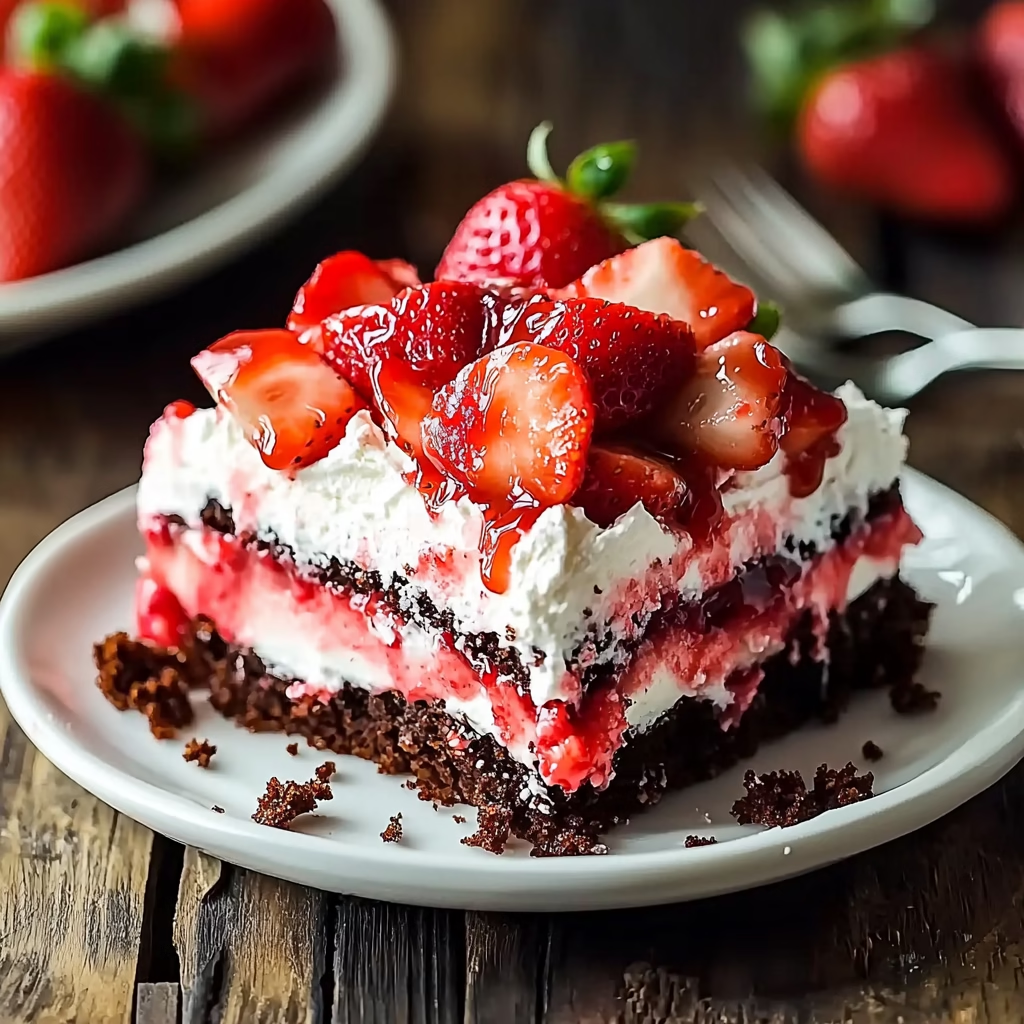
An Easy Strawberry Earthquake Cake is a uniquely delightful dessert characterized by its dramatic, swirled appearance, reminiscent of geological fault lines, hence the name ‘earthquake’. It starts with a rich chocolate cake batter, into which pockets of a creamy strawberry-cheesecake mixture are dolloped. The magic happens when the remaining chocolate batter is poured over, creating those signature cracks and marbled layers during baking. This creates a stunning visual and a textural wonderland, merging the moistness of chocolate cake with the tangy sweetness of strawberry cheesecake and often studded with melty chocolate chips.
While its specific origin is a bit of a modern culinary mystery, often appearing on social media feeds for its visual appeal and irresistible gooeyness, it embodies a spirit of American comfort baking. It takes the familiar elements of chocolate cake and cheesecake and playfully combines them in a way that’s both surprising and deeply satisfying. The fresh strawberries woven into the cheesecake layer add a burst of vibrant flavor and color, making it a celebration in every slice. It’s a recipe that feels both classic and contemporary, perfect for sharing.
Reasons to Try Easy Strawberry Earthquake Cake
This Easy Strawberry Earthquake Cake is a must-try for anyone who loves a dessert that’s as fun to look at as it is to eat. It’s surprisingly simple to assemble, making it perfect for beginners or those busy weeknights when you crave something special without a lot of effort. The contrast between the rich chocolate cake and the bright, creamy strawberry cheesecake filling is simply divine. Plus, the ‘earthquake’ effect provides a beautiful, imperfect aesthetic that makes each cake unique and incredibly photogenic, sure to impress your family and friends.
It’s a fantastic option for potlucks, birthdays, or any gathering where you want to bring a showstopper dessert that’s guaranteed to be a hit. The combination of textures – the tender cake, the smooth cheesecake, and the pockets of melty chocolate chips – offers a delightful sensory experience. This cake brings a sense of playful indulgence to any occasion, offering a comforting and memorable flavor profile that speaks volumes of love and care. It’s a recipe that truly captures the spirit of joyous home baking.
Ingredients Needed to Make Easy Strawberry Earthquake Cake
To create this delightful Easy Strawberry Earthquake Cake, you’ll want to gather these comforting ingredients:
- 1 box (15.25 oz) chocolate cake mix
- Ingredients required for cake mix (typically eggs, oil, and water, as per the box instructions)
- 8 oz cream cheese, softened to room temperature
- ½ cup powdered sugar (also known as confectioners’ sugar or icing sugar)
- 1 tsp vanilla extract
- 1½ cups fresh strawberries, hulled and chopped
- 1 cup chocolate chips
- ½ cup chopped pecans or walnuts (optional, for added crunch)
Instructions to Make Easy Strawberry Earthquake Cake – Step by Step
Step 1: Prepare Your Baking Haven
Begin by preheating your oven to 350°F (175°C). Take a 9×13 inch baking pan and generously grease it with butter or non-stick cooking spray. This simple step is crucial for ensuring your beautiful cake releases perfectly, keeping its magnificent form intact and ready to be shared.
Step 2: Crafting the Chocolate Foundation
Now, it’s time to bring the chocolate cake to life. In a large bowl, combine the chocolate cake mix with the ingredients typically called for on the box – usually eggs, oil, and water. Whisk or beat these together until you have a smooth, luscious batter, reminiscent of melted dark chocolate. The aroma at this stage is a wonderful prelude to the deliciousness that awaits.
Step 3: Weaving the Strawberry Cheesecake Dream
In a separate medium bowl, let’s create the creamy heart of our cake. Ensure your cream cheese is nicely softened for easy mixing. Beat the softened cream cheese until it’s wonderfully smooth, then gradually mix in the powdered sugar until fully incorporated and lump-free. Stir in the vanilla extract for that comforting, sweet aroma. Gently fold in the freshly chopped strawberries, distributing them evenly throughout the creamy mixture. This blend will create those delectable pockets of flavor.
Step 4: Layering the Anticipation
Pour about half of the prepared chocolate cake batter into your greased 9×13 inch pan. Spread it gently to create an even base. Now, take spoonfuls of the strawberry cheesecake mixture and dollop them evenly across the surface of the chocolate batter. Distribute them with gentle spacing, imagining where each tender bite will land.
Step 5: Embracing the ‘Earthquake’
Carefully pour the remaining chocolate cake batter over the dollops of cheesecake mixture. Resist the urge to smooth it completely flat. Instead, let it lay more naturally. This is where the ‘earthquake’ effect begins to form. The slight unevenness of the top layer will encourage those wonderful cracks and swirls as it bakes, creating the cake’s signature, beautifully imperfect look.
Step 6: Adding the Sweet Surprises
Now, it’s time to sprinkle the chocolate chips generously over the top of the cake. If you’re using chopped pecans or walnuts, scatter them evenly on top as well. These additions will bake into delightful bursts of flavor and texture, adding another layer of deliciousness to every slice.
Step 7: The Bake of Transformation
Place the pan into your preheated oven. Bake for approximately 40 to 45 minutes. You’ll know it’s ready when the top looks gorgeously crackly and the center is just set. A thin wooden skewer or toothpick inserted into a non-cheesecake part of the cake should come out with moist crumbs, but not wet batter. Avoid overbaking to maintain that desirable gooeyness.
Step 8: The Gentle Cool Down
Once baked to perfection, carefully remove the cake from the oven. Allow it to cool in the pan on a wire rack for about 15 to 20 minutes. This resting period is essential for the cake to set slightly, making it easier to slice and serve while still wonderfully warm and gooey.
Chef’s Tips for a Perfect Result
- Ensure your cream cheese is truly at room temperature before mixing; this prevents lumps and ensures a silky smooth cheesecake layer.
- Don’t overmix the cake batter once the dry and wet ingredients are combined, as overworking can lead to a tougher cake texture.
- When layering, resist smoothing the top chocolate batter too much; gentle dolloping and partial spreading encourage the signature ‘earthquake’ cracks.
- Use fresh, ripe strawberries for the best flavor and texture in the cheesecake layer; frozen strawberries can release too much moisture.
- Bake until a toothpick comes out with moist crumbs attached when inserted into the cake portions, not the cheesecake ones, to ensure it’s cooked through but still gooey.
- Serving the cake warm is key to experiencing its ultimate gooey texture and melty chocolate chip goodness.
Variations and Substitutions
Vegan Option: For a delightful vegan take, substitute the cake mix with a vegan-friendly chocolate cake mix. Use a plant-based cream cheese alternative and a vegan powdered sugar. For the ‘egg’ and ‘oil’ in the cake mix, follow the package’s vegan recommendations. Replace regular chocolate chips with vegan chocolate chips.
Gluten-Free Alternative: Opt for a gluten-free chocolate cake mix. Ensure your cream cheese and other ingredients are naturally gluten-free. This substitution will yield a similar delightful flavor and texture, perfect for those with gluten sensitivities.
Berry Bliss: While strawberries are classic, feel free to experiment with other berries. Fresh raspberries or blueberries, chopped into smaller pieces, can be folded into the cream cheese mixture for a delightful variation in flavor and color.
Extra Chocolate Lover’s Dream: Enhance the chocolate experience by folding an extra half cup of chocolate chips or chunks into the chocolate cake batter before pouring it into the pan. This doubles down on the rich chocolatey goodness.
Nut-Free Version: Simply omit the optional chopped pecans or walnuts. The cake will still be incredibly delicious, focusing on the fantastic blend of chocolate and strawberry cheesecake flavors.
How to Serve and Pair
This Easy Strawberry Earthquake Cake is best served slightly warm, allowing the chocolate chips to be lusciously melty and the cheesecake swirls to be wonderfully gooey. It does not require much accompaniment, as it is quite decadent on its own. However, a small dollop of whipped cream or a light dusting of powdered sugar can add an extra touch of elegance.
For a refreshing contrast, consider pairing it with a scoop of vanilla bean ice cream or a light strawberry sorbet. This classic combination enhances the berry notes and adds a delightful temperature play. The cake is perfect for casual family dinners, birthday celebrations, or any occasion that calls for a comforting and visually stunning dessert. It’s a true centerpiece that sparks conversation and brings smiles.
Storage and Reheating
Refrigerator: Once completely cooled, store any leftover Easy Strawberry Earthquake Cake in an airtight container in the refrigerator for up to 3-4 days. Covering it well will help maintain its moisture and prevent it from drying out.
Freezer: For longer storage, you can freeze pieces of the cake. Wrap individual slices tightly in plastic wrap, then in aluminum foil, and place them in a freezer-safe container or bag. Frozen cake can last for up to 2 months. Make sure to thaw it completely before serving.
Room Temperature: Due to the cream cheese and strawberry components, it is best to store this cake in the refrigerator after it has cooled down. Leaving it at room temperature for extended periods is not recommended for food safety.
Reheating: If you prefer your cake warm, you can gently reheat individual slices. The best method is in a low oven (around 300°F or 150°C) for 5-10 minutes, or in a microwave on a defrost setting or at 50% power for short bursts until warmed through. Be careful not to overheat, as this can make the cake dry or gummy.
Frequently Asked Questions (FAQ)
Can I use a different type of cake mix for this strawberry earthquake cake?
Yes, you can substitute the chocolate cake mix for another flavor like white or yellow cake mix. This will alter the overall flavor profile but still create the delightful earthquake effect with the strawberry cheesecake swirls.
How do I know when my Easy Strawberry Earthquake Cake is perfectly baked?
The cake is done when the edges are set and slightly pulling away from the pan, and the top is visibly cracked. A toothpick inserted into a chocolate cake portion should come out with moist crumbs attached, indicating it’s cooked but still delightfully gooey.
My strawberry cheesecake layer sank too much, what went wrong?
If your cheesecake layer sank excessively, it could be due to the cream cheese not being soft enough, or the cheesecake mixture being too thin. Ensuring the cream cheese is fully softened and the mixture is well-combined without being too watery is key to a good rise.
Can I make this Easy Strawberry Earthquake Cake ahead of time?
Yes, you can prepare the components ahead. The cake batter can be made a few hours in advance and stored covered at room temperature. The cheesecake mixture can also be made and refrigerated for up to a day, but bring it to room temperature before dolloping into the batter.
What are the best ways to customize this cake for a special occasion?
For special occasions, consider decorating the cooled cake with fresh strawberries, a drizzle of chocolate ganache, or edible flowers. You can also add a touch of fruit extract to the cheesecake layer or use colored chocolate chips for a festive look.
CONCLUSION
The Easy Strawberry Earthquake Cake is a marvel of simplicity and decadence, offering a delightfully gooey texture and a beautiful marbled appearance. It’s a truly satisfying dessert that brings comfort and joy to any table, perfect for both seasoned bakers and those new to the kitchen. Its signature blend of rich chocolate and creamy strawberry cheesecake is an irresistible combination that will have everyone asking for seconds.
Print
Easy Strawberry Earthquake Cake
- Prep Time: 20 minutes
- Cook Time: 45 minutes
- Total Time: 65 minutes
- Yield: 12 slices 1x
- Category: Dessert
- Method: Baked
- Cuisine: American
- Diet: Vegetarian
Description
Ultra gooey strawberry earthquake cake with rich chocolate layers, pockets of creamy strawberry cheesecake, and melty chocolate chips for a deliciously unique marbled dessert.
Ingredients
- 1 box (15.25 oz) chocolate cake mix
- Ingredients required for cake mix, such as eggs, oil, and water
- 8 oz cream cheese, softened
- 1/2 cup powdered sugar
- 1 teaspoon vanilla extract
- 1 1/2 cups chopped fresh strawberries
- 1 cup chocolate chips
- 1/2 cup chopped pecans or walnuts, optional
Instructions
1. Preheat oven to 350°F and grease a 9×13 inch pan.
2. Prepare chocolate cake mix according to package directions.
3. Beat cream cheese, powdered sugar, and vanilla until smooth, then fold in strawberries.
4. Pour half of the chocolate batter into the prepared pan.
5. Dollop strawberry cheesecake mixture evenly over the batter.
6. Pour remaining chocolate batter over top without fully smoothing.
7. Sprinkle chocolate chips and nuts evenly on top.
8. Bake for 40–45 minutes until the center is just set and the top is crackly.
9. Cool for 15–20 minutes before serving.
Notes
Do not overmix the layers to achieve the signature earthquake effect.
Use fresh strawberries for the best texture and flavor.
Serve warm for the ultimate gooey experience.
Nutrition
- Serving Size: 1 slice
- Calories: 350
- Sugar: 32g
- Sodium: 280mg
- Fat: 18g
- Saturated Fat: 9g
- Unsaturated Fat: 7g
- Trans Fat: 0g
- Carbohydrates: 45g
- Fiber: 2g
- Protein: 4g
- Cholesterol: 55mg