No-Bake Strawberry Delight emerges as a beacon of simplicity and elegance in the world of desserts. This layered marvel, born from the fusion of creamy, tart, and crunchy textures, captures the essence of spring and summer in every bite. Perfect for those who cherish the kitchen as a sanctuary without the burden of a blazing oven, this dessert whispers of lazy afternoons spent with loved ones, sharing stories over chilled treats. With its vibrant color and luscious layers, it’s not surprising that this recipe has become a staple for celebrations. Whether you’re preparing for a backyard barbecue or a cozy family dinner, this No-Bake Strawberry Delight is your canvas for creating memories through the alchemy of flavor and care.
What is No-Bake Strawberry Delight?
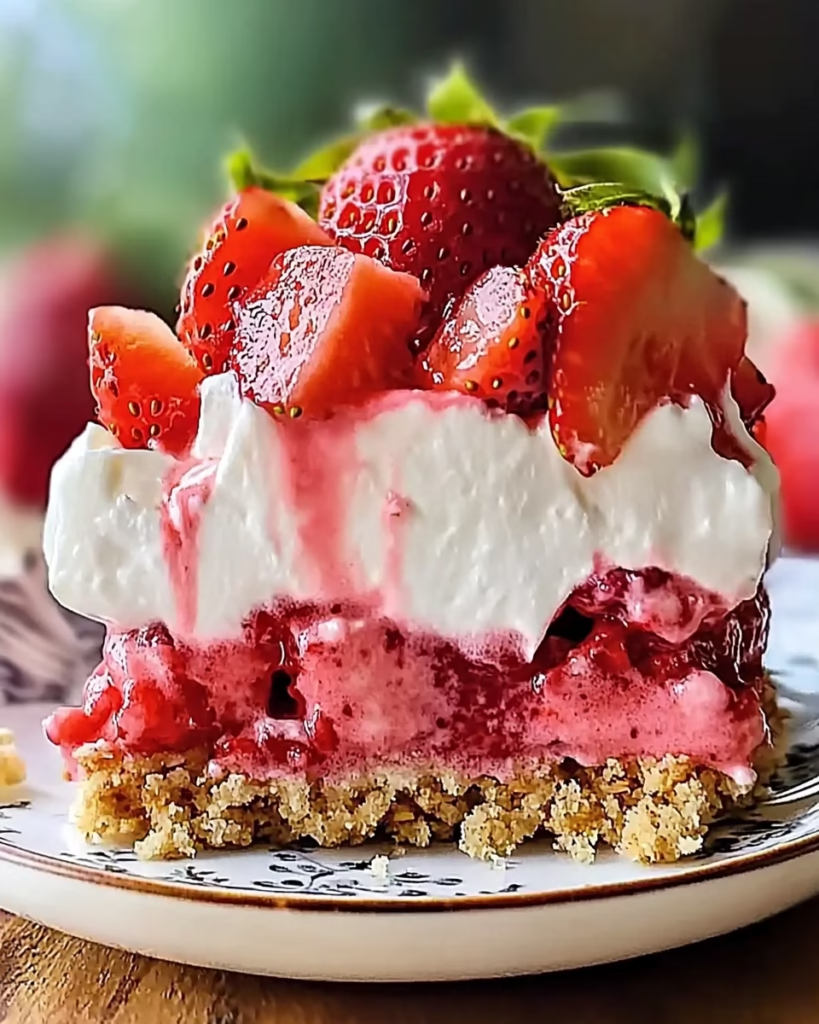
This dish is a modern twist inspired by classic American layered desserts but without the oven. It layers a buttery graham cracker crust beneath a smooth cream cheese center, which is crowned with jewel-like strawberry slices and a final dusting of strawberry Jell-O mix. Though no single historical recipe claims this creation as its own, it echoes the heartwarming simplicity of home kitchens where improvisation reigns supreme. The contrast of the dense crust and airy filling, paired with the tang of fresh strawberries, makes it unique and deeply satisfying. For those who recall childhood picnics or late-night dessert experiments, this recipe will feel familiar and comforting.
What sets this delight apart is its effortless charm. It eschews the complexity of traditional desserts, relying instead on quality ingredients and the magic of refrigeration to set its layers. The strawberries, often a symbol of summer’s bounty, add a burst of color and flavor that brightens any table. Even its preparation time feels like a gentle invitation to savor the process rather than rush through it.
Reasons to Try No-Bake Strawberry Delight
For busy cooks and parents who find solace in the kitchen, this dessert proves that love and convenience can coexist. Its no-bake approach means fewer dishes and more time to savor the moment—whether you’re enjoying a quiet cup of tea after slicing it from the fridge or preparing for a crowd. Every layer, from the crushed graham cracker base to the glistening strawberry topping, promises a delightful sensory experience that warms the soul.
It also invites connection. Imagine sharing this treat with a teenager learning the ropes of dessert-making or a partner craving something sweet after the kids are asleep. The process of pressing the crust into place, swirling the fillings together, and arranging strawberries in patterns feels like a ritual of nurturing. And for those who find joy in feeding friends, it’s a showstopper for potlucks and holiday gatherings where beauty and flavor walk hand-in-hand.
Ingredients Needed to Make No-Bake Strawberry Delight
2 cups graham cracker crumbs (store-bought or homemade by pulsing graham crackers in a food processor)
½ cup unsalted butter, melted (for binding the crust)
16 ounces full-fat cream cheese (the richness keeps the filling stable without baking)
¼ cup granulated sugar (adjust to balance the tartness of strawberries)
1 tablespoon fresh lemon juice (adds brightness and stabilizes the filling)
1 teaspoon pure vanilla extract (a whisper of warmth in the background)
1 cup heavy whipping cream (creates the lightest, airiest layer)
½ cup powdered sugar (for sweetness and stiff peaks when whipping)
2 pounds fresh strawberries (the star of the show, washed and halved for even slicing)
2 tablespoons strawberry Jell-O mix (powdered form for a vibrant pink dusting on the final layer)
Instructions to Make No-Bake Strawberry Delight – Step by Step
Step 1: Craft the Graham Cracker Base
Begin with the crust, a buttery fortress that anchors the dish. In a large bowl, combine the graham cracker crumbs and melted butter. Stir until the mixture resembles wet sand—that’s when the butter clings lovingly to every crumb. Press this mixture firmly into the bottom of your 9×13-inch pan. The even compression here matters—it ensures each slice later stands tall, proud, and uncrushed. For the cleanest edges, I run wet fingers around the pan to create a smooth barrier before pressing the crust. Let it rest in the fridge as you prepare the filling; this chill will solidify it just enough to avoid muddling the layers as you build them.
Step 2: Whisk the Cream Cheese Mixture
Softening the cream cheese in a mixing bowl with a spatula feels like coaxing a stubborn friend into a calm mood. Add the granulated sugar gradually—this isn’t about dissolving sugar but blending into a smooth, creamy base. A splash of lemon juice cuts through richness, while vanilla adds a familiar embrace. The goal is a silken texture with no lumps, as if you’re crafting liquid sunshine. Resist the urge to rush this step; patience ensures a filling that flows like a dream when folded with whipped cream.
Step 3: Whip and Fold for Cloud-Like Layers
Whipping the heavy cream transforms it into a fluffy topping. Pour in powdered sugar gradually as you whip, keeping an eye on the peaks—ideally, they hold their shape like miniature clouds. Gently folding the whipped cream into the cream cheese mixture is an art. Overmixing deflates the cream’s lightness, so approach it like you’re blending a cherished memory: slow, deliberate, and with care. The final texture should balance the density of the base with the airy kiss of whipped cream, a harmony of contrasts you’ll want to preserve in every layer.
Step 4: Layer the Cheesecake and Berries
Spoon half of the cream mixture into the prepared crust. Spread it into an even layer with a spatula, thinking of it as cradling something fragile. The first layer of strawberries should be a mosaic of halves, their bright color stealing the spotlight. A second layer of cream cheese follows, then a second tier of strawberries. Sprinkle the Jell-O mix evenly over the top—this isn’t just a garnish but a memory of childhood parties with cotton-candy hues. Refrigerating it overnight allows the flavors to bond, while the firmness makes slicing clean and elegant.
Chef’s Tips for a Perfect Result
- Use room-temperature cream cheese—it blends smoothly and avoids grit.
- Slice strawberries just before layering to prevent excess moisture from seeping into the filling.
- Don’t overmix the final batter. Stop as soon as the whipped cream is incorporated to maintain its airy structure.
- Chill the dessert in the refrigerator overnight to let the crust settle and the layers firm up.
- Keep the pan in the fridge for up to three days—it’s best served cold but holds up beautifully.
Variations and Substitutions
Vegan Option: Swap cream cheese with vegan cream cheese, heavy whipping cream with coconut cream, and ensure graham crackers are vegan. The texture remains creamy, though with a subtle coconut undertone.
Gluten-Free Alternative: Choose certified gluten-free graham crackers or crush gluten-free digestive biscuits manually. The crust keeps its integrity without compromising quality.
Budget Swap: Replace Jell-O with a sprinkle of confectioners’ sugar mixed with food-grade strawberry coloring. It adds whimsy without the specialty product expense.
Low-Fat Version: Use reduced-fat cream cheese and yogurt-based whipped cream made from Greek yogurt, honey, and lemon. Note that the filling will be slightly denser and less indulgent.
Seasonal Twist: Substitute strawberries with sliced peaches in the summer or apple slices in fall. Adjust sugar accordingly to match the fruit’s natural sweetness.
How to Serve and Pair
Serve this delight in individual portions for a personalized touch—use clear glass jars to showcase the layers. Pair it with light, fresh sips: try a chilled cup of hibiscus iced tea or citrus-infused lemonade that mirrors the strawberries’ brightness. For texture, serve it alongside a crisp whole-wheat biscuit that contrasts with the creamy filling.
A simple garnish lifts it into masterpiece territory—think of a dollop of whipped cream with a few strawberry slices perched delicately on top. At holiday gatherings, this dessert works wonders as the last course, cooling down the richness of a hearty meal while tying the theme together with its bold color.
Storage and Reheating
Refrigerator
Store in an airtight container for up to 3 days. The cheese and cream layers harden slightly in the fridge but retain their silky texture. Wrap the top with plastic cling to keep condensation at bay and ensure the strawberries don’t weep into the filling.
Freezer
Freeze for 2–3 months, but assemble as a whole dessert first. Thaw in the refrigerator for 8–12 hours to avoid icy textures. Note: The crust may stale slightly; serve with a side of fresh berries to restore its charm.
Room Temperature
Leftover slices stay fresh for 2–3 hours at room temperature but lose their creamy bite. Keep sliced portions covered with a damp cloth to maintain freshness if serving at a picnic or outdoor event.
Reheating
Technically, this dessert doesn’t need reheating—but some enjoy it slightly softened. Place slices in a parchment-lined plate, cover with foil, and let sit for 20 minutes. Avoid oven heating; the filling will collapse. A few seconds in the microwave work for texture, not flavor.
Nutritional Values
Per serving (approx. 120g):
- Calories: 300
- Protein: 4g
- Carbohydrates: 30g
- Fat: 18g
- Fiber: 1g
Approximate values.
Frequently Asked Questions
Can I use frozen strawberries?
Thawed and well-drained frozen berries work well but use them within the hour of preparation. The extra water may thin the filling slightly, but it won’t compromise the overall structure.
How do I know the filling is done?
The filling is ready when it holds its shape when spooned. If it dribbles, chill it for 15 minutes before layering. Room temperature cream cheese prevents lumps from forming.
Why did my crust crack when slicing?
This usually means the crust wasn’t pressed firmly enough or the pan wasn’t prepped properly. Line the pan with parchment paper before pressing the crust for easy releases, and avoid moving the dessert until it’s fully chilled.
Can I make the filling a day ahead?
Yes—prepare the filling the night before and store it in the refrigerator. Assemble the dessert before serving to prevent the strawberries from becoming soggy against the filling. If you must assemble early, cover with plastic as soon as the strawberries are layered.
What kitchen tools are essential?
A stand mixer or hand-held whisk for the cream, a food processor for homemade graham cracker crumbs, and a 9×13-inch rectangular pan for clean, restaurant-quality slices. A spatula with a flexible edge helps smooth layers without overworking the batter.
Conclusion
No-Bake Strawberry Delight is a testament to how simple ingredients, handled with care, can transform into a crowd-pleasing masterpiece. The balance of fresh, zesty, and creamy textures is a flavor conversation that whispers of spring gardens and summer sunsets. Let this dessert become your own—adjust sweetness, play with layers, and most importantly, slow down to savor the joy of creating it with loved ones. Its signature strawberry-cream harmony is sure to linger long after the final bite.
Print
No-Bake Strawberry Delight
- Prep Time: 25
- Total Time: 25
- Yield: 8 servings 1x
- Category: desserts
- Method: No-Bake
- Cuisine: American
- Diet: Vegetarian
Description
A vibrant, layered dessert made with a graham cracker crust, creamy cream cheese filling, fresh strawberry topping, and a dusting of strawberry Jell-O mix—perfect for warm-weather gatherings without turning on the oven.
Ingredients
2 cups graham cracker crumbs
1/2 cup (1 stick) butter, melted
8 oz cream cheese, softened
3/4 cup granulated sugar
1 package (3 oz) strawberry gelatin mix
1 cup heavy cream
2 cups fresh strawberries, hulled and quartered
1 tsp lemon juice
Instructions
Mix graham cracker crumbs with melted butter; press into a greased 9-inch springform pan. Chill 15 minutes.
Beat cream cheese and sugar until smooth. Fold in half of the strawberries and 1/4 tsp lemon juice. Spread over crust. Chill 2 hours.
Whip heavy cream until stiff peaks form. Fold in remaining strawberries and lemon juice. Spread over cream cheese layer. Chill for 1 hour.
Dust gelatin mix over the top. Chill 30 minutes to set.
Notes
Use halal-certified graham crackers and gelatin if needed. Chill the layered dessert completely for firm slices. Store covered in the fridge for up to 3 days.
Nutrition
- Serving Size: 1 serving
- Calories: 320
- Sugar: 35g
- Sodium: 280mg
- Fat: 20g
- Saturated Fat: 12g
- Carbohydrates: 30g
- Fiber: 2g
- Protein: 7g
- Cholesterol: 65mg